background image

8

exhaust version, follow these rules : Do not 

connect the exhaust hood to chimneys, 

flues, and air ducts serving the room. Before 

venting into exhaust flues and ducts no 

longer in use, ask for approval of person or 

agency responsable for the building. The 

evacuated air must not be let into a warm 

airduct. For the evacuation of the exhausted 

air please note official instructions.

INSTALLATION

The hood may be in recirculating or in 

exhaust version (see A-B-C pag.2). Decide 

from the outset which type is to be instal

-

led. For better efficiency, we recommend 

installing the hood in the exhaust version (if 

possible).

RECIRCULATING VERSION (A)

The hood purifies the air and 

recycles the clean air back into 

the room. For this version, the 

following is required: a theft-proof 

cover, a reducer and charcoal filter. 

In the version with flue, the upper 

flue must have the air evacuation 

slots positioned in the upper part 

and the deflector must be used in 

place of the anti-theft cover. The 

upper flue air evacuation slots must 

be positioned at the top.

EXHAUST VERSION (B) (C)

The hood purifies the air and eva

-

cuates it to the outside through an 

exhaust duct or hole (diameter

  5” 

29/32).

Roof Venting (B)

Wall Venting (C)

AIR VENT 

(for exhaust versions) 

!

 Prepare the hole and the air vent duct (5” 

29/32 diameter - The component is not in

-

cluded in the product, but can be purchased 

separately).

!

 Use a duct of the shortest possible length.

!

 Use a duct with as few elbows as possible 

(maximum elbow angle: 90°).

!

 Avoid drastic changes in the duct cross-

section.

!

 Use a duct with an as smoothest possible 

interior.

!

 The duct must be made of certified mate

-

rial.

!

 Do not connect the hood to smoke exhaust 

ducts for the products of combustion (boi

-

lers, fireplaces, stoves, etc).


!

 For the air vents comply with the pro

-

visions laid down by the competent au

-

thorities. In addition, the air must not be 

evacuated through a hole in the wall unless 

specifically intended for this purpose.


!

 Fit air intakes in the room to prevent the 

hood from creating a negative pressure 

in the room (which must not exceed 0.04 

mbar); if the hood is used at the same time 

as non-electrical equipment (gas-, oil- and 

charcoal-fired stoves, etc.) the exhaust gas 

may be sucked in by the heat source.

ASSEMBLY

! WARNING:

 Very heavy product; hood 

handling and installation must be carried 

out by at least two persons.

! WARNING:

 Wear gloves and goggles when 

carrying out installation and maintenance 

operations.

! WARNING:

 Failure to install the screws 

or fixing device in accordance with these 

instructions may result in electrical hazards.


!

The minimum distance between the sup

-

porting surface for the cooking equipment 

on the hob and the lowest part of the range 

hood must be not less than 25” 19/32 from 

electric cookers and 29” 17/32 from gas 

or mixed cookers. If the instructions for 

installation for the gas hob specify a greater 

distance, this must be adhered to.

!

 Wall anchors are provided to secure the 

hood to most types of walls/ceilings. Howe

-

ver, a qualified technician must verify suita

-

bility of the materials in accordance with the 

type of wall/ceiling. The wall/ceiling must 

be strong enough to take the weight of the 

hood. Do not tile, grout or silicone.


!

 In case of doubt, contact an authorized 

service provider.

Содержание KCH24XV

Страница 1: ...1 3LIOU3LG 1 MODEL K36HERX 14 K31A HV5X UA MODEL K48HERX 14 K41A HV5X UA CHIMNEY HOOD Installations instructions EN FR HOTTE DE CUISINE Instructions pour le montage ...

Страница 2: ...it This coverage will include scratches stains surface imperfections on stainless steel paint and porcelain with the exclusion of slight differen ces in color due to materials and painting enamelling technologies Exclusions are labor costs B stock items out of box appliances and display units HOW TO OBTAIN SERVICE To obtain service please contact Bertazzoni Customer Service at the numbers below an...

Страница 3: ...ater than 4 months after date of purchase 13 Defects and damages arising from accident alteration misuse abuse improper installation 14 Defects and damages arising from transportation of the product to the home of the owner 15 Defects and damage arising from external forces beyond the control of Bertazzoni Spa such as fire flood earthquakes and other acts of God In case the product will be install...

Страница 4: ...4 A B C 6x 4 8x40mm 2x 3 2x13mm 6x Ø 8mm C B A Charcoal filter kit for recircula tion cod 901488 Kit de filtre à charbon pour recirculation cod 901488 ...

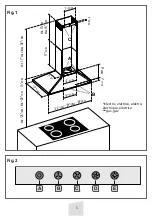
Страница 5: ... 36 19 64 0 25 32 9 29 64 1 11 16 C A B Min 25 19 32 Min 29 17 32 10 25 64 Min 3 29 32 Max 18 15 16 17 23 64 17 11 64 7 3 4 7 55 64 8 21 32 8 21 32 23 57 64 29 59 64 35 29 32 electric elettrico elektro èlectrique elèctrico gas gaz Fig 1 ...

Страница 6: ...6 Ⓨ Ⓩ Ⓔ Ⓕ Ⓜ G Fig 4 Fig 5 Fig 7 Fig 6 A ...

Страница 7: ...pair Do not run cord under carpeting Wiring shall be protected from sharp edges including male screw threads burrs fins moving parts and other agencies that might abrade the insulation on conductors INTRODUCTION These instructions are designed to tell you of the various technical details of your cooker hood and to make you familiar with its use Since these instructions cover more than one type of ...

Страница 8: ...section Use a duct with an as smoothest possible interior The duct must be made of certified mate rial Do not connect the hood to smoke exhaust ducts for the products of combustion boi lers fireplaces stoves etc For the air vents comply with the pro visions laid down by the competent au thorities In addition the air must not be evacuated through a hole in the wall unless specifically intended for ...

Страница 9: ... The hood should be switched on before or at the moment the cooking process initiates The filters are more effective if the fan is not switched off immediately after cooking or frying is completed but only after a period of some 20 30 minutes Before using the cooker hood please ensure that all plastic films like on metal grease filter and stainless steel ducting are removed INSTALLATION INSTRUCTIO...

Страница 10: ...t least with the same frequency with which you carry out maintenance of the grease filters internally and externally Clean using the cloth dampened with neu tral liquid detergent mild non corrosive Do not use abrasive products DO NOT USE ALCOHOL WARNING Failure to carry out the basic cleaning recommendations of the cooker hood and replacement of the filters may cause fire risks Therefore we recomm...

Страница 11: ...ing fans frequently Grease should not be allowed to accumulate on fan or filter d Use proper pan size Always use cookwa re appropiate for the size of the surface element 2 WARNING to reduce the risk of fire or electric shock do not use this fan with any solid state speed control device 3 WARNING TO REDUCE RISK OF FIRE ELECTRIC SHOCK OR INJURY TO PERSON OBSERVE THE FOLLOWING a Use this unit only in...

Страница 12: ...ing into wall or ceiling do not damage electrical wiring and other hidden utilities d Ducted fans must always be vented to the outdoors e If this unit to be installed over a tube or shower it must be marked as appropriate for the application and be connected to a GFCI Ground Fault Circuit Interrupter pro tected branch circuit f Never place a switch where it can be ac cessible from a tub or shower ...

Страница 13: ...13 ...

Страница 14: ...erdeladated installationdel unité Cettecouvertureinclu ralesrayures lestaches les imperfections de surface sur l acier inoxydable de la peinture et de la porcelaine à l exclusion de légères différences de couleur dûes à des matériaux et des technolo gies de peinture émaillage Les coûts de main d oeuvre B stock appareils out of box et les unités d affichage sont exclus COMMENT OBTENIR LE SERVICE CL...

Страница 15: ...nt du transport du produit à la maison du propriétaire 15 Les défauts et les dommages résultant de forces externes qui échappent au contrôle de Ber tazzoni SpA tels que les incendies les inondations les tremblements de terre et autres catastro phes naturelles Au cas où le produit sera installé dans une zone là où techniciens qualifiés certifiés ne sont pas raisonnablement disponibles le client ser...

Страница 16: ...iletages mâles les bavures les nageoires les pièces mobiles et d autres organismes pouvant causer une abrasion de l isolant sur les conducteurs INTRODUCTION Ces instructions sont conçues pour vous informer des différents détails techniques de votre hotte et de vous familiariser avec son utilisation Étant donné que ces instruc tions couvrent plus d un type de hotte de la même série il se peut ou un...

Страница 17: ...au de la longueur strictement nécessaire Les coudes du tuyau doivent être en nom bre minime angle maxi du coude 90 Éviter les variations excessives de section du tuyau Utiliser un tuyau le plus lisse possible sur sa partie interne Le matériau du tuyau doit être aux normes Ne pas relier la hotte à des conduites d évacuation de fumées de combustion chaudières cheminées poêles etc Pour l évacuation d...

Страница 18: ...i l appareil est correctement mis à la terre Ne pas utiliser de rallonge Si le cordon d ali mentation est trop court un électricien quali fié doit installer une prise près de l appareil UTILISATION DE LA HOTTE La hotte doit être mis en marche avant ou soit en même temps que la cuisson ou la friture commence Les filtres sont plus efficaces si le ventilateur n est pas éteint immédiatement après la c...

Страница 19: ...on III conformément aux règlemen tations de montage Attention Avant de rebrancher le circuit de la hotte à l alimentation électrique et d en vérifier le fonctionnement correct contrôlez toujours que le câble d alimentation soit monté correctement Attention La hotte est pourvue d un câble d alimentation spécial en cas de détério ration du câble en demander un neuf au service d assistance technique ...

Страница 20: ...pe en prenant soin de passer d abord le connecteur avec son câblage 6 Positionnez le ressort dans une position centrale dans les deux rainures spéciales et appuyez pour adapter la lampe 7 Rebranchez le connecteur de la lampe avec celui du câblage 8 Montez les filtres anti graisse 9 Rebranchez la hotte au réseau électrique 10 Vérifiez le fonctionnement de la nouvelle lampe LIRE ET CONSERVER CES INS...

Страница 21: ...et le câblage électrique doivent être effectués par une personne qualifiée s en conformité avec tous les codes et normes applicables y com pris la construction d incendie nominale b Air suffisante est nécessaire pour la combustion et l évacuation complète des gaz par la cheminée cheminée des équipe ments de combustion pour prévenir un re foulement Suivez les consignes du fabricant de l équipement ...

Страница 22: ...ITION 65 WARNING Cancer and Reproductive Harm www P65Warnings ca gov ADVERTENCIA Cáncer y Daño Reproductivo www P65Warnings ca gov AVERTISSEMENT Cancer et Troubles de l appareil reproducteur www P65Warnings ca gov 3071108 ...

Страница 23: ...23 ...

Страница 24: ...3LIOUCALB 2 17 11 2020 ...

Отзывы: