Instruction Manual
Ceiling type range hood
Victory SKY
This Installation manual only applicable to Detachable ceiling decorative board
Страница 1: ...Instruction Manual Ceiling type range hood Victory SKY This Installation manual only applicable to Detachable ceiling decorative board ...
Страница 2: ...ge Do not light up any fire directly under the range hood If there is any fault with your range hood please call the service department immediately Please ensure there is enough ventilation when you are using the range hood and hob at the same times Do not connect the ducting system of the range hood to existing ventilation system which it is being use for gas hob or other fuel burning appliance M...
Страница 3: ...d minutes and then will stop automatically delay setting mode does not affect lighting as it works independently The last time used will be memorized To cancel delay function press time delay push button 1 again the blower will continue to operate and won t stop until ON OFF push button 4 is pressed To turn delay function and blower OFF at once press ON OFF push button 4 NOTE Delay will be reset i...
Страница 4: ...e button to another the range hood it in connection mode press any bottom on remote control to confirm the connection The connection process finished and the remote control can be used for speed selection lighting and timer setting If you want to connect again you will need to clear the code that has been set up previously To clear the code press for 5 seconds the indicators light begin flashing f...
Страница 5: ...otor speed 1st press Low speed 2nd press Medium 2 speed 3rd press Medium 1 speed 4th press High speed Turning off Decreasing motor speed press the button and the motor begins shift to a lower speed and the LCD screen display the speed level Repeating press the button it keep on decreasing the motor speed to till the range hood turning off Timer Press the button to set up the timer on off function ...
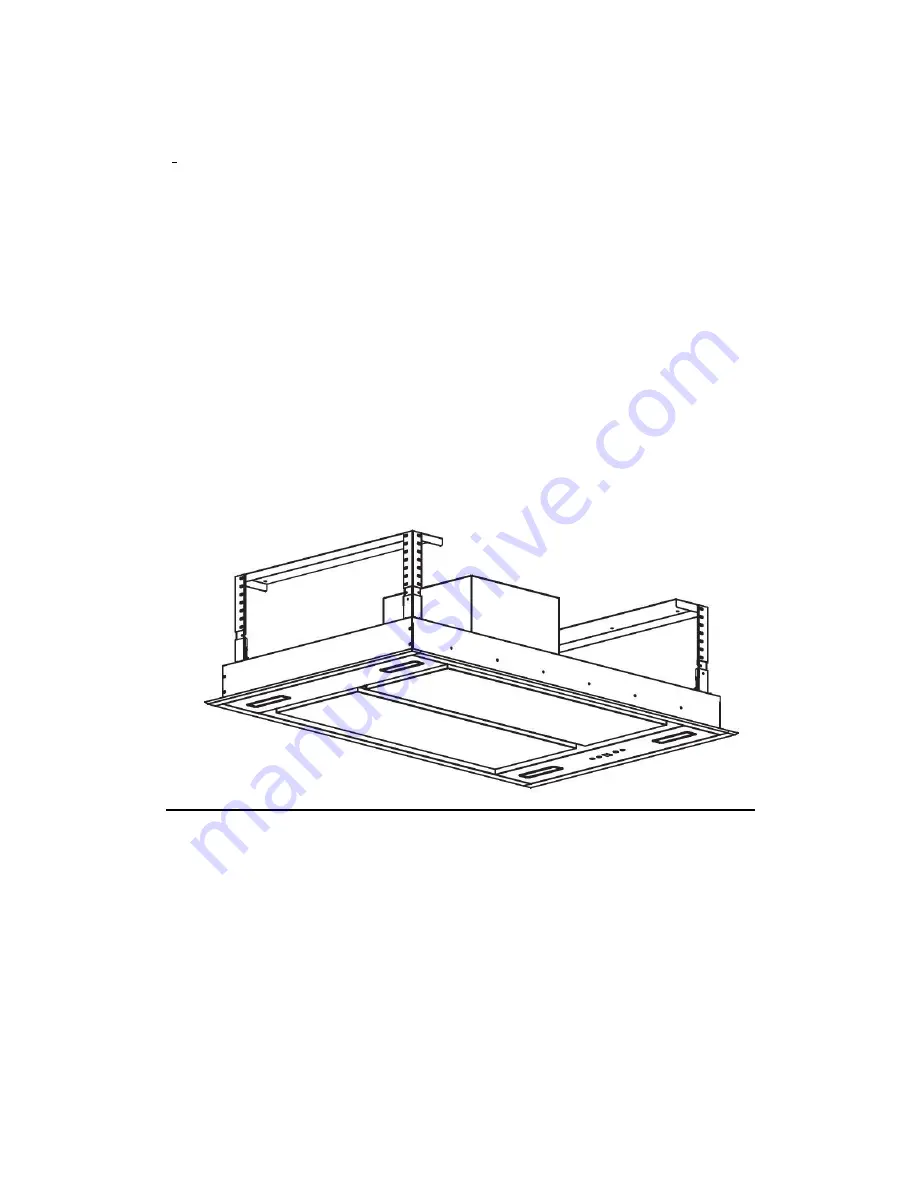
Страница 6: ...een 28 and 36 above the gas hob for best performance The higher you install the hood the less efficient it would be 2 Refer to Pic 1 3 The ceiling box should be able to bear at least 200 pounds in weight 4 Positon the hanging plate on the ceiling and then mark the position of screw holes refer to pic 2 Drill 14 pcs holes at diameter 8mm on the ceiling and 2pcs of hanging plate should be securely f...
Страница 7: ...lugs Refer pic 3 5 Calculate the length of angle bar refer to pic 4 5 adjust the corner connector bar to the required height then fix them with angle bar using the 10mm x M4 nut and bolts with metal washer 32pcs the angle bar must have an overlap of at least 36mm ...
Страница 8: ...6 Fix the outlet reducer to the range hood body using 4pcs ST4 X 8MM self tap screws Refer to pic 6 ...
Страница 9: ...o pic8 7 Use M4 X 10MM screws 8pcs to fix the corner connector bar 4pcs onto the main body of the range hood Refer pic 9 Lift the main body of the range hood toward the hanging plate use M4 x 12mm bolts and nut with metal washer 8pcs to attach the angle bar to the hanging plate 2pcs the ducting hose should be connected to your external ducting at this stage Refer to pic 10 11 Important 1 the ducti...
Страница 10: ...ht or cross screwdriver to adjust the screw on the flexible corner The detail setting method refer to pic 12 adjust the screw on each flexible corner by using the screwdriver towards clockwise direction the body of the range hood will move up to hanging plate When you adjust the screw on each flexible corner by using the screwdriver towards anticlockwise direction the body of the range hood will ...
Страница 11: ...move the grease filters of the range hood should following the cleaning procedure as pic 13 shown 2 Cleaning the grease filter you may refer to following method A Sock the grease filter in 40 50 warm water and washing up liquid for about 2 3 minutes Then use a soft brush to loosen any grease deposits have formed Wash it in a soft way otherwise the filter will be damage B You may use the dishwasher...
Страница 12: ...asher And then turn on the switch for washing function C The stainless steel cover plates are also removable for cleaning Important Before cleaning always to disconnect your range hood form power supply For instruction how to install the carbon filter into the range hood please refer to pic 13 ...
Страница 13: ...e Refer to pic 16 Important shut off the power to the hood before changing the lamp bulb Changing a lamp bulb for high pressure LED 1 Use the screw driver loosen the ST4 8MM self tapping screw 2pcs from the lighting panel take out the lighting fixture Open the terminal box that connected with the wire disconnect the wire connector and replace the lamp ...
Страница 14: ...Victory Range Hoods 7272 Buller Ave Burnaby BC Canada www kitchenhoods ca ...