background image

7

IT

A

LI

A

N

O

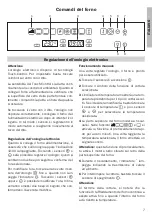
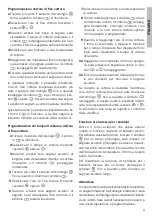
Comandi del forno

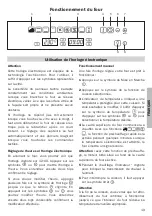
Regolazione dell’orologio elettronico

Attenzione

L’orologio  elettronico  dispone  di  tecnologia
Touch-Control.  Per  impostarlo  basta  toccare 
i simboli sul vetro con il dito.
La sensibilità del Touch-Control si adatta conti-
nuamente alle condizioni ambientali. Quando si
collega il forno all'alimentazione, verificare che
la superficie del vetro della parte frontale con-
tenente i comandi sia pulita e libera da qualsia-
si ostacolo. 
Se  toccando  il  vetro  con  il  dito,  l'orologio  non
risponde correttamente, scollegare il forno dal-
l'alimentazione elettrica e dopo un istante ricol-
legarlo.  In  tal  modo  i  sensori  si  regoleranno  in
modo  automatico  e  reagiranno  nuovamente  al
tocco del dito. 

Regolazione dell'orologio elettronico 

Quando  si  collega  il  forno  all'alimentazione,  si
osserverà che sull'orologio appare l'indicazione
12:00  lampeggiante.  Toccando  i  sensori 

o

sarà  possibile  regolare  l’orologio;  quindi  si

sentiranno due beep di seguito a conferma del-
l'ora selezionata.
Per modificare l’ora, toccare alcune volte il sen-
sore  dell’orologio 

fino  a  quando  non  lam-

peggia  l’indicatore 

.  Toccando  i  sensori

oppure 

è  possibile  modificare  l’ora.  Infine,

verranno emessi due beep di seguito che con-
fermerrano l’avvenuta modifica.

Funzionamento manuale

Una  volta  regolato  l'orologio,  il  forno  è  pronto
per essere utilizzato. 

1

Toccare il sensore di accensione 

.

2

Toccare  il  simbolo  della  funzione  di  cottura
selezionata.

3

L’indicatore di temperatura mostrerà una tem-
peratura predefinita per il tipo di cottura scel-
to. Se si desidera modificarla, basterà toccare
il  sensore  di  temperatura 

e  poi  i  sensori

per  selezionare  la  temperatura 

desiderata. 

4

La parte superiore del forno inizierà a riscal-
darsi.  Nelle  funzioni 

si

attiverà la funzione di preriscaldamento rapi-
do  per  alcuni  minuti.  Una  volta  raggiunta  la
temperatura selezionata, il forno emetterà un
segnale sonoro. 

Attenzione: 

questa funzione di preriscaldamen-

to  attiva  il  motore  turbo  situato  sul  retro  della
parte superiore del forno. 

5

Durante  il  riscaldamento,  l’indicatore 

o

lam-

peggia  indicando  la  trasmissione  di  calore
all’alimento. 

6

Per interrompere la cottura, basterà toccare il
sensore di spegnimento 

Attenzione 

Al  termine  della  cottura,  si  noterà  che  la
funzione di raffreddamento del forno continua a
essere  attiva  fino  a  quando  l’interno  del  forno
avrà ridotto la temperatura. 

1

2

3

5

4

6

7

8

9

Содержание F60CONXD

Страница 1: ...Specifiche tecniche Feature List Feuille de Caractéristiques Hoja de Características Datenblatt F60CONXD ...

Страница 2: ......

Страница 3: ...e Bertazzoni And we vow to continue building this great enterprise into the future DALLA SCRIVANIA DEL PRESIDENTE Gentile proprietario di un prodotto Bertazzoni Abbiamo costruito un impresa che porta nelle case di tutto il mondo prodotti con altissime prestazioni il meglio del Design italiano con sicurezza e rispetto per l ambiente Abbiamo costruito un impresa che eleva la preparazione e la condiv...

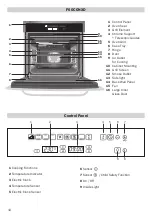
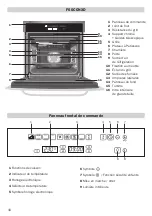
Страница 4: ... i bambini 8 Accensione Spegnimento 9 Luce interna 11 Pannello di comando 12 Guarnizione 13 Resistenza del grill 14 Supporto cromato guide telescopiche 15 Griglia 16 Vassoio per pasticceria 17 Cerniera 18 Sportello 19 Uscita aria di raffreddamento 10 Fissaggio al mobile 11 Schermo del grill 12 Uscita dei fumi 13 Luce laterale 14 Pannello posteriore 15 Ventola 16 Vetro interno grande 2 3 5 7 6 8 4 ...

Страница 5: ...iore del forno Adatta per riscaldare piatti o far lievitare impasti Grill e Inferiore Particolarmente adatta per gli arrosti Si utilizza per qualsiasi pezzo di carne indipendentemente dalle sue dimensioni Grill Gratinatura e cottura arrosto superficiale Consente di dorare lo strato esterno degli alimenti senza modificarne la parte interna Indicato per alimenti come bistecche costine pesce pane tos...

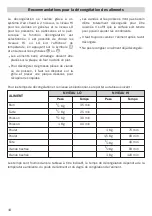
Страница 6: ... per raccogliere il liquido La carne e il pesce non hanno bisogno di essere completamente scongelati per iniziare la cottura Basta che la superficie sia morbida per poter aggiungere il condimento Una volta scongelati cucinare sempre gli alimenti Non ricongelare un alimento scongelato Per i tempi di scongelamento e il livello da selezionare fare riferimento alla tabella seguente I tempi riportati n...

Страница 7: ...gia l indicatore Toccando i sensori oppure è possibile modificare l ora Infine verranno emessi due beep di seguito che con fermerrano l avvenuta modifica Funzionamento manuale Una volta regolato l orologio il forno è pronto per essere utilizzato 1 Toccare il sensore di accensione 2 Toccare il simbolo della funzione di cottura selezionata 3 L indicatore di temperatura mostrerà una tem peratura pred...

Страница 8: ... orologio fino a quando si illumina il simbolo 2 Selezionare il tempo dopo il quale si desidera che l orologio emetta l allarme acustico toc cando i sensori oppure 3 Saranno emessi due segnali acustici di segui to sarà visualizzato il tempo restante fino all allarme acustico e il simbolo lampeg gerà lentamente per indicare che l allarme acustico è programmato 4 Trascorso il tempo impostato il forn...

Страница 9: ...izzata l ora corrente e il simbolo resterà illuminato 17 Selezionare una funzione e una temperatura di cottura 18 Il forno resterà spento e il simbolo rimar rà illuminato mentre il simbolo lampeg gerà lentamente L orologio mostrerà l ora corrente e la luce interna resterà spenta Il forno adesso è programmato 19 Quando si raggiunge l ora di inizio cottura il forno si accenderà e resterà in funzione...

Страница 10: ...17 Sensor Child Safety Function 18 On Off 19 Inside Light 11 Control Panel 12 Oven Seal 13 Grill Element 14 Chrome Support Telescopic Guides 15 Oven Grid 16 Cake Tray 17 Hinge 18 Door 19 Air Outlet for Cooling 10 Cabinet Mounting 11 Grill Screen 12 Smoke Outlet 13 Side light 14 Back Wall Panel 15 Fan 16 Large Inner Glass Door 2 3 5 7 6 8 4 10 9 11 13 12 14 15 16 1 ...

Страница 11: ...n to give a spongy texture Lower Element Heat only comes from beneath Suitable for warming plates or letting dough rise Grill and Lower Element Ideal for roasts This function can be used with any size joints of meat Grill Toasting and browning This function allows the surface to be cooked without affecting the inside of the food Suitable for flat pieces such as steaks ribs fish and toasts MaxiGril...

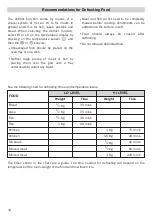
Страница 12: ...llect any liquid Meat and fish do not need to be completely thawed before cooking Condiments can be added once the surface is soft Food should always be cooked after defrosting Do not refreeze defrosted food See the following chart for defrosting times and temperature levels The times shown in the chart are a guide The time needed for defrosting will depend on the temperature of the room weight of...

Страница 13: ...ock sensor until the indicator flashes Change the time by touching the or sensors The two beeps you hear after that will confirm the new time has been set Manual Operation After setting the clock the oven is ready for use 1 Press the On sensor 2 Press on the desired cooking function symbol 3 The temperature display will show the preset temperature for that cooking function Press on the temperature...

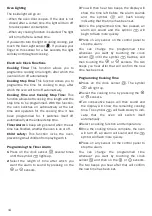
Страница 14: ...larm 1 Press on the clock sensor several times until the symbol lights up 2 Select the length of time after which you want the alarm to sound by pressing on the or sensors 3 You will then hear two beeps the display will show the time left before the alarm sounds and the symbol will flash slowly indicating that the timer has been set 4 Once the programmed time has passed an alarm will sound and the...

Страница 15: ...the cooking stop time by pressing the or sensors 16 This will be confirmed by two beeps The current time will show on the display and the symbol will remain lit 17 Select a cooking function and temperature 18 The oven will remain off with the symbol lit and the symbol flashing slowly The clock will show the current time and the inside light will remain off The oven is now programmed 19 When it is ...

Страница 16: ...é enfants 18 Mise en marche Arrêt 19 Lumière intérieure 11 Panneau de commande 12 Joint de four 13 Résistance du grill 14 Support chromé Guides télescopique 15 Grille 16 Plateau à Patisserie 17 Charnière 18 Porte 19 Sortie d air de réfrigération 10 Fixation au meuble 11 Écran du grill 12 Sortie des fumées 13 Ampoules latérales 14 Panneau du fond 15 Turbine 16 Vitre intérieure de grande taille 2 3 ...

Страница 17: ...férieure Idéale pour chauffer des plats ou faire lever des pâtes à gâteaux et autres Grill et sole Spécialement conçus pour les rôtis Ils peuvent être utilisés pour tout type de morceaux indépendamment de la taille Grill Gratins et rôtis en cuisson superficielle Il permet de dorer la couche externe sans modifier l intérieur des aliments Conseillé pour des morceaux plats tels que le bifteck les côt...

Страница 18: ...sous pour récupérer les liquides Les viandes et les poissons n ont pas besoin d être totalement décongelés pour être cuisinés Il suffit que la surface soit tendre pour pouvoir ajouter les condiments Il faut toujours cuisiner l aliment après l avoir décongelé Ne pas recongeler un aliment déjà décongelé Pour les temps de décongélation et le niveau à sélectionner se reporter au tableau suivant Les te...

Страница 19: ...n clignote En appuyant sur les symboles ou vous pourrez modifier l heure Vous entendrez ensuite deux bips consécutifs confirmant la modification effectuée Fonctionnement manuel Une fois l horloge réglée votre four est prêt à fonctionner 1 Appuyez sur le symbole de Mise en Marche 2 Appuyez sur le symbole de la fonction de cuisson sélectionnée 3 L indicateur de température indiquera une température ...

Страница 20: ...que le symbole s allume 2 Sélectionnez le temps après lequel vous souhaitez que l horloge sonne en appuyant sur les symboles ou 3 Il y aura ensuite 2 bips consécutifs indiquant le temps restant avant que l horloge ne sonne et le symbole clignotera lentement indiquant que l avertisseur est bien programmé 4 Une fois la durée programmée écoulée un signal sonore retentira et le symbole clignotera plus...

Страница 21: ...4 Appuyez à plusieurs reprises sur le symbole de l horloge jusqu à ce que le symbole s allume 15 Sélectionnez l heure de fin de la cuisson en appuyant sur les symboles ou 16 Il y aura ensuite 2 bips consécutifs l heure actuelle s affichera et le symbole restera allumé 17 Sélectionnez une fonction et une température de cuisson 18 Le four restera éteint le symbole allumé et le symbole clignotera len...

Страница 22: ... le symbole et entendre un bip prolongé Attention En cas de coupure de courant toute la programmation de l horloge électronique sera effacée et l indication 12 00 clignotera sur l afficheur de l horloge Il vous faudra alors remettre l horloge à l heure et procéder à une nouvelle programmation ...

Страница 23: ...do 19 Luz interior Frontal de Mandos 1 Frente de Mandos 2 Junta de Horno 3 Resistencia de Grill 4 Soporte Cromado Guías Telescópicas 5 Parrilla 6 Bandeja pastelera 7 Bisagra 8 Puerta 9 Salida de Aire de Refrigeración 10 Fijación al Mueble 11 Pantalla de Grill 12 Salida de Humos 13 Lámpara lateral 14 Panel Trasero 15 Turbina 16 Cristal Interior de Gran Tamaño 1 2 3 5 4 6 7 8 9 2 3 5 7 6 8 4 10 9 11...

Страница 24: ...que dora superficialmente Ideal para parrilladas Especial para piezas con gran volumen como aves caza Se recomienda colocar la pieza de carne sobre la parrilla del horno y la bandeja por debajo para el escurrido de jugos Atención Durante el uso de la función Grill o MaxiGrill con Turbina la puerta debe mantenerse cerrada Convencional con Turbina Adecuado para asados y pastelería El ventilador repa...

Страница 25: ...s líquidos Las carnes y pescados no necesitan estar totalmente descongelados para cocinarlos Es suficiente que la superficie esté blanda para poder añadir los condimentos Siempre se debe cocinar el alimento des pués de la descongelación No congelar de nuevo un alimento ya des congelado Para los tiempos de descongelación y el nivel a seleccionar observe la siguiente tabla Los tiempos mostrados en l...

Страница 26: ...padee el indi cador Tocando en los sensores ó podrá modificar la hora Finalmente escucha rá dos beep seguidos como confirmación del cambio realizado Funcionamiento Manual Tras poner el reloj en hora su horno está listo para cocinar 1 Toque en el sensor de Puesta en Marcha 2 Toque en el símbolo de la función de coci nado seleccionada 3 El indicador de temperatura mostrará una temperatura prefijada ...

Страница 27: ... Toque varias veces el sensor del reloj hasta que el símbolo se ilumine 2 Seleccione el tiempo tras el cual desea que el reloj avise tocando los sensores ó 3 Posteriormente sonarán 2 beep seguidos se mostrará el tiempo restante hasta que el reloj avise y el símbolo parpadeará len tamente indicando que el avisador ya está programado 4 Transcurrido el tiempo programado sonará una señal acústica y el...

Страница 28: ...uidos se mostrará la hora actual y el símbolo permanecerá iluminado 17 Seleccione una función y una temperatura de cocinado 18 El horno permanecerá desconectado que dándose iluminado el símbolo y con el símbolo parpadeando lentamente En la pantalla del reloj verá la hora actual y la luz interior permanecerá apagada Su horno está programado 19 Cuando se alcance la hora de comienzo del cocinado el h...

Страница 29: ... Kindersicherung 18 Ein Ausschalter 19 Innenlicht 11 Bedienfeld 12 Backofendichtung 13 Grillwiderstand 14 Verchromte Halterung Teleskopführung 15 Rost 16 Backblech tief 17 Scharnier 18 Tür 19 Kühlluftaustritt 10 Befestigung am Einbauschrank 11 Grillblech 12 Abzug 13 Seitenlampen 14 Rückwand 15 Ventilator 16 Große Innenglasscheibe 2 3 5 7 6 8 4 10 9 11 13 12 14 15 16 1 ...

Страница 30: ... der Unterseite Geeignet zum Anwärmen von Tellern oder zum Aufgehenlassen von Teig oder ähnlichem Grill mit Unterhitze Besonders für Braten geeignet Kann für Gargut beliebiger Größe genutzt werden Grill Gratinieren und Überbacken Ermöglicht das Bräunen der Oberfläche ohne das Innere des Garguts zu beeinflussen Empfohlen für flaches Gargut wie z B Beefsteak Rippchen Fisch Toasts MaxiGrill mit Umluf...

Страница 31: ...fzufangen Fleisch oder Fisch müssen vor der Garung nicht komplett aufgetaut werden Es reicht aus wenn die Oberfläche weich genug ist um sie zu würzen Die Lebensmittel sollten immer gleich nach dem Auftauen gegart werden Aufgetaute Lebensmittel nicht nochmals einfrieren Die Auftauzeit und die entsprechende Auftaustufe entnehmen Sie bitte der nachstehenden Tabelle Die in der Tabelle angegebenen Zeit...

Страница 32: ...n Uhrsensor bis die Anzeige blinkt Durch Berührung der Sensoren oder können Sie die Uhrzeit ändern Schließlich hören Sie zwei aufeinander folgende Pieptöne zur Bestätigung der durchgeführten Änderung Manueller Betrieb Nachdem die Uhrzeit eingestellt wurde ist der Backofen betriebsbereit 1 Berühren Sie den Start Sensor 2 Berühren Sie das gewünschte Garfunktionssymbol 3 Auf der Temperaturanzeige ers...

Страница 33: ... mehrmals den Uhrsensor bis das Symbol aufleuchtet 2 Wählen Sie die Zeitdauer nach deren Ablauf der Timer ertönen soll indem Sie die Symbole oder drücken 3 Danach hören Sie 2 aufeinander folgende Pieptöne die Restzeit bis zum Ertönen des Timers erscheint und das Symbol blinkt langsam um anzuzeigen dass der Timer programmiert ist 4 Nach Ablauf der eingestellten Zeit ertönt ein Signal und das Symbol...

Страница 34: ...die aktuelle Uhrzeit wird angezeigt und das Symbol leuchtet 17 Wählen Sie eine Funktion und eine Gartemperatur 18 Der Backofen bleibt ausgeschaltet das Symbol bleibt erleuchtet und das Symbol blinkt langsam Auf der Uhranzeige sehen Sie die aktuelle Uhrzeit und das Innenlicht bleibt aus Der Backofen ist nun programmiert 19 Wenn die eingestellte Uhrzeit des Gar Beginns erreicht ist schaltet sich der...

Страница 35: ......

Страница 36: ...ional heating Forced convection Cooking surface Noise dB A re 1 pW Classe d efficience énergétique sur une échelle de A le plus efficient à G le moins efficient Fonction de chauffage Chauffage traditionnel Convection forcée Consommation d énergie Chauffage traditionnel Convection forcée Volume net litres Type Petit Moyen Grand Temps de cuisson à charge normale Chauffage traditionnel Convection for...

Отзывы: