Bernina Overlocker Plus Скачать руководство пользователя страница 2

 2 

7/01/16 

BERNINA


Overlocker Workbook 2 

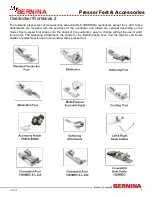
Presser Feet and Accessories ..................................................................................... 3 
Elasticator: Attaching Elastic ....................................................................................... 4 
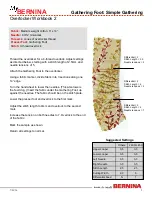
Gathering Foot: Simple Gathering ............................................................................... 5 
Gathering Foot: Fabric to Fabric .................................................................................. 6 
Multi-Purpose Foot: Piping .......................................................................................... 7 
Multi-Purpose Foot: Inserted Piping ............................................................................ 8 
Multi-Purpose Foot + Gathering .................................................................................. 9 
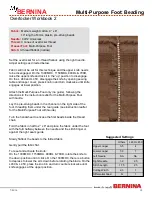
Multi-purpose Foot: Beading ...................................................................................... 10 
Blindstitch Foot: Blind Hem ........................................................................................ 11 
Blindstitch Foot: Decorative Tucks ............................................................................. 12 
Blindstitch Foot: Joining Lace to Lace ........................................................................ 13 
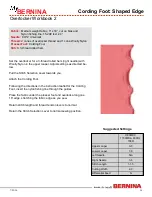
Cording Foot: Shaped Edges  .................................................................................... 14 
Cording Foot: Wired Edges ........................................................................................ 15 


The remainder of the exercises are for models 1300MDC and L 220 only: 

3-Needle Coverstitch .................................................................................................. 16 
2-Needle Coverstitch .................................................................................................. 17 
Coverstitch Hem......................................................................................................... 18 
Chainstitch ................................................................................................................. 19 
Decorative Chainstitch ............................................................................................... 20 


Color-Coded Threading Charts .................................................................................. 21 
 

Table of Contents 

The information in this work-
book applies to the current line 
of BERNINA Overlockers. 

Note: Some exercises apply 
only to certain models 
equipped with the feature  
being highlighted. 


Overlocker 

Plus


Содержание Overlocker Plus

Страница 1: ...ica Permission granted to copy and distribute in original form only Content may not be altered or used in any other form or under any other branding Overlocker Plus For current BERNINA models Overlock...

Страница 2: ...ot Decorative Tucks 12 Blindstitch Foot Joining Lace to Lace 13 Cording Foot Shaped Edges 14 Cording Foot Wired Edges 15 The remainder of the exercises are for models 1300MDC and L 220 only 3 Needle C...

Страница 3: ...attachments are included with the purchase of the overlocker and others are optional depending on the model Each presser foot snaps onto the shank of the overlocker easy to change without the use of...

Страница 4: ...ighten the elastic along the right edge of the slot Turn the hand wheel to lower the needles Lower the roller guide Using the small screwdriver loosen the set screw on the front of the elasticator and...

Страница 5: ...This also lowers the feed dog Insert the fabric under the Gathering Foot up against the needles The fabric should be on the stitch plate Lower the presser foot and overlock to the first mark Adjust t...

Страница 6: ...fabric right side up under the Gathering Foot with the fabric on the stitch plate Lower presser foot Sew several stitches until the fabric is under the needles Turn the handwheel to lower the needles...

Страница 7: ...ommo date the Guide Insert the filler cord into the guide from front to back Raise the Multi Purpose Foot and insert the filler cord into the guide on the left side of the foot Feed the filler cord un...

Страница 8: ...h Guide Note 700D and 800DL need the Attachment Base to accommodate the Guide Place one of the 3 x 8 pieces of fabric under the foot right side up Wrap the bias strip around the cord and place the wra...

Страница 9: ...and metal post directly behind the fixing screw Hint Place the horseshoe shaped slot over the screw then rotate the attachment to lock over the metal post Tighten fixing screw Note 700D and 800DL also...

Страница 10: ...the Multi Purpose Foot with Guide Lay the pre strung beads in the channel on the right side of the foot threading them under the rear guide see instruction leaflet for the Multi Purpose Foot with Guid...

Страница 11: ...low Attach the Blindstitch Foot Fold the fabric under for a 1 blind hem and then turn the body of the project back so that extends beyond the fold as in a conventional blind hem Place the fabric under...

Страница 12: ...ges at lower position Move the fabric guide just to the left of the knife line on the stitch plate Mark three lines 1 apart across the fabric Fold the fabric wrong sides together along one marked line...

Страница 13: ...toward you Raise the upper knife and lock it in the up position You will not cut fabric with this technique Move the fabric guide just to the left of the knife line on the stitch plate Stiffen the lac...

Страница 14: ...irected be low Pull the Stitch Selection Lever towards you Attach the Cording Foot Following the directions in the instruction leaflet for the Cording Foot insert the nylon fishing line through the gu...

Страница 15: ...the guides Place the fabric under the presser foot and overlock along one 18 edge feeding the wire through the foot as you overlock Use wire cutters to cut the wire Do not use the overlocker knives R...

Страница 16: ...o the end of the fabric At the end of the stitching turn the handwheel counterclockwise until the needles are at their lowest position Then turn the handwheel clock wise until the needles are at their...

Страница 17: ...ed from overlock mode to cover and chain mode Attach the Coverstitch presser foot Fold up a 2 hem along the 8 edge of the fabric Glue stick or pin in place The coverstitch hem attachment may be used o...

Страница 18: ...he fabric At the end of the stitching turn the handwheel counterclockwise until the needles are at their lowest position Then turn the hand wheel Clockwise until the needles are at their highest posit...

Страница 19: ...nation presser foot for overlock and chain stitch model L 220 has an optional chain stitch foot or the Standard presser foot may be used With right sides together place the fabric under the needles Al...

Страница 20: ...presser foot for overlock and chain stitch model L 220 has an optional chain stitch foot or the Stan dard presser foot may be used Place the stabilizer against the wrong side of the denim Place the de...

Страница 21: ...21 7 01 16 BERNINA Overlocker Workbook 2 4 thread overlock...

Страница 22: ...22 7 01 16 BERNINA Overlocker Workbook 2 3 thread flatlock...

Страница 23: ...23 7 01 16 BERNINA Overlocker Workbook 2 3 thread rolled hem...

Страница 24: ...24 7 01 16 BERNINA Overlocker Workbook 2 4 thread 3 needle coverstitch...

Страница 25: ...25 7 01 16 BERNINA Overlocker Workbook 2 3 thread 2 needle coverstitch...

Страница 26: ...26 7 01 16 BERNINA Overlocker Workbook 2 2 thread 1 needle chainstitch...

Отзывы: