


Embroidering preparation
157
> Push the clamping lever up.
> Remove the presser foot.
> Insert the embroidery foot from below into the bracket.
> Press the clamping lever down.
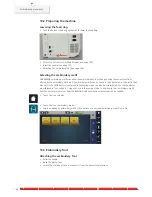
Selecting the embroidery foot in the User Interface
After having attached the respective embroidery foot (Embroidery foot No. 26, supplied accessory with the
embroidery module), you can select and save it on the machine. Moreover, alternative feet are displayed
which will also be suitable for the selected embroidery motif.
> Switch the machine on.
> Select an embroidery motif.
> Touch the icon «Presser foot display/Presser foot selection».
> Touch the icon «Optional presser feet» to display all the suitable feet for the selected embroidery motif.
> Select the attached embroidery foot.
13.4 Needle and stitch plate
Inserting the embroidery needle
Embroidery needles of the type 130/705 H-SUK provide a larger eye and are slightly rounded. This avoids
thread abrasion when using Rayon- and cotton embroidery thread. Depending on the embroidery thread
use a size No. 70-SUK to No. 90-SUK needle.
> Raise the needle.
> Switch the machine off and disconnect it from the power supply system.
> Remove the attached foot.
Содержание 790 PLUS
Страница 1: ...BERNINA 790 PLUS...
Страница 99: ...Creative sewing 100 Lower the presser foot Resume sewing until the sewing project is on the feed dog again...
Страница 142: ...Quilting 143 If there are knots on the wrong side of the fabric move the fabric more quickly...
Страница 180: ...Creative embroidering 181 Touch the icon Duplicate The combination is duplicated 2 1 2...
Страница 254: ......


