background image

-  -

-  -

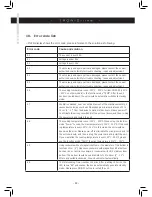
10.  Error code list:

– If LED-display shows the error code, please reference to the solution as following.

Error code

Cause and solution

E0

The current is over 0A

E1

Voltage is under 95V

E

Voltage is over 145V

E

The accessory and spare parts are damaged, please contact the nearest 
authorized service facility for trouble shooting, repair and adjustment.

E4

The accessory and spare parts are damaged, please contact the nearest 
authorized service facility for trouble shooting, repair and adjustment.

E5

The accessory and spare parts are damaged, please contact the nearest 
authorized service facility for trouble shooting, repair and adjustment.

E6

The cooking temperature is over 00°C - 9°F for item 181000 (40°C 
- 450°F on other models) in the function mode “TEMP“. After the unit 
has been cooled down, the unit would be automatic switches to standby 
mode.

E7

Ventilation blocked, heat can not be blew out of the machine smoothly, it 
causes device inside over-heat. Please keep a minimum distance of 5 to 
10 cm (” - 4”) from the device to walls or other items. Please power off 
to eliminate the wrong record and let the unit cool down, and then re-plug 
the power cord and restart the unit

E8

The cooking temperature is over 150°C - 0°F. When using the function 
mode “Power” to cook, the max temperature is 150°C - 0°F. If the cook-
ing temperature is over 150°C - 0°F in this mode, the unit would be 
appeared the error. Please power off to eliminate the wrong record and let 
the unit cool down, and then re-plug the power cord and restart the unit. 
If you would like the cooking temperature is over 150°C - 0°F, please 
use the function mode “TEMP”, the max temperature is 00°C - 9°F.

E9

Using cookware without magnetic bottom or the diameter of the bottom is 

less than 12cm (5”). Please use cookware with magnetic and flat bottom. 

Such as iron or cast iron cookware, or cookware with 18/0 stainless steel 
bottom. The bottom should have a diameter of 1 to 6cm (5” - 10”). 
After using suitable cookware, the unit will restart automatically.

EE

The total cooking Timer reaches 150 mins. After reaching 150 mins, the 
LED shows “EE” and sounds, the device automatically goes into standby 
mode. Please press ON/OFF button to restart the unit.

Содержание 1810003 - 2216750

Страница 1: ......

Страница 2: ...d perfection in the United States market the European markets of Bel gium the Netherlands Germany France Spain Greece Russia Poland Hungary and many other countries The United States headquarters is located in Odessa Florida with distribution centers in both Florida and California BergHOFF also operates two research and development centers to bring our customers the edge they need to stay ahead of...

Страница 3: ... 1810027 2216743 2213735 1810003 2216750 2207123 1810119 2216736 ...

Страница 4: ...R decreases TIME 8 Cooking surface glass or ceramic 9 Feet Images for reference only your model may be slightly different 1 2 3 4 5 7 6 9 8 All of our other models with designated buttons and on the PRO style models 1 Power ON OFF 2 Power 300 W 1800 W 3 Temp Cook 60 C 232 C 150 F 450 F 4 Timer 150 5 Arrow up raises TEMP or POWER increases TIME 6 Arrow down lowers TEMP or POWER decreases TIME 7 Coo...

Страница 5: ...tallation requirements 5 Safety 5A General information 5B Commercial use and safety instructions of this appliance 5C Expected use 6 Installing and operating tips 6A The function mode and product advantages 6B General operation information and important safeguards 6C Induction and non induction cookware 6D Connection and installation 6E Operating the cooktop 7 Cleaning and safety procedures 7A Saf...

Страница 6: ...s manual 1B Symbols explained Symbols are used to highlight important safety signs and instructions and any advice relating to the device The instructions should be followed very carefully to avoid any risk of accident per sonal injury or equipment damage WARNING A warning symbol highlights hazards and dangers which could lead to injury Please follow the instructions very carefully and proceed wit...

Страница 7: ...from not following the instructions for use The BergHOFF manual should be kept at hand and should be easily accessible for everyone who works with this appliance We reserve the right to make technical changes for purposes of devel oping and improving the appliance s performance 1D Copyright protection The manual texts drawings images or other illustrations are copyright protected No part of this p...

Страница 8: ...ontrol lamp for power WATT temperature F and timer min 3 Temperature stage selector 4 Power stage selector 5 Arrow down reduction of time temperature or power 6 Arrow up increase of time temperature or power Name PRO Induction Cooking Unit Induction Stove Induction Stove Double Induction stove Item No 2207123 1810003 2216750 2213735 1810027 2216743 1810119 2216736 Model BHI_01SS BH_003 BHI_01S BHI...

Страница 9: ...mages should be reclaimed immediately after notice as claims for damages can only be asserted within the effective period for complaints usually 48 hours 3B Packaging Please do not discard the packaging as it might be useful for storage purposes when moving or in case the device must be sent back for service Remove the packing material completely before installation or use NOTE If you would like t...

Страница 10: ... owner s responsibility to comply with those codes BergHOFF is not responsible for any damages resulting from failure to comply with proper installation 3C Storage Keep the package closed until the device is installed in a dry ventilated place Do not store it outdoors Keep it dry and dust free Do not expose it to aggressive media Do not expose it to direct sunlight Avoid mechanical shocks and vibr...

Страница 11: ...rial standards However the appliance can pose a danger if handled improperly or inappropriately Knowing the contents of the manual as well as avoiding mistakes and thus operating this appliance safely and in a fault free manner is essential to protect yourself from any danger To ensure efficiency and safety no modifications or alterations are to be made to this appliance unless they are approved b...

Страница 12: ...ohibited and is not considered as conventional Any claims against the manufacturer or his her authorized agent as a consequence of experiencing damages resulting from unconventional use are not valid The operator is liable for all damages resulting from improper use The anticipated conventional suitable usage includes the observance of installation function maintenance and cleaning instructions 6 ...

Страница 13: ...internal damage therefore voiding the warranty To protect against electric shock do not immerse cord plugs or appliance in water or other liquid Make sure the outside of your cookware is dry before placing on the unit Water droplets on the outside of your cookware may begin to boil and spatter Close supervision is necessary when the appliance is used by or near children Unplug from outlet when not...

Страница 14: ...any articles on the unit other than inductive cookware We therefore recommend not to place any metal kitchen utensils cookware pan covers knives forks spoons cans or other metal objects on the cooktop They may heat up when the appliance is turned on For the same reason do not place any aluminium foil or metal plates on the appliance Do not place a sheet of paper between the pot or the pan and the ...

Страница 15: ...ooktop on a stable and level surface Never place the cooktop on a flammable surface e g table cloth carpet etc Do not block the ventilation slots of the cooktop This may overheat the cooktop Keep a minimum distance of 5 2 to 10 4 cm to walls or other items Make sure that the main connection cable is not damaged or compressed beneath the cooktop Make sure that the main connection cable does not get...

Страница 16: ... cookware on the unit Select the TEMP button or choose with the function button TEMP Adjust the up and down Arrow Keys until the desired cooking temperature appears on the LED display Turn the unit off by pressing the Power button Note If the unit is left on and unattended without a pan for more than 9 seconds it will turn off The LED will tell you it is in off mode To exit this mode press the pow...

Страница 17: ...atically goes in standby mode NOTE During timer operation you can change the duration at any time with the arrow keys With the memory function of the appliance the power stage or temperature settings remain unchanged here Specific for 1810003 2216750 Power 1x pressing the Function button The pre set power stage 5 is selected and the device turns on With the arrow keys you can change the settings a...

Страница 18: ...ounds Press the Function Key HEAT once The preset power stage 5 is selected and the device turns on With the Keys you can change the settings at any time in a range from 1 10 When you start up the second side at HEAT function and first is at level 5 the other side will start to adjust the heating level The max level of two sides is 10 One side at the HEAT function the other side is at the TEMP fun...

Страница 19: ... 140 mins During timer operation you can change the duration at any time with the arrow keys With the memory function of the device the power stage or temperature settings remain unchanged here You can also change to the power stage selection or the temperature stage selection with the Function and change the settings there without changing the preset time NOTE The power will completely shut off w...

Страница 20: ...urface of the glass field although a scratched surface does not impair the use of the cooktop Make sure that the cooktop is cleaned and dried properly for storage and further usage 7C Maintenance Check the main connection cable for damage from time to time Never operate the cooktop when the cable is damaged If the main connection cable shows defects have it replaced by a qualified electrician When...

Страница 21: ...f the unit has been opened or modi fied in any way or service has been attempted by unauthorized personnel The prices charged by BergHOFF for its products are based upon the limitations in this warranty Seller s obligation under this warranty is limited to the repair of covered defects without charge by a BergHOFF fac tory authorized service agent or one of its sub service agencies To receive warr...

Страница 22: ...o 10 cm 2 4 from the device to walls or other items Please power off to eliminate the wrong record and let the unit cool down and then re plug the power cord and restart the unit E8 The cooking temperature is over 150 C 302 F When using the function mode Power to cook the max temperature is 150 C 302 F If the cook ing temperature is over 150 C 302 F in this mode the unit would be appeared the erro...

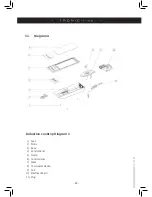
Страница 23: ... 23 Induction cooktop Diagram 1 1 Feet 2 Motor 3 Base 4 Control Panel 5 Frame 6 Control panel 7 Glass 8 Thermostat Device 9 Coil 10 Electrical Board 11 Plug 11 Diagrams ...

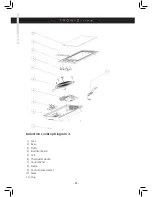
Страница 24: ... 24 Induction cooktop Diagram 2 1 Feet 2 Base 3 Motor 4 Electrical Board 5 Coil 6 Thermostat Device 7 Control Panel 8 Frame 9 Control panel contact 10 Glass 11 Plug ...

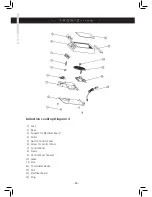
Страница 25: ... 25 Induction cooktop Diagram 3 1 Black glass 2 Frame 3 Control Panel 4 Thermostat Device 5 Coil 6 Plug 7 Electrical Board 8 Motor 9 Base 10 Feet ...

Страница 26: ...am 4 1 Feet 2 Base 3 Support for Electrical Board 4 Motor 5 Nut for Control Panel 6 Screw for Control Panel 7 Control Panel 8 Frame 9 Control Panel Contact 10 Glass 11 Slot 12 Thermostat Device 13 Coil 14 Electrical Board 15 Plug ...

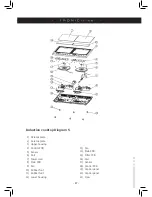
Страница 27: ...7 Sensor 18 Control PCB 19 Control panel 20 Control panel 21 Crew Induction cooktop Diagram 5 1 Ceramic plate 2 Ceramic plate 3 Upper housing 4 Control PCB 5 Sensor 6 Coil 7 Power cord 8 Main PCB 9 Fan 10 Rubber foot 11 Rubber foot 12 Lower housing ...

Страница 28: ...www berghoffworldwide com ...

Отзывы: