

2. Connection Thermostat with Phone
Thermostat part Setting
Press and hold , then press button the same time for 2 seconds, then will
enter into Advanced Setting.
After enter into Advanced Setting, press 10 times until “FAC” appears.
When
FAC
appears, press to change 08 to 10 or 32, make FAC=10 or FAC=32.
7. Setting the Timer off
After the setting of Regular boot, press
again, until
and “hh” twinkling
,
press
to
adjust
the
hours.
After the adjustment of hours is completed
,
press until
the
“
mm”twinkling,
press
to adjust
the minutes
.
After the completion of all adjustment, press
to confirm, then
does
not twinkling, Off timer setup is completed
.
The operation of canceling Off timer is the same, press
to the state of
The setting of the third period and forth period are same with the first and
8. Setting
the
Circulation
of
Timer
Switch
After setting the time of timer switch, continue to press the
,
there will
be “LooP”
,
then press
,
week display area will displays the day of
the week, or the transformation of “12345" “123456"
,
or “1234567"
.
If the screen only displays the day of the week, then the timer switch setting
is valid only for the day.(= “Execute once” in App interface)
If it displays “12345"
,
then the timer switch is valid from Monday ~ Friday,
and Saturday and Sunday will be invalid
.
If it displays “123456"
,
then the timer switch is valid from Monday ~Saturday,
and Sunday will be invalid.
If it displays “1234567"
,
then the timer switch is valid from Monday ~ Sunday.
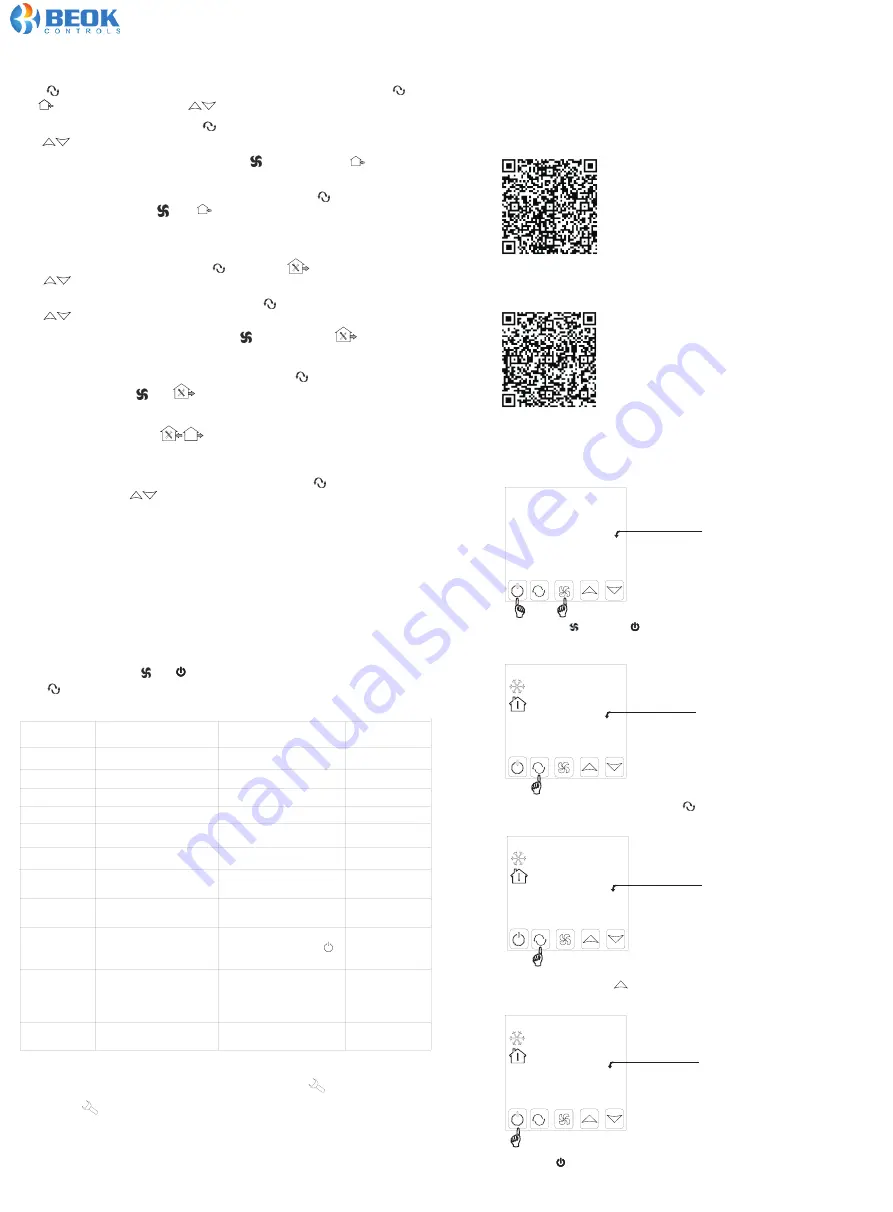
9.Advanced Setting Mode
Step 1
Step 2
Step 3
Step 4
POWER OFF STATE
0:01
SET TEMP
28
ROOM
TEMP
22
℃
℃
fac
28
ROOM
TEMP
08
℃
fac
28
ROOM
TEMP
10
℃
6. Setting the Time-on(Regular
Boot)
Press
for more than 3 seconds, after setting the time, continue to press
After
the
adjustment of hours, press until
the “mm”
twinkling,
After the completion of all adjustments
,
press to
confirm, then
does not twinkle,
Regular boot setup is complete
.
The operation of canceling Regular boot
is the same, press
to
the state of
Regular boot, then pressing
,
the
is twinkling, Regular boot has been canceled
.
In power-off state, press and meanwhile, to enter into Advanced Setting.
Press to switch dIF, Sh1, Sl2, Sh2, Sl2, ADJ, FAN, FrE, LOC, ADD, FAC.
Display code
Function
Parameters
Factory default
SL1
SH1
dIF
SH2
SL2
AdJ
FAN
FrE
LOC
Pon
FAC
Deadzone/hysteresis
0.5
℃;
1
℃
1
℃
Max temp in cooling
Min temp in cooling
Max temp in heating
Temp. Calibration
Fan coil control mode
Anti-freeze function
Key lock(button lock)
Working state
memory function
Factory setting
10~40
℃
40
℃
10~40
℃
10
℃
10~40
℃
40
℃
10~40
℃
10
℃
0:fan coil in-control
1:fan coil out off control
0
℃
0:Anti-freeze On
1:Anti-freeze Off
Min temp in heating
-5~5
℃
0
0
0:Unlock
1:All locked except
2:All button locked
0
when power fails suddenly,
working state memory or not
00: no memory
01: memory
00
00: Factory reset
08:Just display
08
Advanced Setting in “BEOK AC”App interface is “Senior”
1. Install APP on phone
For IOS system: Login in App Store, search “
Beok AC
”,
you can download it on your iphone.
For Android System: Login in Google Play, search “
Beok AC
”, you can
download it on your phone.
Or scan below code to download:
Or scan below code to download:
X. Phone Port Operation Instruction
Then, press to power-off state.
until
and
“
hh”
twinkling. Press to adjust
the
hours
.
press
to adjust the minutes.
Off timer, then pressing , the
is twinkling, Off timer has been canceled
.
second period, the icons are
(
on, off/into the house, out of the house
)
Touch press for 2 second, you will enter into Advanced Setting interface.


