background image

Connecting to external display devices

30

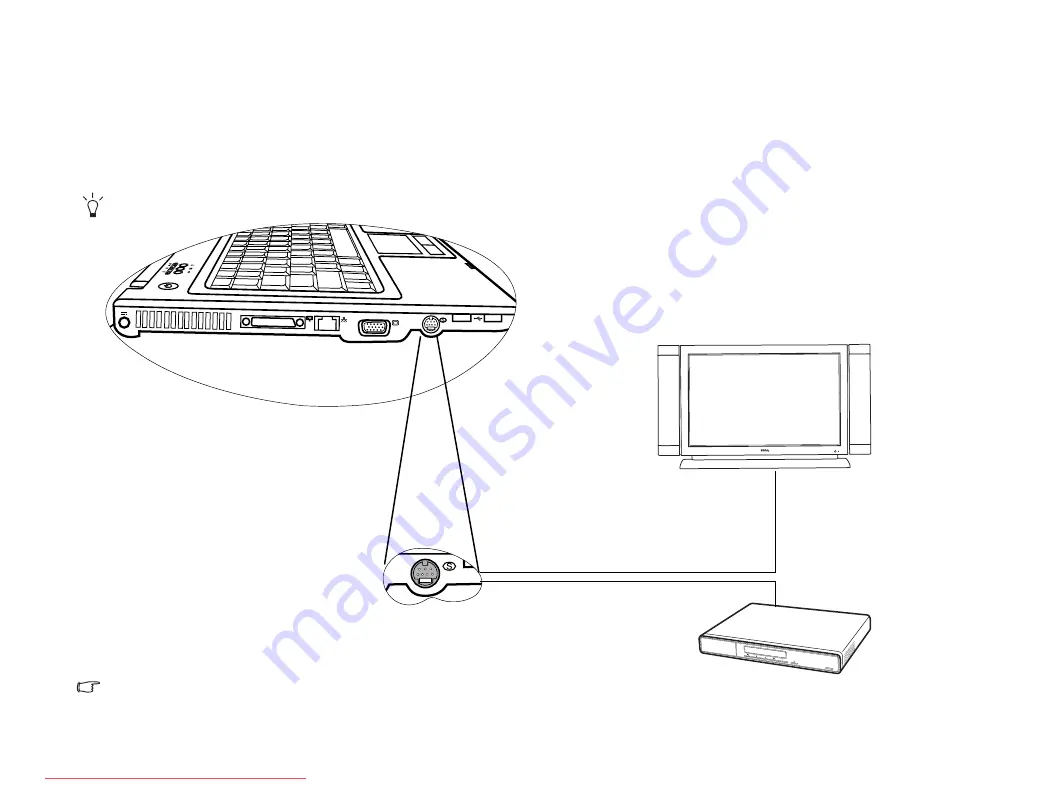
S-Video output

The S-Video Out socket on your Joybook allows you to output display signals to S-Video capable devices, such as a television set or VCR for viewing or 
recording.

1. Connect your Joybook to the TV or VCR using an optional S-Video cable.
2. Press the <Fn> + <F3> hotkey combination to switch between Joybook’s own screen and the external display device, or use simultaneous display.

When you output display signals on your Joybook to an S-Video capable device, such as a TV set, the resolution on your Joybook will be adjusted 
automatically. To restore the resolution to 1280 x 800 after disconnecting the S-Video cable, simply press the <Fn> + <F3> hotkey combination again.

The S-Video Out socket on your Joybook supports video signals only. For the audio function, you will need a separate audio cable.
1. Plug one end of the audio cable to your Joybook earphone output socket.
2. Plug the other end to the audio input socket of the external device.

TV

VCR

JB_R55V.book  Page 30  Wednesday, February 7, 2007  4:56 PM

Downloaded from LpManual.com Manuals

Содержание Joybook R55V

Страница 1: ...Welcome Joybook R55V Series User Manual Downloaded from LpManual com Manuals...

Страница 2: ...ompany to notify any person of such revision or changes Windows Internet Explorer and Windows Mail are trademarks of Microsoft Corporation Others are copyrights of their respective companies or organi...

Страница 3: ...h icons 19 Turning Bluetooth on or off 19 Connecting to a Bluetooth device 19 Sending a file to a Bluetooth device 21 Using QMedia Bar 22 Introduction to QMedia Bar 22 Setting up QMedia Bar 22 Using B...

Страница 4: ...rmation 43 Safety information about the battery 43 Caution texts concerning lithium batteries 43 Safety information about the AC adapter 43 Safety information about the modem 44 Caution 44 Disposal of...

Страница 5: ...ation about using system recovery tools Connecting to external display devices Information about how to connect your Joybook to external display devices Installing additional memory Information about...

Страница 6: ...stalling the battery pack Turn your Joybook upside down and put it on a soft clean cloth With the label side of the battery pack facing down slide it gently into the battery compartment until it snaps...

Страница 7: ...id up 4 Performing initial setup Press the Power button to start up your Joybook and then follow the on screen instructions to complete the initial Windows Vista setup Your Joybook R55V Series works b...

Страница 8: ...ocket of your Joybook Connect a telephone line to the modem port of your Joybook and dial up to the Internet or send a fax Access local area network LAN by connecting a network cable to the LAN port o...

Страница 9: ...s and enjoy movies or music Connect an earphone to the earphone socket to output sounds Connect a Hi Fi set radio synthesizer walkman etc to the audio input socket to input sounds Connect a microphone...

Страница 10: ...t USB peripherals to the USB port of your Joybook Output video images on your Joybook to a TV or AV device that has an S Video Input socket by connecting it to the S Video Out socket on your Joybook U...

Страница 11: ...Digital Interface Format is a fibre optic digital audio outlet for Mini Optical 3 5mm plugs It shares a common socket in the Joybook with a standard analog audio outlet for 3 5mm stereo plugs To activ...

Страница 12: ...ector Allows Joybook to connect to a 10 100 1000Mbps fast Ethernet 1000BASE T network Please be careful to avoid plugging a RJ 11 phone cable connector in the RJ 45 port This will damage the LAN port...

Страница 13: ...upports multi functional optical module for reading music CDs VCDs and DVDs or burning CD R CD RW or DVD R DVD R DVD RW DVD RW DVD RAM optional discs Discs can be inserted ejected by pressing the smal...

Страница 14: ...installed on selected models To remove the cover a small Phillips head screwdriver is required For more information about adding additional memory the limit of maximum memory or the types of BenQ cer...

Страница 15: ...off and connected to the AC power it lights up in amber 5 Battery indicator When the battery is charging it lights up in amber When the battery is fully charged and the system is on and connected to t...

Страница 16: ...service packs and security patches How to synchronize the system clock with an Internet time server How to locate download and install latest system device drivers How to setup scheduled events for s...

Страница 17: ...n or do one of the following Click Start Control Panel Mobile PC and then click Windows Mobility Center Click the battery meter icon or in the notification area located in the lower right corner of th...

Страница 18: ...trol Panel Hardware and Sound and Mouse The touchpad is a pressure sensitive device that requires proper care to avoid damage Do not rest heavy objects on the touchpad or its buttons Do not scratch th...

Страница 19: ...oybook the default setting is off Fn F9 Media play pause Fn F3 Switches display between the screen and an external monitor projector or allows simultaneous display switches between internal external d...

Страница 20: ...Num Lk Activates or deactivates the numeric keypad integrated in the keyboard indicated by the light gray shade in the illustration above E Opens the Computer window for browsing disks and files Caps...

Страница 21: ...cator you need to install the port replicator driver from the supplied CD Connecting the port replicator 1 Align the connector with the port opening on the back of your Joybook 2 Insert the connector...

Страница 22: ...twork service area 2 Press on your Joybook to enable the WLAN The status is indicated by the on screen display as follows 3 Click on the wireless LAN icon in the notification area located at the lower...

Страница 23: ...white Bluetooth icon on the Windows system tray 2 Turn on the power of your Bluetooth device and activate its Bluetooth function You also need to make your Bluetooth device Discoverable For details a...

Страница 24: ...ck Next 7 Refer to the documentation that came with your Bluetooth device to determine if there is a pre defined passkey If not you can select Choose a passkey for me 8 Windows will generate a passkey...

Страница 25: ...r Joybook is connected to a Bluetooth device right click the Bluetooth icon in the notification area to display the pop up box and then select Send a File 2 Click Browse to select the location to whic...

Страница 26: ...ware applications to enhance the multimedia experience on your Joybook Click on the small triangle button and a rotating button bar will display Setting up QMedia Bar Right click on QMedia Bar and a m...

Страница 27: ...for your reference only The actual items or settings on your Joybook may differ The BIOS setup program may have been updated after the publication of this manual The settings you select in your operat...

Страница 28: ...y Support allows you to enable or disable the support for USB keyboards or mice in DOS mode Security menu The Security menu contains the security settings which safeguard your system against unauthori...

Страница 29: ...creen during system startup The Boot Menu will appear Use the up and down arrow keys to select a boot device and then press Enter to confirm Exit menu The Exit menu displays ways of exiting BIOS setup...

Страница 30: ...a Business Windows Vista Ultimate Using QDataTrove Launching QDataTrove 1 Start your Joybook 2 During the startup process press the F10 key when you see Press F10 key to enter QDataTrove on the upper...

Страница 31: ...hod 2 the supplied Operating System Disc and Drivers and Applications discs will cause the QDataTrove function to become unavailable You will also need to install the device drivers manually from the...

Страница 32: ...screen instructions to complete the installation Protecting your Joybook from viruses and other security threats Your Joybook comes with an Anti Virus CD so please be sure to install the anti virus so...

Страница 33: ...ice such as a projector or monitor Once the VGA cable is connected properly simultaneous display will be available on your Joybook and the external display device automatically Pressing the Fn F3 hotk...

Страница 34: ...aneous display When you output display signals on your Joybook to an S Video capable device such as a TV set the resolution on your Joybook will be adjusted automatically To restore the resolution to...

Страница 35: ...lect Graphics Properties 2 Click Display Settings and then select the Television tab 3 Select the appropriate standard from the drop down list next to Video Standard The required settings of Video Sta...

Страница 36: ...nter for the upgrade or memory replacement For details about the limit of maximum memory refer to the product information from http BenQ com Please follow the steps below to consult the FAQ informatio...

Страница 37: ...cover Ground yourself to your Joybook with professional grounding equipment like an anti static wristband or touch the metal surface on the inside of your Joybook to discharge any static electricity...

Страница 38: ...over with the screws It is recommended that you go into BIOS to load setup defaults after installing additional memory For details refer to Using BIOS setup on page 23 10 Place the battery on its orig...

Страница 39: ...ake sure the battery is properly inserted Make sure that the battery is fully charged If this does not work consult your BenQ dealer What should I do with the battery if I will not use my Joybook for...

Страница 40: ...the age and condition of the telephone lines A 56K modem does not guarantee all connections at 56K rather it s the ability to connect at up to 56K speed Can t connect to the Internet with the built in...

Страница 41: ...r Removing programs from the Startup folder also helps to prevent programs from running when Windows starts up To do so follow the steps below 1 Right click anywhere in the open area on the desktop an...

Страница 42: ...ay slightly get warm There is no need to be concerned However since your computer has a thermally controlled fan when the CPU and or internal temperature of the notebook reaches a certain temperature...

Страница 43: ...e evenly on both hands to reduce hinge wearing and prevent deformation or breaking of hinge due to uneven force application What should I do if a program in Windows freezes If your system freezes pres...

Страница 44: ...you have connected devices to both the S Video Out socket and the 15 pin mini D sub video socket on the Joybook If yes disconnect the device connected to the S Video Out socket on the Joybook to enabl...

Страница 45: ...sources of extreme heat Do not incinerate Exposure of battery to extreme heat may result in an explosion 8 Do not use AC adapters other than the one provided with the Joybook 9 Do not place the batte...

Страница 46: ...te FAQ Contains answers to frequently asked questions about Joybook as well as additional tips Contact Center Here you can directly contact BenQ Customer Service for answers and advice to your questio...

Страница 47: ...n your own If it becomes damaged please contact an authorized BenQ distributor or service center 12 Make sure that the modem port is used only with a regular analog phone line Do not connect a digital...

Страница 48: ...me for the recycling of electrical and electronic equipment For more information about recycling of this equipment please contact your city office the shop where you purchased the equipment or your ho...

Страница 49: ...it nlocui i numai cu acela i tip sau cu un tip echivalent recomandat de produc torul echipamentului Arunca i bateriile folosite n conformitate cu instruc iunile produc torului 4 Conecta i adaptorul la...

Страница 50: ...Nekad nelietojiet un neveiciet telefona l nijas piesl gumu negaisa laik Hrvatski 1 Pridr avajte se svih uputa i upozorenja u vezi sa sustavom 2 Ne postavljajte ra unalo u podru je jakih magnetskih pol...

Отзывы: