background image

  19

  How to adjust your monitor

Hot key mode

The monitor keys perform as hot keys to provide direct access to particular functions whenever 
the menu isn't currently displaying on-screen.
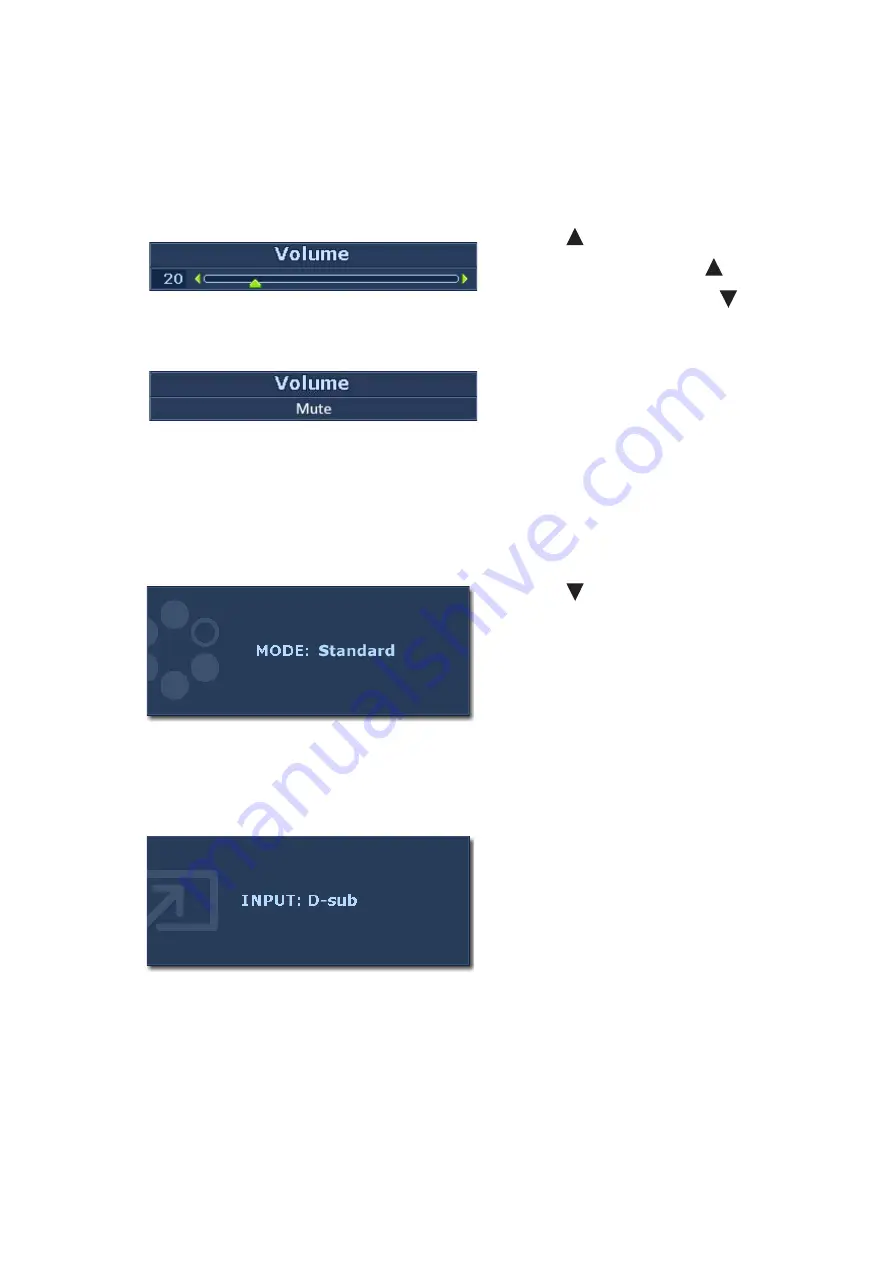
Volume hot key

Mode hot key

Input hot key

Press the 

 key to display the 

Volume


indicators. Further press the 

 key will 

increase the volume, while the 

 key will 

decrease the volume.

To Mute, press the Volume hot key for 3 
seconds. To release Mute, press the Volume 
hot key for 3 more seconds.

Press the 

 key continually to switch 

between the 6 modes for the main window, 
including 

Standard

Movie

Game

Photo

sRGB, 

and

 Eco

. The setting will take effect 

immediately.
See also


Picture Mode on page 25

.


Press the 

ENTER

 key to toggle between 

different PC video signal inputs that may be 
connected to your monitor.
The setting will take effect immediately.
See also


Input on page 29

.


Содержание GL2440HM

Страница 1: ...Welcome LCD Monitor User Manual GL2440HM...

Страница 2: ...a power disconnect device for pluggable equipment The socket outlet should be installed near the equipment and be easily accessible This product should be operated from the type of power indicated on...

Страница 3: ...enQ monitor 11 How to install the monitor on a new computer 12 How to upgrade the monitor on an existing computer 13 How to install on Windows 7 system 14 How to install on Windows Vista systems 15 Ho...

Страница 4: ...heck you have the following items If any are missing or damaged please contact the place of purchase for a replacement BenQ LCD Monitor Monitor Base Quick Start Guide CD ROM Power Cord Picture may dif...

Страница 5: ...hen you may need to transport the monitor The fitted foam packing is ideal for protecting the monitor during transport Video Cable DVI D Optional accessory for models with DVI inputs sold separately V...

Страница 6: ...ew 1 Speakers 2 Power button 3 Control buttons 4 AC Power Input jack 5 Line In 6 Headphone jack 7 HDMI socket 8 DVI D socket 9 D Sub socket 10 Lock switch 2 3 1 1 4 10 8 9 5 6 7 Above diagram may vary...

Страница 7: ...Protect the monitor and screen by clearing a flat open area on your desk and placing a soft item like the monitor packaging bag on the desk for padding Gently lay the screen face down on a flat clean...

Страница 8: ...DVI D Cable Connect the plug of the DVI D cable at the end without the ferrite filter to the monitor video socket Connect the other end of the cable at the end with the ferrite filter to the computer...

Страница 9: ...of the power cord into the socket labelled POWER IN on the rear of the monitor Do not connect the other end to a power outlet just yet 5 Connect to and turn on the power Plug the other end of the powe...

Страница 10: ...k and placing a soft item like a towel on the desk for padding before laying the screen face down on a flat clean padded surface Please be careful to prevent damage to the monitor Placing the screen s...

Страница 11: ...r connecting the monitor to your computer Windows will automatically recognize the new or different hardware and will launch its Found New Hardware wizard Follow the wizard instructions until it asks...

Страница 12: ...uld instead be following the instructions for How to upgrade the monitor on an existing computer 1 Follow the instructions in How to assemble your monitor hardware on page 7 When Windows starts it wil...

Страница 13: ...no testing of this driver on other versions of Windows and cannot guarantee its operation on those systems Installing monitor driver software involves selecting an appropriate information file inf on...

Страница 14: ...er button 5 Insert the BenQ LCD Monitor CD ROM into a CD drive on the computer 6 In the Update Driver Software window select the option Browse my computer for driver software 7 Click Browse and naviga...

Страница 15: ...and the Update Driver button 6 Insert the BenQ LCD Monitor CD ROM into a CD drive on the computer 7 In the Update Driver Software window select the option Browse my computer for driver software 8 Clic...

Страница 16: ...ivers are already installed and you need do nothing further Cancel out of these property windows However if BenQ is not listed as the manufacturer or the correct model is not currently shown you will...

Страница 17: ...avour BenQ has provided a screen test image utility which you can use to check for screen color grayscale and line gradient display 1 Run the test program auto exe from CD ROM You could also use any o...

Страница 18: ...Volume 4 Mode key For Down Decrease adjustment The key is the hot key for Mode 5 ENTER key Enters sub menus and select items For models with DVI inputs this key is also the hot key for Input 6 Power...

Страница 19: ...while the key will decrease the volume To Mute press the Volume hot key for 3 seconds To release Mute press the Volume hot key for 3 more seconds Press the key continually to switch between the 6 mode...

Страница 20: ...on page 30 under OSD Settings for more details For more information on each menu please refer to the following pages Display menu on page 21 Picture menu on page 23 Picture Advanced menu on page 25 A...

Страница 21: ...keys to make adjustments or selections 5 To return to the previous menu press the MENU button DISPLAY MODE Standard Auto Adjustment H Position V Position Pixel Clock Phase 10 12 1 12 ENTER MENU Exit S...

Страница 22: ...n image 0 to 100 Pixel Clock Adjusts the pixel clock frequency timing to synchronize with the analog input video signal Not applicable to a digital input signal See also Picture optimization on page 1...

Страница 23: ...N Item Function Operation Range Brightness Adjusts the balance between light and dark shades Press the key to increase the brightness and press the key to decrease the brightness 0 to 100 Contrast Adj...

Страница 24: ...uce their respective influence on the color tint of the image e g if you reduce the Blue level the image will gradually take on a yellowish tint If you reduce Green the image will become a magenta tin...

Страница 25: ...NU button Picture Mode Senseye Demo Dynamic Contrast Display Mode Color Format HDMI RGB PC Range 0 Standard OFF RGB RGB 16 235 ENTER MENU Exit Select Move Item Function Operation Range Picture Mode Se...

Страница 26: ...y Mode This feature is provided to allow aspect ratios other than 16 9 to be displayed without geometric distortion Overscan Slightly enlarges the input image Use this feature to hide annoying edge no...

Страница 27: ...splay properly DVI for models with DVI inputs Color Format is automatically set to RGB HDMI Color Format is not selectable In other words Color Format is automatically set depending on the input video...

Страница 28: ...keys to make adjustments or selections 5 To return to the previous menu press the MENU button Item Function Operation Range Volume Adjusts the audio volume Press the key to increase the volume and pr...

Страница 29: ...the highlight to a menu item and then press the ENTER key to select that item 4 Press the or keys to make adjustments or selections 5 To return to the previous menu press the MENU button SYSTEM MODE...

Страница 30: ...oduct supplied in your region English French German Italian Spanish Polish Japanese Czech Traditional Chinese Hungarian Simplified Chinese Serbo Croatian Romanian Dutch Russian Swedish Portuguese H Po...

Страница 31: ...essible YES NO Press MENU to leave the OSD Settings menu DDC CI Allows the monitor settings to be set through the software on the PC Press the ENTER key to select this option Press the or keys to chan...

Страница 32: ...er color Clean the LCD screen Cycle power on off These are pixels that are permanently on or off and is a natural defect that occurs in LCD technology The image has a faulty coloration It has a yellow...

Страница 33: ...e image is displaced in one direction Read the instructions on the link Adjusting the Screen Resolution on the CD and then select the correct resolution refresh rate and make adjustments based on thes...

Отзывы: