background image

  35

  Adjusting your monitor

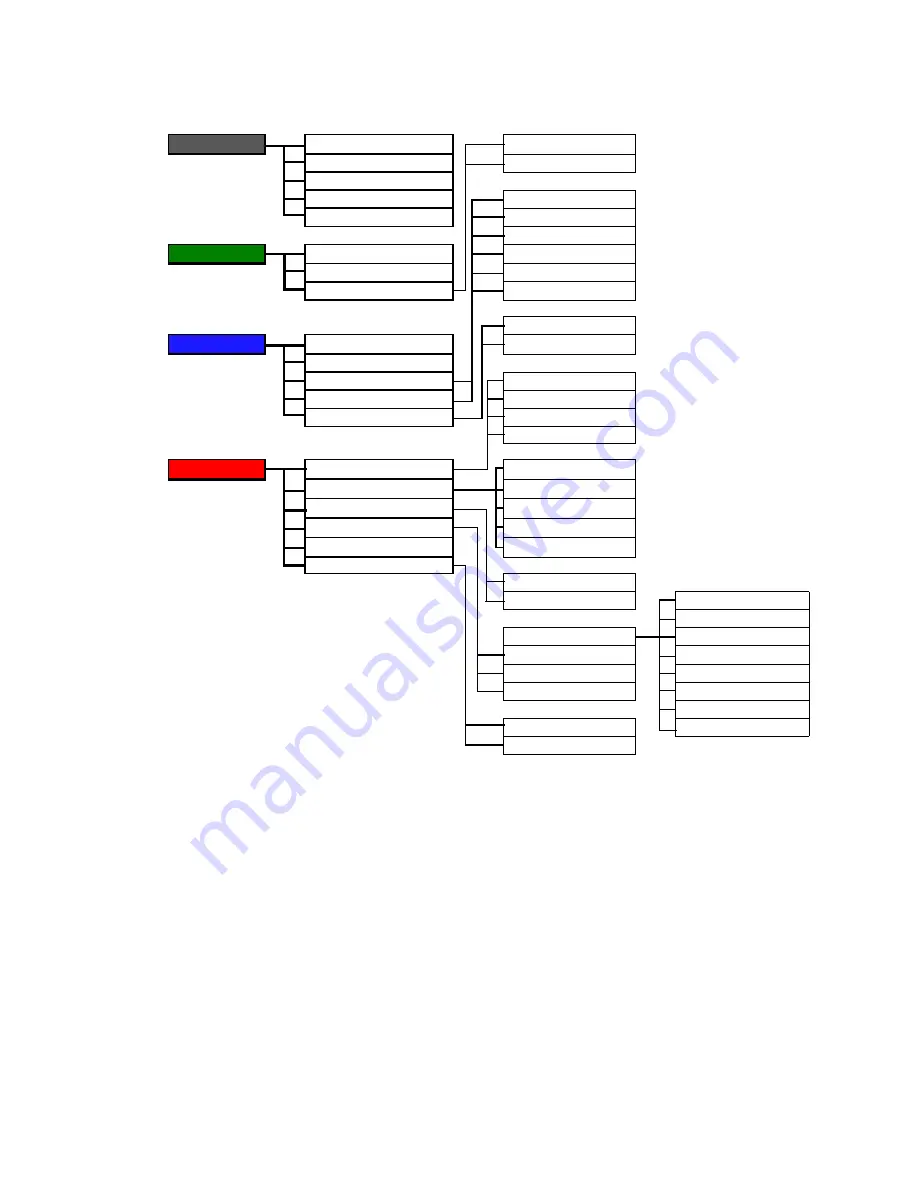
On Screen Display (OSD) menu structure 

SCREEN

Auto Adjust

ON

Position

OFF

Pixel Clock
Phase

Red

Sharpness

Yellow
Green

LUMINANCE

Calibrate

Cyan

Backlight

Blue

Calibration Reminder

Magenta

Yes

COLOR

Color Temperature

No

Gamma
Hue

DVI-1

Saturation

DVI-2

Reset Color

D-Sub 1
D-Sub 2

SYSTEM

Input

sRGB

Mode

MAC STD.

Color Settings Lock

Text

OSD Settings

User Preset-1

Information

User Preset-2

Reset All Settings

ON
OFF

English
Français

Language

Deutsch

Position

Italiano

Display Time

Español

Transparency

日本語

繁體中文

Yes

简体中文

No

Содержание FP91R

Страница 1: ...Welcome FP91R R Series Professional LCD Monitor User Manual...

Страница 2: ...ication and to make changes from time to time in the contents hereof without obligation of BenQ Corporation to notify any person of such revision or changes Please follow these safety instructions for...

Страница 3: ...o install the monitor on a new computer 17 To upgrade the monitor on an existing computer 18 To install on Windows XP system 19 To install on Windows 2000 system 21 To complete the Windows Upgrade Dev...

Страница 4: ...Caring for your monitor 45 Cleaning your monitor 45 Storing your monitor 45 Storing the monitor controller 45 Troubleshooting 47 Frequently asked questions FAQ 47 Need more help 48 Supported PC Timing...

Страница 5: ...n Consider keeping the box and packaging in storage for use in the future when you may need to transport the monitor The fitted foam packing is ideal for protecting the monitor during transport BenQ L...

Страница 6: ...mally The power indicator lights red when the PC goes into power saving mode 2 i key Press to adjust vertical position phase horizontal position and pixel clock automatically 1 DC12V input socket for...

Страница 7: ...modes sRGB MAC STD Text User Preset 1 and User Preset 2 2 Calibrate Press to activate the luminance compensation 3 Input Press to switch the input signal that may connect to your monitor between DVI 1...

Страница 8: ...r controller place the plug in the socket to secure the plug from accidental separation For information on storing the monitor controller see Storing the monitor controller on page 44 The controller d...

Страница 9: ...nd and controls Protect the monitor and screen by clearing a flat open area on your desk and placing a soft item like the monitor packaging bag on the desk for padding 2 Adjust the angle and height of...

Страница 10: ...t signal If you wish to switch between two input signals you may connect two signal cables from two computers to the DVI I sockets and use Input on the monitor controller to assign the input signal wi...

Страница 11: ...wer adapter to a electric outlet just yet Use only power supplies listed in the user manual 6 Connect the USB hub cable Connect the USB cable between the USB socket on the rear of the monitor and a US...

Страница 12: ...ture may differ from product supplied for your region Turn on the monitor by pressing the power key on the left side of the panel The monitor is now ready to display your computer images You should no...

Страница 13: ...tached CD first If your garphics card supports display rotation you will not need to install the Pivot software and may skip this section for the installation may cause a conflict with this type of gr...

Страница 14: ...e vertically extended to allow the monitor to rotate from landscape to portrait mode 2 Rotate the display 90 degrees clockwise To avoid the edge of the LCD display hitting the monitor base surface whi...

Страница 15: ...00 and later comes with integrated USB support It will automatically detect and identify your USB devices and install the necessary drivers for them to work If your USB device was accompanied by the m...

Страница 16: ...mputer Windows will automatically recognise the new or different hardware and will launch its Found New Hardware wizard Follow the wizard instructions until it asks you to select a monitor model At th...

Страница 17: ...ld not be following these instructions You should instead be following the instructions for To upgrade the monitor on an existing computer on page 18 1 Follow the instructions in Assembling your monit...

Страница 18: ...me of writing BenQ has done no testing of this driver on other versions of Windows and cannot guarantee its operation on those systems Installing monitor driver software involves selecting an appropri...

Страница 19: ...is not listed as the manufacturer or the correct model is not currently shown you will need to continue with these instructions 5 Click the Driver tab and the Update Driver button The Hardware Update...

Страница 20: ...rom your FP91R 11 Click Close OK and OK This will close the Display Properties windows You do not need to restart Windows XP as the BenQ LCD monitor drivers will operate immediately with no further ac...

Страница 21: ...enu Alternatively the Windows menu to Display Properties is located in Control Panel In Windows 2000 version Control Panel is located under the Settings menu item Click Start Settings Control Panel Di...

Страница 22: ...e Driver folder will display If the operating system you are using is Windows XP Professional x64 Edition select the BenQ driver from d Driver For_Windows_XP_Pro_x64_Edition instead 7 Click the Open b...

Страница 23: ...color See Adjusting the screen resolution on page 26 for details 14 Click OK This will close the Display Properties window and if you made any changes to the screen resolution Windows 2000 will prompt...

Страница 24: ...the monitor controller simply close the window of Visual Optimizer to exit Installing Visual Optimizer involves the hardware set up and software installation Follow the procedures below to complete th...

Страница 25: ...p on the pro vided CD 2 If you have Microsoft NET Framework installed on your system skip to the next step If you do not have Microsoft NET Framework installed on your system you will be asked to inst...

Страница 26: ...low to use ICC profiles on Windows 2000 or XP 1 Save the icc file under the folder named ICC Profiles to C WINNT system32 spool driv ers color for Windows 2000 or C WINDOWS system32 spool drivers colo...

Страница 27: ...l resolution To take full advantage of LCD technology you should select the native resolution setting of 1280 x 1024 To start you will need to open the Windows Control Panel first 1 Open Display Prope...

Страница 28: ...actory modes in the specification section of this user manual Supported PC Timings on page 48 You can choose 60 70 and 75 Hertz but not 72Hz for the native resolution of 1280 x 1024 1 Double click the...

Страница 29: ...as provided a screen test image utility which you can use to check for screen color grayscale and line gradient display 1 Run the test program auto exe from CD ROM You could also use any other image s...

Страница 30: ...tion 3 Input Press to switch the input signal between DVI 1 DVI 2 D Sub 1 and D Sub 2 4 Menu back Press to display the main menu return to the previous menu or exit On Screen Display OSD 5 W X T S and...

Страница 31: ...ly the factory color profiles to the displayed images Additionally concerning your specific working preference you may create 2 sets of color profiles for custom usage Mode To meet the establishing st...

Страница 32: ...k function will be activated automatically MAC STD MAC Standard 1 8 Text Parameters suitable for reading texts More advanced color settings such as the six independent primary and complementary colors...

Страница 33: ...to perform the calibration See Calibration Reminder on page 38 With the sensor on the back of the handheld monitor controller Calibrate ensures you the accurate display measurement Press Calibrate to...

Страница 34: ...supplied DVI I to D Sub adapter to the D Sub cable and then you may connect your DVI I monitor to a VGA output on your computer Press Input to learn the current input signal Keep pressing Input to swi...

Страница 35: ...n Backlight Blue Calibration Reminder Magenta Yes COLOR Color Temperature No Gamma Hue DVI 1 Saturation DVI 2 Reset Color D Sub 1 D Sub 2 SYSTEM Input sRGB Mode MAC STD Color Settings Lock Text OSD Se...

Страница 36: ...ls Warning messages will be displayed in English For more information on each menu please refer to the following pages SCREEN menu on page 36 LUMINANCE menu on page 38 COLOR menu on page 39 SYSTEM men...

Страница 37: ...the previous menu press the Menu key Item Function Operation Range Auto Adjust Optimizes and adjusts the screen settings automatically for you The i key is a hot key for this function When you connec...

Страница 38: ...ys to adjust the value 0 to 100 Phase Adjusts the pixel clock phase timing to synchronize with the analog input video signal Not applicable to a digital input signal See also Picture optimization on p...

Страница 39: ...o achieve consistent color reproduction Press the Enter key to select this option and follow the on screen instructions along with the handheld monitor controller to execute the calibration See Calibr...

Страница 40: ...Operation Range Color Temperature Adjusts the color temperature of the image to be warmer or cooler whereas the unit of measurement of temperature is Kelvin K The higher the value the cooler or bluer...

Страница 41: ...ust the value Red 30 to 30 Yellow 30 to 30 Green 30 to 30 Cyan 30 to 30 Blue 30 to 30 Magenta 30 to 30 Saturation Adjusts the purity and intensity of colors in the displayed image Red 0 to 100 Yellow...

Страница 42: ...tem and then press the Enter key to select that item 4 Press the W or X keys to make adjustments or selections 5 To return to the previous menu press the Menu key Item Function Operation Range Input S...

Страница 43: ...also Mode on page 30 Press the W or X keys to change the settings sRGB MAC STD Text User Preset 1 User Preset 2 Color Settings Lock Prevents all the monitor color settings from being accidentally chan...

Страница 44: ...30 sec Transparency Adjusts the transparency of the OSD menu 0 to 4 Press Menu to leave the OSD Settings menu Information Displays the current monitor property settings Press the Enter key to select t...

Страница 45: ...onnect the monitor power cord from the back of the monitor Pull the plug not the cord To clean the monitor case use a soft cloth dampened with water to wipe the case clean and do not use solvents or a...

Страница 46: ...ler follow the procedures below 1 Disconnect the cable attached on the controller from the controller jack on the monitor 2 Wind the cable in direction into the space between rubber suckers around the...

Страница 47: ...cable connectors If any pin is bent or broken off please contact your dealer to get necessary support The image is blurred See Adjusting the screen resolution on page 26 to configure the correct resol...

Страница 48: ...age displayed is visible on the screen Activate the power management function to let your computer and monitor go into a low power sleep mode when not actively in use Use a screensaver to prevent the...

Страница 49: ...ent function Incoming display mode Input timing Resolution Horizontal Frequency KHz Vertical Frequency Hz Pixel Frequency MHz Comment 640 x 350 31 47 P 70 08 N 25 17 DOS 720 x 400 31 47 N 70 08 P 28 3...

Страница 50: ...i key Vertical and horizontal image position pixel clock phase sharpness calibration calibration reminder back light adjustment color tempertature gamma hue and saturation including 6 independent col...

Страница 51: ...Class B ISO 13406 2 VCCI CB Report CE C Tick BSMI Fimko GOST CSA CCC MIC Operating voltage Tilt down up Height adjustment Dimensions H x W x D Weight Automatic switched mode power supply 100 260 V 50...

Страница 52: ...will do the data transmission DDC CI capability allows monitor controls to be sent via the software for remote diagnostics DVI I DVI I short for Digital Visual Interface Integrated A DVI Integrated c...

Страница 53: ...ng systems HP products the Internet and all other interested vendors This color space is provided to complement the current color management strategies by enabling a third method of handling color in...

Отзывы: