BenQ DC 5530 User’s Manual
En
gli
sh
Using the DC C420
7
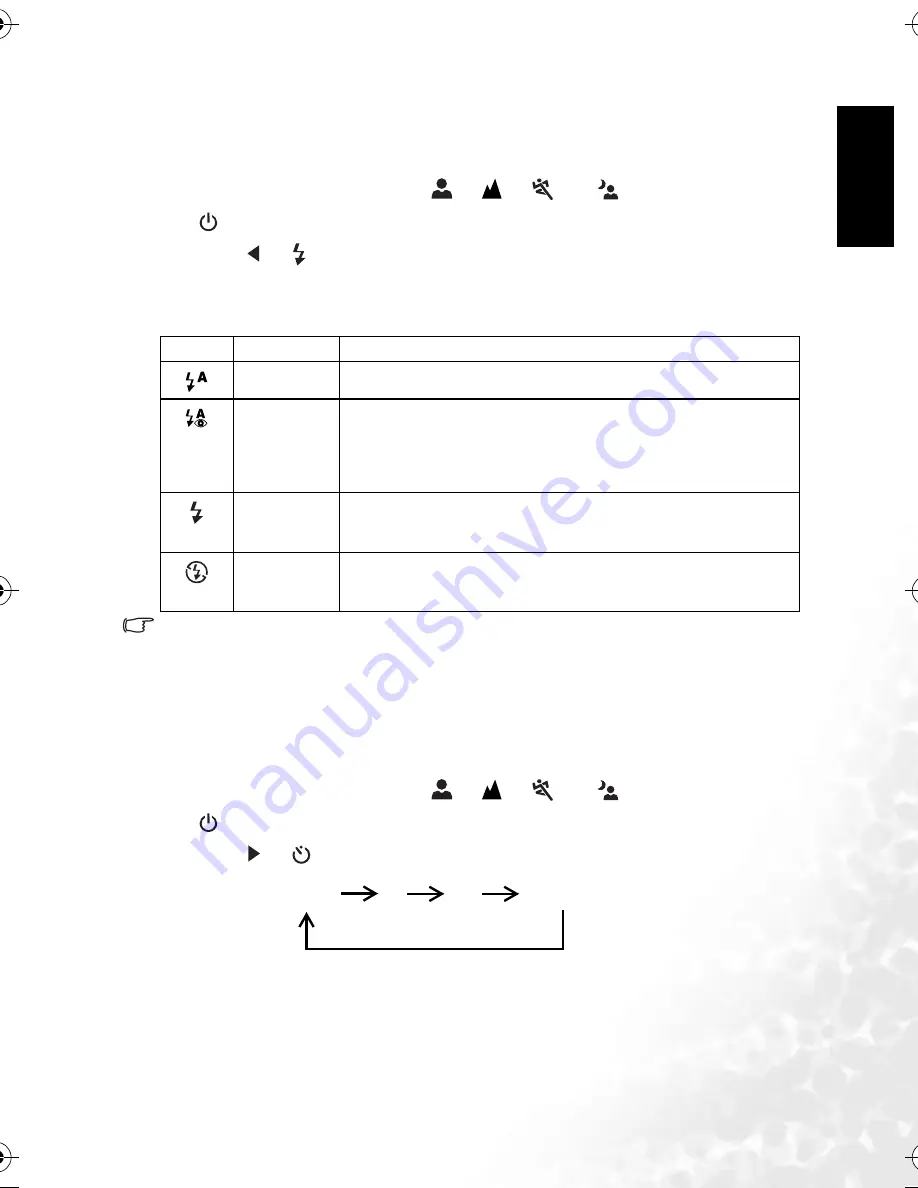
3.3.4 Using the flash
The flash is designed to function automatically when lighting conditions warrant the use of
flash. You can capture an image using a flash mode suitable to your circumstances.
1. Rotate the mode dial to [
A
], [
P
], [
], [
], [
] or [
], and then press the
[
] button to turn on your camera.
2. Toggle [
] / [
] until the desired flash mode appears on the LCD monitor.
3. Compose your scene and press the shutter button.
The camera has four flash modes: Auto Flash (default), Red Eye, Forced Flash and No Flash.
The table below will help you choose the appropriate flash mode.
•
The flash cannot be used in Video Mode.
3.3.5 Using the self-timer
The self-timer can be used in situations such as group shots. When using this option, you
should either mount the camera on a tripod (recommended) or rest it on a flat surface.
1. Secure the camera to a tripod or place it on a stable surface.
2. Rotate the mode dial to [
A
], [
P
], [
], [
], [
] or [
], and then press the
[
] button to turn on your camera.
3. Toggle [
] / [
] until the desired self-timer mode appears on the LCD monitor.
Icon
Flash mode
Description
[
]
AUTO FLASH
The flash fires automatically according to the photographic conditions.
[
]
RED EYE
This mode can reduce the red-eye phenomenon when you want to capture
natural-looking images of people and animals in low-light conditions.
When capturing images, the red-eye phenomenon can be reduced by asking
the subject (person) to look at the camera lens or get as close to the camera
as possible.
[
]
FORCED
FLASH
The flash will always fire regardless of the surrounding brightness. Select
this mode for capturing images with high contrast (backlighting) and deep
shadows.
[
]
NO FLASH
The flash will not fire. Select this mode in a place where flash photography
is prohibited, or when the distance to the subject is beyond the effective
range of the flash.
OFF
2
10
10+2
[No Indication]
DC_C420_UM.book Page 7 Wednesday, June 22, 2005 5:49 PM


