background image

BNC-15T-IP  User  Guide


                                                      www.benecom.co.kr 

49 

4

4

.

.

5

5

.

.


I

I

n

n

t

t

e

e

g

g

r

r

a

a

t

t

e

e

d

d


P

P

e

e

r

r

i

i

p

p

h

h

e

e

r

r

a

a

l

l

s

s


z


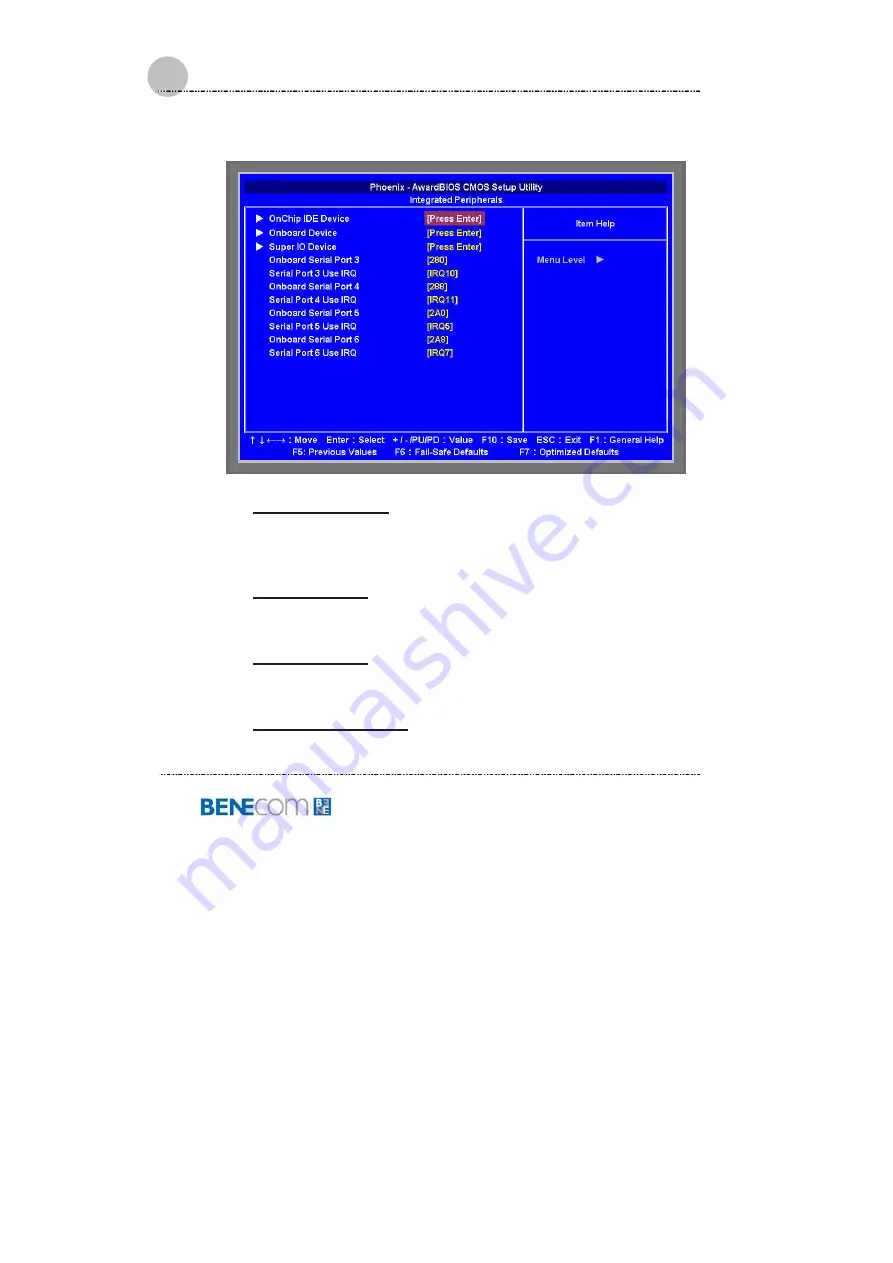
OnChip IDE Device


This item enables users to set the OnChip IDE device status, 
including IDE devices and setting PIO and DMA access modes. 
Some chipsets support newer SATA devices (Serial-ATA) 

z


Onboard Device


This item enables users to set the Onboard Device status, including 
USB AC97, MC97 and LAN devices. 

z


Super IO Device


This item enables users to set the Super IO device status, including 
Floppy, COM, LPT, IR and to control GPIO and Power fail status. 

z


Onboard Serial Port 3


Lets y

ou modify the serial port parameters when the serial port 3 

Содержание BNC-15T-IP

Страница 1: ...B BN NC C 1 15 5T T I IP P U Us se er r G Gu ui id de e ...

Страница 2: ......

Страница 3: ...ages resulting from using this material or the performance or use of this product BENECOM reserves the right to change product specifications without notice Information in this document may change without notice No part of this document may be copied reproduced or transmitted by any means for any purpose without prior written permission from BENECOM Trademarks All trademarks mentioned in this Inst...

Страница 4: ... Unplug this product from the wall outlet before cleaning Do not use liquid cleaners or aerosol cleaners Use a damp cloth for cleaning 3 Do not use this product near water for example near a bathtub washbowl kitchen sink or laundry tub in a wet basement or near a swimming pool 4 Do not place this product on an unstable cart stand or table The product could fall and sustain serious damage 5 Avoid u...

Страница 5: ...ged into the wall outlet does not exceed the fuse rating 11 Never push objects of any kind into this product through cabinet slots as they may touch dangerous voltage points or short out parts that could result in a fire or electronic shock Never spill liquid of any kind on the product 12 To reduce the risk of fire use at least No 26 AWG wire for the telecommunication line cord 13 Always disconnec...

Страница 6: ...jects Please operate the product in a well ventilated ambient condition If the system is to be operated in an audio visual cabinet be sure the cabinet is well ventilated on the front and or rear panel section otherwise heat generated by the system will be accumulated in the cabinet Safety instructions The computer has been tested for conformance to international safety regulations Like any electro...

Страница 7: ...njury from electrical shock or hot surfaces disconnect the power cord from the wall outlet and allow the internal system components to cool before touching WARNING This equipment is designed for connection to a grounded earthed outlet The grounded type plug is an important safety feature To reduce the risk of electrical shock damage to your equipment or loss of data do not disable this feature Req...

Страница 8: ...s of the country where you use the computer For more information on power cord set requirement contact your local authorized dealer reseller or service provider Protect the power cord from being walked on or pinched particularly at plugs convenience receptacles and the point where they exit from apparatus Do not defeat the safety purpose of the polarized or grounding type plug A polarized plug has...

Страница 9: ...atterien nach Angaben des Herstellers 4 Swedish Explosionsfara vid felaktigt batteribyte Använd samma batterityp eller en ekvivalent typ som rekommenderas av apparattillverkaren Kassera använt batteri enligt fabrikantens instruktion 5 Danish Lithiumbatteri Eksplosionsfare ved fejlagtig håndtering Udskiftning må kum ske med batteri af samme fabrikat og type Lever det brugte batteri tilbage til leve...

Страница 10: ...lled and used in accordance with the instructions may case harmful interference to radio communications However there is no guarantee that interference will not occur in a particular installation If this equipment does cause harmful interference to radio or television reception which can be determined by turning the equipment off and on the user is encouraged to try to correct the interference by ...

Страница 11: ...rs protection for system TV tuner card External television antenna grounding If an outside antenna or cable system is to be connected to the product make sure that the antenna or cable system is electrically grounded to provide some provide some protection against voltage surges and static charges Article 810 of the National Electrical Code ANSI NFPSA 70 provide information with regard to proper g...

Страница 12: ...solator CATV Cable Safety Make sure that your CATV system installer has connected the Coaxial cable shield to the grounding system of the building as close to the point of cable entry as practical TV Antenna The TV antenna supplied with any TV Tuner module is intended for Indoor use only Please do not use your TV Tuner module outdoors Power Lines WARNING When installing or realigning an outside an...

Страница 13: ...usly listening to music at very high volumes and for extended durations can cause hearing damage In order to reduce the risk of damage to hearing user should lower the volume to a safe comfortable level and avoid listening at very high volume Headsets should comply with EN 50332 2 requirements ...

Страница 14: ...ation Restrictions 2 Thermal Restrictions 4 Safety instructions 4 Requirements 5 General Requirements 5 Power Cord Set Requirements 6 Battery Lithium 6 FCC Information 8 Laser Compliance Statement 8 Television antenna connectors protection for system TV tuner card 9 Table of Contents 12 Chapter 1 General Information 1 1 Introduction 15 1 2 Specification 160 ...

Страница 15: ...e USB ports 35 3 6 Using the External Audio System 35 3 7 Using the LAN port 36 3 8 TouchScreen 38 Chapter 4 The BIOS Setup Program 32 4 1 CMOS Setup Utility 39 4 2 Standard CMOS Features 41 4 3 Advanced BIOS Features 44 4 4 Advanced Chipset Feature 47 4 5 Integrated Peripherals 49 4 6 Power Management Setup 56 4 7 PnP PCI Configurations 59 4 8 PC Health Status 60 4 9 Frequency Voltage Control 61 ...

Страница 16: ...BNC 15T IP User Guide www benecomc co kr 14 Memo ...

Страница 17: ...ic applications to life without sacrifices to any industrial reliability Delivering a variety of connectivity features built in USB Audio RJ45 port E SATA port VGA port Mini PCI E socket and robust capacity of 2 5 SATA HDD it is ideal for an all around system performance Furthermore BNC 15T IP is equipped with fanless and no ventilation hole design featured with dustproof waterproof rugged aluminu...

Страница 18: ... Intel 910GMLE GMCH Integrated GMA 900 Graphics device ICH6M z System Memory 1 x 200pin SO DIMM DDR2 400 MHz supports up to 2 GB z Display Memory Intel DVMT 3 0 supports up to 128 MB video memory z BIOS Award 4Mbits Flash BIOS z Storage 1 x Internal 2 5 SATA HDD interface 1 x CompactFlash socket for type I II CompactFlash z Watchdog Timer Reset 1 sec 255 min and 1 sec or 1 min step z H W Status Mo...

Страница 19: ...z Durability Touch lifetime 35 million 1 2 4 I O Interface z Serial Port COM 2 x Serial port COM1 RS 232 COM2 RS 232 422 485 select by jumper z USB Port 3 x USB 2 0 ports z Audio Interface 1 x Line out z Ethernet 1 x 10 100M RJ 45 Connector Intel 82562EZ z VGA 1 x DSUB15 Female Connector support up to QXGA 2048 x 1536 75Hz z E SATA 1 x E SATA port 1 2 5 Bus Expansion Mini PCI E Mini PCIE socket 1 ...

Страница 20: ...densing z EMI EMS Meet the CE and FCC class B regulation z Other function Support USB device boot up FDD HDD CD ROM z 5 sides IP IP65 Front back left right and top side z Panel mounted IP IP65 z RoHS RoHS Compliant z Vibration 3 axis Non Operating 5 17Hz double amplitude displacement 17 640Hz 1 5G acceleration peak to peak z Shock 3 axis Operating 3G 1 2 sine 11msec Non Operating 10G 1 2 sine 11ms...

Страница 21: ...T IP User Guide www benecom co kr 19 1 2 9 Software Software Support Microsoft Windows XP Professional XP Embedded 1 2 10 Certifications z EMI EMS Meet the CE and FCC class B regulation z RoHS RoHS compliant ...

Страница 22: ...BNC 15T IP User Guide www benecomc co kr 20 1 1 3 3 D Di im me en ns si io on ns s The following sections provide information for the BNC 15T IP dimensions Dimensions units in mm ...

Страница 23: ...BNC 15T IP User Guide www benecom co kr 21 ...

Страница 24: ...BNC 15T IP User Guide www benecomc co kr 22 Panel Mounting Instruction ...

Страница 25: ...BNC 15T IP User Guide www benecom co kr 23 THIS PAGE IS INTENTIONALLY LEFT BLANK ...

Страница 26: ... l P PC C Before starting to set up the panel PC take familiar with the locations and purposes of controls drives connectors and ports which are illustrated in the figures below When placed upright on the desktop the front panel of the panel PC appears as shown in Figure 2 1 The bottom side of the panel PC is equipped the I O as described below ...

Страница 27: ...you plug in an e SATA HDD device z USB Ports x3 The Universal Serial Bus USB port allows you to connect USB 2 0 compliant devices for example printers scanners and so on to your Panel PC z LAN Port An internal 10Base T 100Base TX Ethernet LAN module connects your Panel PC to other computers networks through a local area network LAN z VGA monitor port This port enables connection of an analog compu...

Страница 28: ...t t ti im me e U Us se e Before setting up the system please make sure the following items are available z Keyboard z Mouse for system software installation 2 2 3 3 I In ns st ta al ll la at ti io on n P Pr ro oc ce ed du ur re es s Your Panel PC is designed and pre configured for easy setup and use This section describes the installation steps you should follow to get the system running as quickl...

Страница 29: ...wer adapter 2 Plug the other end of the AC power cord to a live AC wall outlet 3 Plug the connector of the AC adapter to the DC IN port found at the bottom side of the Panel PC Please make sure to rotate the lock screw tightly for firmly attaching to the DC In socket At the same time the Power LED at face panel lights up orange ...

Страница 30: ... a pointing device Please connect these two devices as graphics shown below to interact with your panel PC 2 3 3 Switching on the power The Power button is found on the left bottom on the rear side of the Panel PC Press the Power button to start your panel PC and check that the Power LED lights on to green on the front panel ...

Страница 31: ...BNC 15T IP User Guide www benecom co kr 29 ...

Страница 32: ...th he e D Dr ri iv ve er rs s After installing your operating system to your Panel PC it is best to install the needed device drivers for using the built in devices of your system Before installing the drivers check with your dealer first if they have already installed all the drivers along with the operating system If not you will be able to set up the drivers by the sequence as Chipset Audio VGA...

Страница 33: ...BNC 15T IP User Guide www benecom co kr 31 ...

Страница 34: ...t tr ro od du uc ct ti io on n This chapter describes the basic features and procedures for using the panel PC It includes the I O ports connecting and the touchscreen operation 3 3 2 2 U Us si in ng g t th he e U US SB B P PS S 2 2 M Mo ou us se e a an nd d K Ke ey yb bo oa ar rd d To install a full size desktop PS 2 keyboard and mouse with the panel PC please follow the instructions below 1 Turn...

Страница 35: ...onnected to the panel PC are turned off 2 Attach the interface cable of the serial device to the panel PC s serial port If necessary attach the other end of the interface cable to the serial device Fasten any retaining screws 3 Turn on any other peripheral devices which are connected to the panel PC and then turn on the panel PC 4 Refer to the manual s which accompanied any serial device s for ins...

Страница 36: ... may be connected to the system through the 15 pin external port located on the bottom of the system unit The panel PC simultaneously supports an external CRT monitor in addition to the built in LCD display 1 Be sure the panel PC is turned off 2 Connect the external monitor to the system 3 Turn on the panel PC and the external monitor ...

Страница 37: ... bottom side of the system unit 1 Connect the external device to the system 2 The USB ports support hot plug in connections Install the device driver before using the device 3 3 6 6 U Us si in ng g t th he e E Ex xt te er rn na al l A Au ud di io o S Sy ys st te em m At the bottom side of your system unit you will find the built in lineout port You can plug in a stereo headphone or powered speaker...

Страница 38: ...e the sound distortion or feedback please lower the volume Some factors is caused by too close locating the microphone and speakers from each other moving away the external audio option from the unit may also help 3 3 7 7 U Us si in ng g t th he e L LA AN N P Po or rt t This unit comes with an internal 10Base T 100Base TX LAN module that connects your panel PC to other computers networks through a...

Страница 39: ... based on the older Ethernet standard Because it is 10 times faster than Ethernet it is often referred to as Fast Ethernet The built in LAN module provides a standard RJ 45 connector To connect the twisted pair cable to your LAN port 1 Connect one end of the cable into the network wall outlet or HUB 2 Connect the other end of the cable into the Panel PC RJ 45 LAN port ...

Страница 40: ... hand or other passive objects such as a stylus It enables one to interact with what is displayed directly on the screen rather than indirectly with a mouse With its adjustable yet rigid backbone the touch screen responds to fingertip input in place of a mouse and is highly resistant to solvents and chemicals found in industrial environments It lets one do so without requiring any intermediate dev...

Страница 41: ...d in the Setup program and tells you how to modify the settings according to your system configuration 4 4 1 1 C CM MO OS S S Se et tu up p U Ut ti il li it ty y The Setup utility program allows updates to the system configuration settings The BIOS setup values will be saved in the CMOS It is executed when you change the system configuration you change the system backup battery or the system detec...

Страница 42: ...tion z Advanced Chipset Features This option lists all the features for advanced chipset configuration z Integrated Peripherals This option lists all onboard peripheral devices z Power Management Setup This option lists all the power management items z PnP PCI Configurations This option lists PnP OS and PCI device configuration z PC Health Status This option lists the system auto detect CPU and sy...

Страница 43: ...e change or disable the passwords z Save Exit Setup This option lets you saves all changes to CMOS while running the BIOS setup program and exit from the system setup program z Exit Without Saving This option allows you to discard all changes made while running the BIOS setup program and exit from the system setup program 4 4 2 2 S St ta an nd da ar rd d C CM MO OS S F Fe ea at tu ur re es s The S...

Страница 44: ... and year format z Time To set the time highlight the Time field and then press PgUp PgDn or keys to set the current time Follow the hour minute and second format z IDE Channel 0 1 Master Slave This field records the specifications for all non SCSI hard drives installed in the system Press Enter for automatic device detection Hard Disk Configurations IDE HDD Auto Detection ...

Страница 45: ... hard disk Precomp The cylinder number at which the disk drive changes the write current Landing Zone The cylinder number on which the disk drive heads read write are seated when the disk drive is parked Sector The sector number of each track defined on the hard disk z Video This field lets you set the type of video display card installed in the system Press Enter for automatic device detection z ...

Страница 46: ...memory address map installed in the system z Total Memory This field displays the total system memory size 4 4 3 3 A Ad dv va an nc ce ed d B BI IO OS S F Fe ea at tu ur re es s z CPU Feature This item allows the user to adjust CPU settings z Hard Disk Boot Priority This item will auto detect all hard disks of bootable devices on the ...

Страница 47: ...r On Self Test POST routine by skipping the re testing procedure for second third and fourth times The default setting is enabled z First Second Third Boot Device This feature allows you to select the boot device priority The options are Hard Disk CDROM USB FDD USB CDROM and Disabled Hard Disk Select boot device priority by Hard Disk CDROM Select boot device priority by CDROM USB FDD Select boot d...

Страница 48: ...8 10 12 15 20 24 and 30 z Typematic Delay Msec This item sets the key press delay time before auto repeat begins The options for delay rate are 250 500 750 and 1000 z Security Option This field allows you to set the security level of the system You can specify to enter password every time the system boots or only when you enter the setup utility z APIC Mode This item allows the user to activate or...

Страница 49: ... timings The system default setting is By SPD z CAS Latency Time This item allows you to set the timing delay in clock cycles before SDRAM starts a read command z DRAM RAS to CAS Delay This item allows you to set the timing for the transition from RAS row address strobe to CAS column address strobe as both rows and columns are separately addressed shortly after the DRAM is refreshed ...

Страница 50: ...frequency to improve performance z PCI Express Root Port Func z PEG Onchip VGA Control This field lets you select PCI Express graph card when boot display or let BIOS auto detect it The options are Onchip VGA PEG Port Auto z On Chip Frame Buffer Size This item allows you to select the memory buffer for on chip graphics z Boot Display This item allows you to select the display mode in booting z Pan...

Страница 51: ...ng PIO and DMA access modes Some chipsets support newer SATA devices Serial ATA z Onboard Device This item enables users to set the Onboard Device status including USB AC97 MC97 and LAN devices z Super IO Device This item enables users to set the Super IO device status including Floppy COM LPT IR and to control GPIO and Power fail status z Onboard Serial Port 3 Lets you modify the serial port para...

Страница 52: ...l Port 5 Lets you modify the serial port parameters when the serial port 5 uses the onboard I O controller The options are Disabled 280 288 2A0 and 2A8 z Serial Port 5 Use IRQ Lets you specify the parameter for Serial Port 5 use IRQ The options are IRQ3 IRQ4 IRQ5 IRQ7 IRQ9 IRQ10 and IRQ11 z Onboard Serial Port 6 Lets you modify the serial port parameters when the serial port 6 uses the onboard I O...

Страница 53: ...or and asks you to run the Setup program Use the arrow keys to select and press Enter to run the selected program z IDE HDD Block Mode Lets you activate or close the IDE HDD Block Mode function z IDE DMA Transfer access Lets you activate or close the IDE DMA Transfer access function z On Chip Primary PCI IDE Lets you activate or close the On Chip Primary PCI IDE function ...

Страница 54: ...d and Auto z On Chip Secondary PCI IDE Lets you activate or close the On Chip Secondary PCI IDE function z IDE Secondary Master PIO Lets you specify the parameter to Auto Mode 0 Mode 1 Mode 2 Mode 3 or Mode 4 z IDE Secondary Slave PIO Lets you specify the parameter to Auto Mode 0 Mode 1 Mode 2 Mode 3 or Mode 4 z IDE Secondary Master UDMA Lets you close this function or allows BIOS to auto detect t...

Страница 55: ...ield lets you activate or close the onboard USB 1 0 feature The options are Disabled and Enabled z USB 2 0 Controller This field lets you activate or close the onboard USB 2 0 feature The options are Disabled and Enabled z USB Keyboard Support This field lets you activate or close the USB Keyboard Support The options are Disabled and Enabled ...

Страница 56: ... will be saved in the CMOS It is executed when you change the system configuration you change the system backup battery or the system detects a configuration error and asks you to run the Setup program Use the arrow keys to select and press Enter to run the selected program z Onboard Serial Port 1 This field lets you modify your serial port parameters when the serial port uses the onboard I O cont...

Страница 57: ...ard Parallel Port This field lets you modify your parallel port parameters when the parallel port uses the onboard I O controller The options are Disabled 378 IRQ7 278 IRQ5 and 3BC IRQ7 z Parallel Port Mode This field lets you connect with an advanced printer via the port mode it supports The options are SPP EPP ECP ECP EPP and Normal z ECP Mode Select z ECP Mode Use DMA This feature displays you ...

Страница 58: ...ure that makes hardware status information available to the operating system for communicating PC and system devices in power management improvement z ACPI Suspend Type This item allows you to select the sleep state when the computer is in suspend mode S1 POS Suspend mode is used for software power down S3 STR The system shuts down and with the exception of a refresh of electrical current to syste...

Страница 59: ...he videobuffer Blank Screen This option only writes blanks to the video buffer DPMS This option Initialize display power management to signalize z Video Off In Suspend This item allows you to turn off the video when the system enters into suspend mode The options are No and Yes z Suspend Type This item allows you to determine the suspend type The options are Stop Grant and PwrOn Suspend z Suspend ...

Страница 60: ...m suspend mode The options are Disabled and Enabled z Power On by Ring This item allows you to make the system resumed by activating the modem ring The options are Disabled and Enabled z Resume by Alarm This item allows you to power on the system by the keying date and time Disabled Disable this function Enabled Enable alarm function to power on system Day of Month Alarm 1 31 Time hh mm ss Alarm 0...

Страница 61: ... Configuration Data This item lets you clear any PnP configuration data stored in the BIOS The options are Disabled and Enabled z Resources Controlled By This item lets you configure all the boot and Plug and Play compatible devices by manually setting or BIOS automatically detection If you choose Manual you can select IRQ DMA and memory base address fields if you choose BIOS system will automatic...

Страница 62: ...u assign an interrupt type to DMA 0 1 2 3 4 5 6 or 7 4 4 8 8 P PC C H He ea al lt th h S St ta at tu us s z CPU Warning Temperature The feature lets you active or close the CPU Warning Temperature Information The options are Disable and Enable These information lets you and technicians to monitor data provided by the BIOS on this mainboard It is not user configurable ...

Страница 63: ...s item lets you set the parameter to Disabled 40 C 104 F 45 C 113 F or 50 C 122 F z Fan2 Tolerance Value This item lets you define the parameter for Fan2 Tolerance Value 4 4 9 9 F Fr re eq qu ue en nc cy y V Vo ol lt ta ag ge e C Co on nt tr ro ol l z Auto Detect PCI Clk This item lets you activate or close the Auto Detect PCI Clk The options are Disabled and Enabled ...

Страница 64: ...oard performance The Fail Safe Defaults are the default values set by the BIOS vendor for stable system performance This submenu is selected for default settings with provide the best system performance 4 4 1 11 1 S Se et t S Su up pe er rv vi is so or r U Us se er r P Pa as ss sw wo or rd d For security issue please activate the Supervisor User passwords entering with selecting the item at the St...

Страница 65: ...ou did not change anything press Esc again or move the cursor to Exit Without Saving and press Y to retain the Setup settings The message SAVE to CMOS and EXIT Y N will appear at the screen center for saving data to CMOS and exit the setup utility 4 4 1 13 3 E Ex xi it t W Wi it th ho ou ut t S Sa av vi in ng g If you select this feature the following message Quit Without Saving Y N will appear at...

Страница 66: ...a small metal clip often protected by a plastic cover that slides over the pins to connect them To CLOSE SHORT a jumper means connecting the pins of the jumper with the plastic clip and to OPEN a jumper means removing the plastic clip from a jumper The following jumpers can be found on the motherboard installed in the BNC 15T IP Before the motherboard is installed the jumpers must be set in accord...

Страница 67: ...BNC 15T IP User Guide www benecom co kr 65 RS 232 default JP1 1 2 short JP2 1 3 short JP3 2 4 short RS 422 JP1 3 4 short JP2 3 5 short JP3 4 6 short RS 485 JP1 5 6 short JP2 3 5 short JP3 4 6 short ...

Страница 68: ...ser Guide www benecomc co kr 66 CMOS CMOS clear connector Normal 1 2 short default CMOS clear 2 3 short Internal Connector CF_SEL CF Card device select Master 1 2 Short Default Slave 2 3 Short MPCIE PCIE Connector ...

Отзывы: