BENDIX TU-FLO 600 Скачать руководство пользователя страница 28

28

Tests

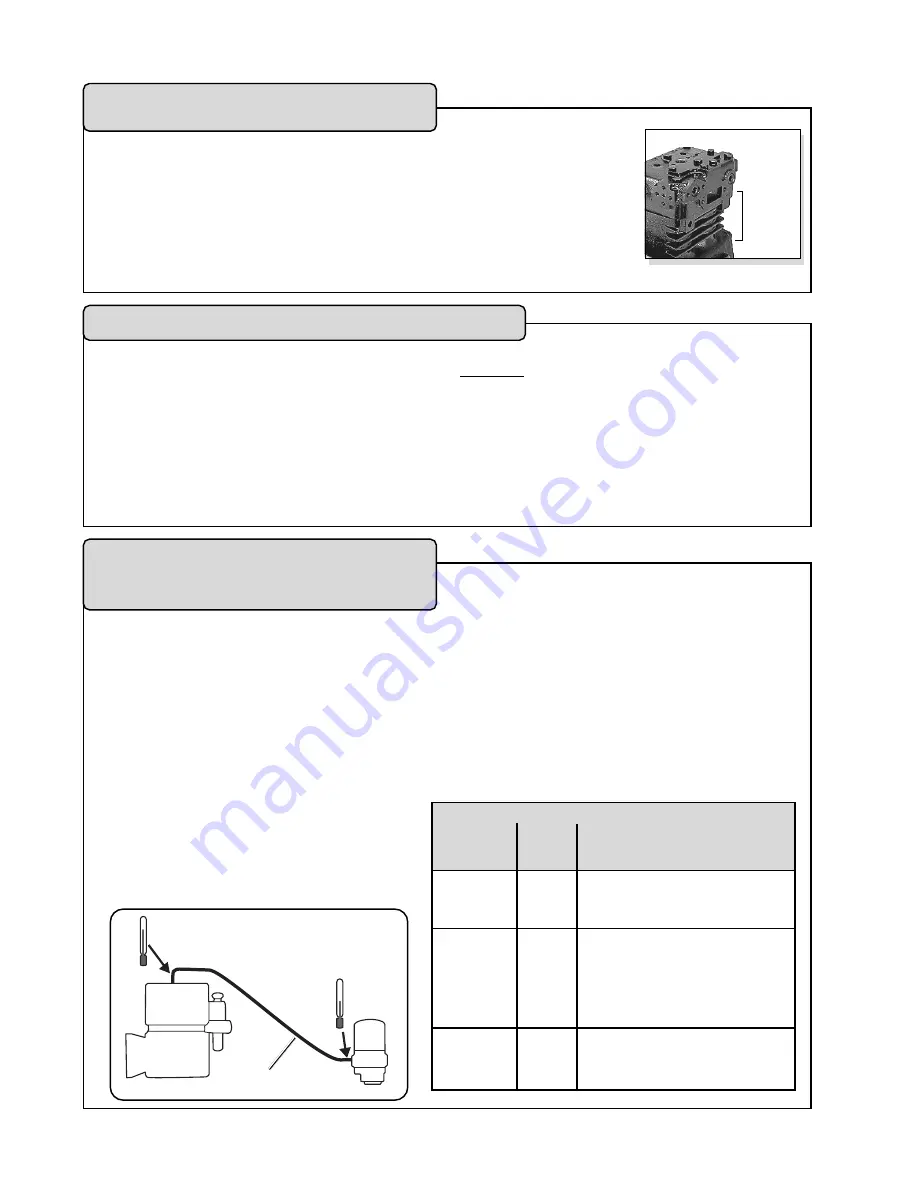
Exterior leaks at the head gasket are not a sign that oil is being passed
into the air charging system.  Oil weepage at the head gasket does not
prevent the compressor from building air.
Observe the amount of weepage from the head gasket.
If the oil is only around the cylinder head area, it is acceptable (return the
vehicle to service), but, if the oil weepage extends down to the nameplate area
of the compressor, the gasket can be replaced.

Test 1:  Excessive Oil Leakage at the

Head Gasket

Inspect for air leaks when working on a vehicle and
repair them promptly.
Park the vehicle on level ground and chock wheels.
Build system pressure to governor cut-out and allow
the pressure to stabilize for one minute.
Step 1: Observe the dash gauges for two additional
minutes without the service brakes applied.
Step 2: Apply the service brakes and allow the
pressure to stabilize.  Continue holding for two
minutes (you may use a block of wood to hold the

pedal in position.) Observe the dash gauges.
If you see any noticeable decrease of the dash air
gauge readings (i.e. more than 4 psi, plus two psi
for each additional trailer) during either two minute
test, repair the leaks and repeat this test to confirm
that they have been repaired.
Air leaks can also be found in the charging system,
parking brakes, and/or other components - inspect
and repair as necessary.

Test 2:  Air Brake System and Accessory Leakage

Caution: The temperatures used in this test
are not normal vehicle conditions.
Above normal temperatures can cause oil (as
vapor) to pass through the air dryer into the
air brake system.
This test is run with the engine at normal
operating temperature, with engine at max. rpm.
If available, a dyno may be used.
1.

Allow the compressor to build the air system
pressure to governor cut-in.

2.

Pump the brakes to bring the dash gauge
pressure to 90 psi.

3.

Allow the compressor to build pressure from
95 to 105 psi gauge pressure and maintain
this pressure range by cycling the brakes for
five (5) minutes.

4.

Then, while maintaining max rpm and
pressure range, measure and record the
surface temperature 
of the fittings:

ð

at the compressor discharge port. (T1).

ð

at the air dryer inlet fitting. (T2).

Use a touch probe thermocouple for
measuring the temperature.

5.

See table below.

6.

Retest before returning the vehicle to service.

Test 3:  Air Compressor Discharge

Temperature and Air Dryer Inlet

Temperature*

Discharge Line

T1

T2

Compressor Air Dryer

Discharge

Inlet

Fitting

Fitting

Action

under

under

Temperatures are within

360°F

200°F

normal range for this test, check
other symptoms. Go to 4.0 (h).

under

over

This could indicate a discharge

360°F

200°F

line problem (e.g. restriction).
Call 1-800-AIR-BRAKE
(1-800-247-2725)
and speak with our Tech Team.

over

__

Compressor is running hot.

360°F

Check coolant 4(f) and/or
discharge line 4(g).

T1

T2

(* Note that only vehicles that have passed Test 2

would be candidates for this test.)

LOOK

FOR

WEEPAGE

Содержание TU-FLO 600

Страница 1: ...om the engine cooling system Various mounting and drive configurations are used as required by different vehicle and engine designs See Fig 1 All Tu Flo 600 compressors receive oil under pressure from...

Страница 2: ...CTING ROD NAME PLATE A name plate is attached to the crankcase of all compressors It shows the piece number type and serial number Fig 4 A name plate with a black background denotes a new compressor w...

Страница 3: ...inlet valve to its seat The piston continues the upward stroke and compresses the air sufficiently to overcome the discharge valve spring and unseat the discharge valve The compressed air then flows...

Страница 4: ...that must be given to maintenance of other components COMPRESSOR INSTALLATION While the original compressor installation is usually completed by the vehicle manufacturer conditions of operation and m...

Страница 5: ...cial solvent or a detergent and water solution The element should be saturated in clean engine oil then squeezed dry before replacing it in the strainer Be sure to replace the air strainer gasket if t...

Страница 6: ...neat fit on compressor crankshaft Replace pulley or gear if worn or damaged Install pulley or gear on compressor crankshaft making sure it properly contacts the shaft and does not ride the key Tighten...

Страница 7: ...emove end cover with oil seal remove end cover gasket Replace oil seal after cleaning end cover Remove cap screws that hold opposite end cover to crankcase remove end cover and its gasket Some compres...

Страница 8: ...8 FIGURE 13 TU FLO 600 AIR COMPRESSOR CYLINDER BLOCK ASSEMBLY FIGURE 14 TU FLO 600 AIR COMPRESSOR CRANK CASE ASSEMBLY...

Страница 9: ...he steps to be followed when using the BASIC test are presented in APPENDIX A at the end of the TROUBLESHOOTING section OIL PASSAGE Clean thoroughly all oil passages through crankshaft connecting rods...

Страница 10: ...the compressor has five ring pistons which are to be reused they should be checked for scores cracks or enlarged ring grooves replace pistons if any of these conditions are found Measure each piston w...

Страница 11: ...alves and seats Leakage which will permit the formation of bubbles is permissible If excessive leakage is found leave the air pressure applied and with the use of a fibre or hardwood dowel and hammer...

Страница 12: ...onnecting rod and piston in the same manner UNLOADING MECHANISM FIG 15 The unloader pistons and their bores must be lubricated with special lubricant piece number 239379 dimethyl polysiloxane prior to...

Страница 13: ...n integrated component of the overall air brake charging system and assumes that an air dryer is in use The troubleshooting presented will cover not only the compressor itself but also other charging...

Страница 14: ...equivalent size type and strength as original equipment and be designed specifically for such applications and systems 9 Components with stripped threads or damaged parts should be replaced rather th...

Страница 15: ...cycles 15 0 26 Leaks air 16 0 27 Safety valve releases air 11 0 25 Noisy 18 0 27 Reservoir Safety valve releases air 13 0 26 INDEX Air Coolant Engine Oil Compressor leaks coolant 17 0 27 Oil consumpt...

Страница 16: ...ng in a temperate climate See Bendix and or other air dryer manufacturer guidelines as needed When the temperature of the compressed air that enters the air dryer is within the normal range the air dr...

Страница 17: ...k fire truck e g Line haul single trailer w o air suspension air over hydraulic brakes e g Line haul single trailer with air suspension school bus e g City transit bus refuse bulk unloaders low boys u...

Страница 18: ...E CAUTION should be used to prevent personal injury resulting from contact with moving rotating leaking heated or electrically charged components 3 Do not attempt to install remove disassemble or asse...

Страница 19: ...or the Bendix AD IS or AD IP air dryers or 5003838 for the Bendix AD 9 air dryer is available to redirect the air dryer exhaust 3 0 Oil at air dryer purge exhaust or surrounding area c 2 0 Oil on the...

Страница 20: ...l range return the vehicle to service For vehicles with accessories that are sensitive to small amounts of oil consider a Bendix PuraGuard QC oil coalescing filter If outside the normal range go to Sy...

Страница 21: ...t insulation may be added here or if the inlet fitting is a typical 90 degree fitting it may be changed to a straight or 45 degree fitting For more information on how to help prevent discharge line fr...

Страница 22: ...es tests all air brake system pneumatic components need to be able to pass including minimum levels of tolerance to contamination 5 0 Oil present at valves e g at exhaust or seen during servicing Air...

Страница 23: ...ay be undersized for the application d Compressor unloader mechanism malfunction e Damaged compressor head gasket Using dash gauges verify that the compressor builds air system pressure from 85 100 ps...

Страница 24: ...o build pressure continued f Restricted discharge line If discharge line is restricted By more than 1 16 carbon build up replace the discharge line see Table A column 2 on page 17 for recommended size...

Страница 25: ...eplace the discharge line See Table A column 2 on page 17 for recommended size The discharge line must maintain a constant slope down from the compressor to the air dryer inlet fitting to avoid low po...

Страница 26: ...est 4 on page 29 Go to Test 2 on page 28 Go to Test 5 on page 29 12 0 Air dryer safety valve releases air a Restriction between air dryer and reservoir b Air dryer safety valve malfunction c Air dryer...

Страница 27: ...ak at the head gasket may indicate a downstream restriction such as a freeze up or carbon blockage and or could indicate a defective or missing safety valve Find blockage go to 9 0 f for details and t...

Страница 28: ...st 2 Air Brake System and Accessory Leakage Caution The temperatures used in this test are not normal vehicle conditions Above normal temperatures can cause oil as vapor to pass through the air dryer...

Страница 29: ...ines to and from the governor for restrictions e g collapsed or kinked Repair as necessary 2 Using a calibrated external gauge in the supply reservoir service reservoir or reservoir port of the D 2 go...

Страница 30: ...n inspects items drained and f days Use Test 2 Air Leakage Use Test 2 Air Leakage NO Re test with the BASIC Test after 30 days NO did not know when last drained Was the number of days since last drain...

Страница 31: ...q Excessive engine oil loss amount described ______________ Is the engine leaking oil q no q yes Is the compressor leaking oil q no q yes q Other complaint ______________________________________ q No...

Страница 32: ...days is 30 60 days high air use or 30 90 days low air use if oil level is at or below acceptance line for number of days if oil level is above acceptance line for number of days System OK Return to s...

Страница 33: ...ome periods of extended engine idling can not be avoided Discharge Lines The discharge line should slope downward form the compressor discharge port without forming water traps kinks or restrictions C...

Страница 34: ...ily reservoir draining is eliminated through the use of an automatic drain valve periodic manual draining is still required Alcohol Evaporator or Injector Systems Check for proper operation of these s...

Страница 35: ...rts of valves and melting or burning non metallic air lines WARNING THIS PRACTICE IS UNSAFE AND CAN RESULT IN VEHICLE FIRE 2 Do not introduce pour fluids into air brake lines or hose couplings glad ha...

Страница 36: ...BW 1560 2004 Bendix Commercial Vehicle Systems LLC All rights reserved 9 2004 Printed in U S A 36...

Отзывы: