background image

FUNCTION: 

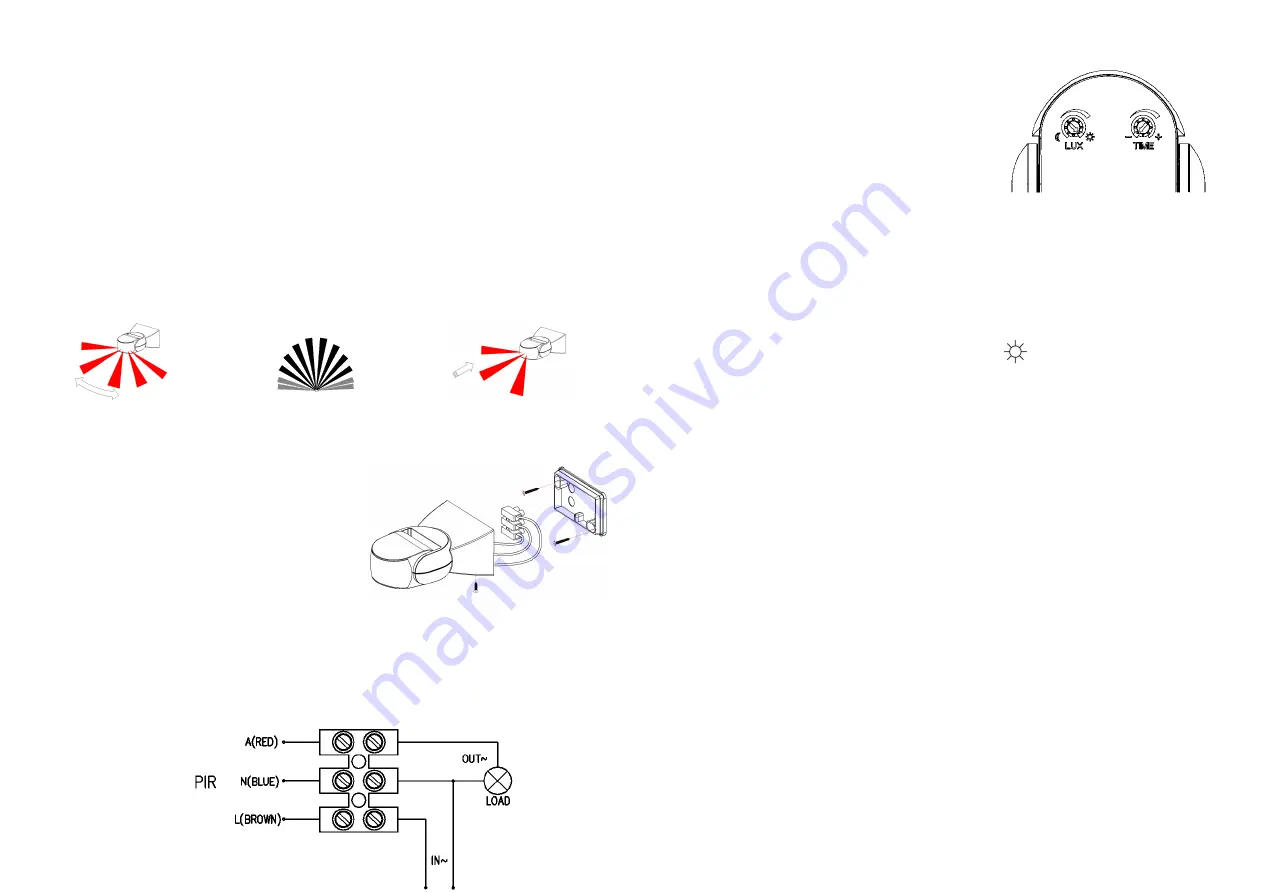
  Detection  field:  The  wide  detection  range  is  made  up  of  up  and  down,  left  and  right

detection  range  could  be  adjusted  according  to  your  desire,  but  the  moving  orientation  in 

detection field has great relation with the sensitivity. 

  Identify  day  and  night  automatically:  The  ambient  light  of  product

according to your desire: when turn to SUN (max), it will work day and night, when turn it to 

MOON (min), it will only work in the ambient light less than 3LUX. As for adjustment, please 

refer to testing way. 

  Time-delay is added continually: When it receives the second induction signals after the first 

induction, it will compute time once more on the rest of the first time

  Time-delay is adjustable: It can be set according to your desire, the minimum is 10sec±3sec

and the maximum is 7min±2min. 


Good sensitivity                                                                                           


INSTALLATION: (see the diagram) 

  Shut off power. 

  Loosen  the  screw  on  the  bottom  lid,  open  the 

wiring terminal, pass the wire of power and load 

through the bottom lid. 

  Fix  the  bottom  lid  with  inflated  screw  on  the 

selected position. 

  Connect the power and load wire into connection-wire column according to the connecting 

figure.


  Put the sensor on the bottom lid, twist the screw tightly then electrify it and test it.


CONNECT-WIRE FIGURE


(See the right figure) 


of  up  and  down,  left  and  right,  the 

detection  range  could  be  adjusted  according  to  your  desire,  but  the  moving  orientation  in 

product  could  be  adjusted 

according to your desire: when turn to SUN (max), it will work day and night, when turn it to 

MOON (min), it will only work in the ambient light less than 3LUX. As for adjustment, please 

lly: When it receives the second induction signals after the first 

induction, it will compute time once more on the rest of the first time-delay basis (set time). 

delay is adjustable: It can be set according to your desire, the minimum is 10sec±3sec, 

                    Poor sensitivity 

wire column according to the connecting 

en electrify it and test it. 

TEST: 

  Turn time knob anti-clockwise to the minimum;

the  LUX  knob  clockwise  to  the  maximum  (SUN),

Switch  on  power,  the  controlled  load  should  not 

work, needing to preheat


within


5-30sec.

  The  sensor  will  be  sensed  again  in  5-

when the first induction is finished; the load should 

work  when  received  sensor  signal  and 

signal. 

  Turn LUX knob to minimum anti-clockwise, if you test it when the ambient light is more than 

3LUX, the induction load would not work after the load stops working; the load should work if 

you cover the detection window with opaque object (towel etc),it would

stops to work within 7-13sec under no induction signal condition.

Note: when testing in daylight, please turn LUX knob to       

sensor lamp could not work! 

NOTE: 

  Should be installed by electrician or experienced person

  Avoid installing it on the unrest object. 

  There should be no hindrance and moving objects in front of the detection windows to effect 

detection. 

  Avoid installing it near air temperature alteration zones such as air condition, central he

etc. 

  Considering  your  safety,  please  do  not  open  the  cover  when  you  find  the  hitch  after 

installation. 

  If  there  is  difference  between  instruction  and  the  function  the  product  has,  please  give 

priority to product and sorry not to inform you additiona


SOME PROBLEM AND SOLVED WAY: 

  The load do not work: 

a. please check if the connection-

b. please check if the load is good.

c. please check if the working light set correspond to ambient light.

  The sensitivity is poor: 

a.  Please  check  if  there  has  hindered

receive the signal. 

clockwise to the minimum; turn 

knob  clockwise  to  the  maximum  (SUN), 

Switch  on  power,  the  controlled  load  should  not 

-10sec  later 

he load should 

when  received  sensor  signal  and  stop  working  within  7-13sec  with  no  any  sensor 

clockwise, if you test it when the ambient light is more than 

3LUX, the induction load would not work after the load stops working; the load should work if 

you cover the detection window with opaque object (towel etc),it would be regular the load 

sec under no induction signal condition. 

Note: when testing in daylight, please turn LUX knob to          (SUN) position, otherwise the 

experienced person. 

There should be no hindrance and moving objects in front of the detection windows to effect 

Avoid installing it near air temperature alteration zones such as air condition, central heating, 

Considering  your  safety,  please  do  not  open  the  cover  when  you  find  the  hitch  after 

If  there  is  difference  between  instruction  and  the  function  the  product  has,  please  give 

priority to product and sorry not to inform you additionally. 

-wiring of power and load is correct. 

good. 

please check if the working light set correspond to ambient light. 

hindered  in  front  of  the  detection  window  to  effect  to 

Содержание SES15

Страница 1: ...ką funkcjonalność Produkt umożliwia automatyczne załączenie obciążenia wykorzystując promieniowanie podczerwone elektrycznych i elektronicznych razem z odpadami rodowiska substancji Urządzenia te należy przekazać do punktu pna jest u władz lokalnych jak i w siedzibie producenta Waste electrical products should not be disposed with household waste Please recycle where электронических устройств вмес...

Страница 2: ...czane a Sprawdź podłączenia zasilania i odbiornika b Sprawdź stan odbiornika c Sprawdź poziom natężenia oświetlenia i nastawę regulatora czujnika zmierzchowego Słaba czułość urządzenia a Sprawdź czy przed czujnikiem nie ma obiektów zakłócających jego pracę b Sprawdź temperaturę otoczenia c Sprawdź czy wykrywany obiekt znajduje się w polu detekcji czujnika d Sprawdź zalecaną wysokość montażu e Spra...

Страница 3: ...nal and signal Turn LUX knob to minimum anti clockwise if you test it when the ambient light is more than 3LUX the induction load would not work after the load stops working the load should work if you cover the detection window with opaque object towel etc it would stops to work within 7 13sec under no induction signal condition Note when testing in daylight please turn LUX knob to sensor lamp co...

Страница 4: ...f the installation height corresponds to the height showed in the Please check if there is continual signal in the detection field to the instruction temperature near the sensor changes obviously such as air высокочувствительный датчик встроенную схему и автоматически включает питание широким своим использованием Имеет Угол улавливания 180º Рабочая температура 20 40 Рабочая влажность 93 RH Высота ...

Страница 5: ...становленному Низкая чувствительность устройства a проверьте нет ли посторонних элементов мешающих приему сигнала b проверьте не высокая ли температура внешней среды c находится ли движимый объект в поле улавливания датчика d проверьте правильную высоту установки датчика e проверьте правильную установку полей улавливания датчика Датчик не может автоматически отключить напряжение a проверьте нет ли...

Страница 6: ...zení a Ujistěte se že pred přední části snímače nejsou objekty ktere mohou rušit jeho práci b Zkontrolujte okolní teplotu c Zkontrolujte zda je zjistny objekt je ve snímači detekční pole d Zkontrolujte doporučenou montážní výšku e Zkontrolujte směr pohybu objektu citlivost na pohyb Snímač nemuze automaticky odpojit zátě a V detekční zone jsou neustále objekty v pohybu b Cas vypnuti je příliš dlouh...

Страница 7: ...us skaitykite TESTAS skiltyje linimas Jei pirmojo aptikimo periodu gaunamas antras aptikimo signalas tai rtotojo poreikių suveikimo laikas gali Geras jautrumas prastas junkite maitinimą ir patikrinkite jutiklį LAIDŲ PRIJUNGIMO DIAGRAMA TESTAS Pasukite LUX rankenėlę pagal laikrodžio rodykl ant maksimalios padėties saulės Pasukite rankenėlę prieš laikrodžio rodyklę ant minimalios padėties Įjunkite m...

Страница 8: ...ngeschlossen werden Der Ausschalter ermöglicht beim Bedarf die sofortige Ausschaltung des Melders Um den Melder zum Netz anschliessen soll man zuerst mit einem Werkzeug eine Anschlusskiste hinten des Melders öffnen Die Anschlussleitung mit der Isolation soll durch eine Einlauf Gummitülle geführt werden Mindestens 30 mm der Leitung mit der Isolation sollte sich in der Anschlusskiste befinden Man so...

Страница 9: ...pie elektrotīkla drī Notīriet izolāciju no elektrotīkla vadiem 6 8mm garum savienotāju izveriet cauri vadiem gumijas stiprinā izejošos vadus no sensora starp ierīces priekšējo vā Savienojiet kustības sensora vadus ar vadu savienot elektrotīkla vadus atbilstoši norādītai shēmai skat att 1 un 2 Pēc tam kad visi vadu savienojumi ir veikti uzlieciet augš Kustības sensora uzstādīšana un režīmu iestatī ...

Страница 10: ...é odrážajú svetlo Neinštalujte senzor u rušné cesty aby nedochádzalo k náhodnému spusteniu Po prvom spusteniu nastavte časovu regulaciu na najnižšiu hodnotu Světelnu regulaciu LUX nastavte na poziciu deň iba svietidla tá ktorá používají klasické žiarovky alebo vysokonapěťové Nazapojovat svietidla s transformátorom štartérom alebo elektronické systémy vonku i vnútri V prípade inštalácie vonku je tr...

Отзывы: