background image

16

1

2

3

4

5

6

7

8

9

se

ct

io

n


Remote Installation 

Step 2  Logging into the Web Interface

To log into the web interface:

1. 

 Open your web browser (Internet Explorer version 6.0 or above is 

required). 

If you are using Windows Vista, you must run Internet 

Explorer in administrator mode. In order to run Internet Explorer in 

administrator mode, right-click on Internet Explorer and select “Run 

as Administrator”.

2. 

 Type in the IP Device’s IP address in the address field, using this format:  

https://192.168.2.155/config

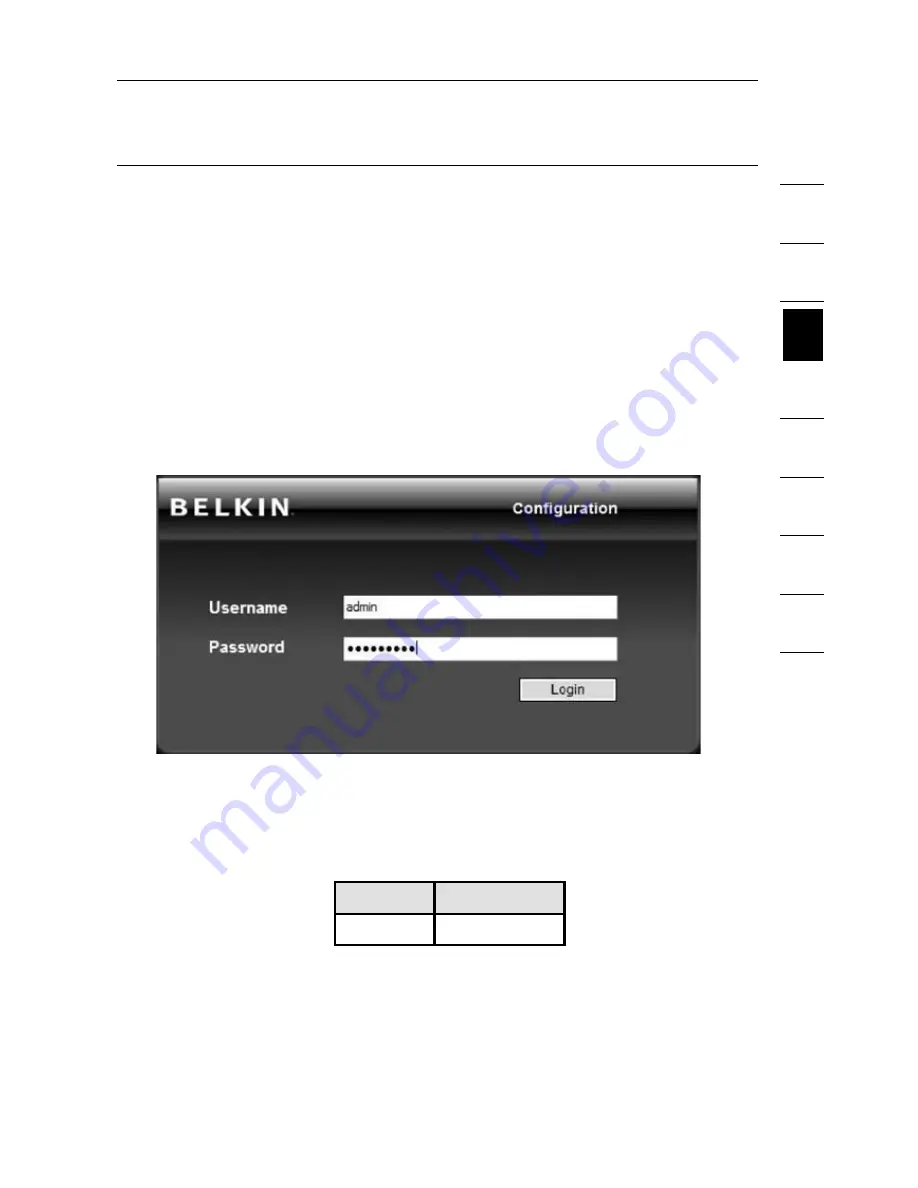
. The login page will appear (see Fig. 1). 

Bookmark the page for easy reference.

Note: 

HTTPS is used for communication over an encrypted secure socket 

layer (SSL) mechanism.


Fig. 1 Login Page

3. 

Type in the following default user name and password (case-sensitive):

User

Password

admin

SMBremote

Содержание OmniView F1DP101Mea

Страница 1: ...User Manual F1DP101M OmniView SMB Remote IP Device ...

Страница 2: ...9 Pre Configuration 9 Mounting the IP Device optional 10 Connecting the Console to the IP Device 11 Connecting the KVM Switch or Server to the IP Device 12 Powering Up the Systems 14 4 Remote Installation 15 Identifying the IP Address 15 Logging into the Web Interface 16 Network Configuration 18 User Settings 20 Switch Configuration 23 Serial Settings 25 Security Settings 26 Maintenance 28 ...

Страница 3: ...ar 32 Mouse Configuration and Settings 33 Keyboard Configuration and Settings 37 Video Configuration and Settings 39 Performance Settings Bandwidth 41 Selecting a Server 42 Additional Features 43 Restoring Factory Defaults 44 6 Frequently Asked Questions 45 7 Troubleshooting 47 8 Glossary 49 9 Information 51 ...

Страница 4: ... efficiently reducing server downtime and service costs This User Manual provides all the details you ll need to install and operate your new IP Device in addition to expert troubleshooting advice in the unlikely event of a problem For quick and easy installation please refer to the Quick Installation Guide included in your packaging We appreciate your business and are confident that you will soon...

Страница 5: ...itch or individual server with PS 2 console connections When connected to a daisy chained KVM configuration the IP Device provides remote access to all connected servers BIOS Level Access The IP Device allows you to remotely access the basic input output system BIOS of your servers to make changes and perform reboots regardless of network connectivity or server condition User Friendly Interface Th...

Страница 6: ...ers collaboratively Video Resolution The IP Device supports video resolutions of up to 1600x1200 75Hz for both local and remote consoles Firmware Updates Flash upgrades allow you to obtain the latest firmware updates for your IP Device These firmware updates ensure that the IP Device is compatible with the latest devices and hardware and are free for the life of the IP Device Visit www belkin com ...

Страница 7: ...nt Requirements Cables To connect the IP Device to your KVM switch or individual server the included PS 2 KVM Cable Kit is required To connect the IP Device to your local area network you will need to locate a network cable with an RJ45 connector ...

Страница 8: ... 8 x and above Adapters may be required KVM Switches The IP Device is compatible with the following Belkin KVM Switches OmniView Quad Bus Series OmniView SMB Series OmniView PRO2 Series OmniView SE Plus Series The IP Device is also compatible with KVM switches with PS 2 console ports from other manufacturers including but not limited to the following Avocent Corporation ATEN Raritan Black Box Comp...

Страница 9: ...A support Remote Console Software The SMB Remote IP Device may be accessed remotely over a TCP IP connection from computers using the following web browsers and OS platforms Microsoft Internet Explorer 6 0 and above with ActiveX support Windows 2000 XP or Server 2003 Windows Vista Internet Explorer must be run under administrator mode due to extra security for ActiveX plug ins under Windows Vista ...

Страница 10: ...rt PS 2 Mouse Console Port VGA Monitor Console Port KVM Server Port Serial Device Port Power Jack Go Local Reset Button Power Status LED PS 2 Keyboard Console Port Overview Back View Unit Display Diagrams Front View ...

Страница 11: ...0 100Base T connection Security 128 bit SSL encryption Typical Bandwidth 0 31Mbps Serial Device Port RJ45 Power Connection IEC Port Selectors 8 and 16 respectively for 8 and 16 port models LED Indicators 8 and 16 respectively for 8 and 16 port models Dimensions 1 1 x 4 1 x 3 1 in 28 x 104 x 79mm Weight 0 5 lbs 0 2kg Operating Temp 32 to 104 F 0 to 40 C Storage Temp 40 to 158 F 40 to 70 C Humidity ...

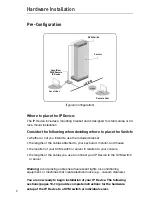
Страница 12: ...attached to your keyboard monitor and mouse the location of your KVM switch or server in relation to your console the lengths of the cables you use to connect your IP Device to the KVM switch or server Warning Avoid placing cables near fluorescent lights air conditioning equipment or machines that create electrical noise e g vacuum cleaners You are now ready to begin installation of your IP Device...

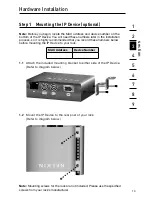
Страница 13: ...lation process so it is highly recommended that you record these numbers below before mounting the IP Device to your rack MAC Address Device Number 1 1 Attach the included mounting bracket to either side of the IP Device Refer to diagram below 1 2 Mount the IP Device to the rear post of your rack Refer to diagram below Note Mounting screws for the rack are not included Please use the specified scr...

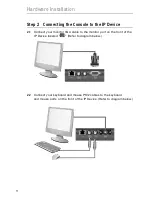
Страница 14: ...he IP Device 2 1 Connect your monitor VGA cable to the monitor port on the front of the IP Device labeled Refer to diagram below 2 2 Connect your keyboard and mouse PS 2 cables to the keyboard and mouse ports on the front of the IP Device Refer to diagram below ...

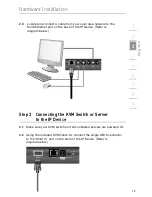
Страница 15: ...t port on the back of the IP Device Refer to diagram below Step 3 Connecting the KVM Switch or Server to the IP Device 3 1 Make sure your KVM switch and all connected servers are powered off 3 2 Using the included KVM cable kit connect the single DB15 connector to the KVM In port on the back of the IP Device Refer to diagram below ...

Страница 16: ...n 3 3 Using the other end of the cable kit connect the VGA and PS 2 cables to the console monitor keyboard and mouse ports on your KVM switch or server Refer to diagrams below Connecting to a KVM Switch Connecting to a Server ...

Страница 17: ...e to power up the IP Device Refer to diagram below 4 2 Power on the KVM switch or server connected to the IP Device The IP Device emulates both a mouse and a keyboard on each port and allows your KVM switch or server to boot normally 4 3 Power on all servers connected to your KVM switch 4 4 Check that the local keyboard monitor and mouse are working normally ...

Страница 18: ...etwork use the MAC address or unique device number located on the back of the IP Device If no DHCP server is found on your network the IP Device will boot with the following static IP address 192 168 2 155 If you want to connect more than one IP Device to the same network and there is no DHCP server available connect each IP Device to your network one at a time and change the static IP address of ...

Страница 19: ...un Internet Explorer in administrator mode right click on Internet Explorer and select Run as Administrator 2 Type in the IP Device s IP address in the address field using this format https 192 168 2 155 config The login page will appear see Fig 1 Bookmark the page for easy reference Note HTTPS is used for communication over an encrypted secure socket layer SSL mechanism Fig 1 Login Page 3 Type in...

Страница 20: ...17 Remote Installation 4 Click The web interface will open at the Network Configuration page see Fig 2 Fig 2 Network Configuration Page ...

Страница 21: ...pe in a name you would like to assign the IP Device The default device name consists of the letter D followed by the 7 digit device number located on the back of the IP Device Three TCP Ports Choose three Transmission Control Protocol TCP ports and type in the provided fields The default ports are 900 901 and 902 This is suitable for the majority of installations However you can enter any value fo...

Страница 22: ...tatic IP If you choose not to use DHCP uncheck the Enable DHCP box then enter the IP address subnet mask and default gateway for LAN as provided by your network administrator Note If you enter a static IP address without unchecking the Enable DHCP box the static IP address will not work and DHCP will remain enabled Note Where you have access to the server your configured or default device name wil...

Страница 23: ...User Profile Page There are three levels of user access Administrator An administrator has unrestricted access to all windows and settings and can take over any active session see page 30 for more details An administrator can change the name and password of all users User A user can access and control target servers but cannot use or have access to the following Advanced mouse settings Web configu...

Страница 24: ... can support up to eight simultaneous viewers to a remote session but only the administrator can take control of the server To add a new user 1 Click and type in a user name and password The password must be at least six characters letter or numbers and must not include the user name even if other characters are added Depending on the security level chosen the user name and password parameters are...

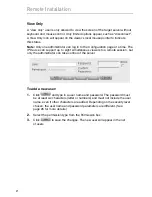
Страница 25: ... name To delete a user 1 Select the user from the list 2 Click 3 Click to save the changes Blocking a standard user and View Only user An alternative to deleting a user is blocking This means that the user s name and password remained stored but the user is unable to access the system To block a user 1 Select the user from the list 2 Check the Block box 3 Click to save the changes Note For securit...

Страница 26: ...n section The Switch Configuration page allows you to specify the KVM Switches attached to the IP Device To open the page click Switch Configuration under Administration in the far left column see Fig 4 Fig 4 Switch Configuration Page Note By default the Switch Configuration page assumes that the IP Device is connected to a single server The page displays a single server name field ...

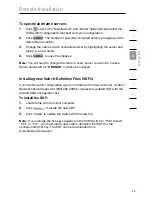
Страница 27: ...server you want to access Server names left as UNUSED cannot be accessed Installing new Switch Definition Files SDFs If your KVM switch configuration type is not listed in the drop down list contact Belkin Technical Support at 800 282 2355 to request an updated SDF with the desired KVM configuration list To install the SDF 1 Load the file onto the client computer 2 Click to locate the new SDF 3 Cl...

Страница 28: ...ion unit PDU you must configure the serial RS232 settings To open the Serial Settings page click Serial Settings under Administration in the far left menu see Fig 5 Fig 5 Serial Settings Page To configure your serial device 1 Type in the name of the serial device 2 Using the drop down menus select the correct baud rate parity and data and stop bit parameters for the device 3 Check the Show box Thi...

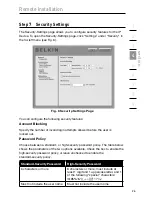
Страница 29: ... of invalid login attempts allowed before the user is locked out Password Policy Choose between a standard or high security password policy The table below shows the parameters of the two options available Check the box to enable the high security password policy or leave unchecked to enable the standard security policy Standard Security Password High Security Password 6 characters or more 8 chara...

Страница 30: ... s own SSL certificate to protect data transferred over the Internet between your servers and remote console To open the SSL Certificate page click SSL Certificate under Security in the far left menu see Fig 7 Fig 7 SSL Certificate Page To install an SSL certificate 1 Click next to the Certificate File field to locate the cer file 2 Click next to the Private File field to locate the private key fi...

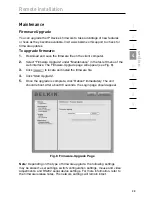
Страница 31: ...menu of the web interface The Firmware Upgrade page will appear see Fig 8 3 Click to locate and install the firmware file 4 Click Start Upgrade 5 Once the upgrade is complete click Reboot immediately The unit should reboot After about 30 seconds the Login page should appear Fig 8 Firmware Upgrade Page Note Depending on the type of firmware upgrade the following settings may be erased user settings...

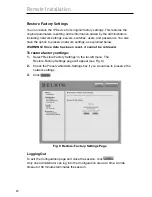
Страница 32: ...ined below WARNING Once data has been reset it cannot be retrieved To restore factory settings 1 Select Restore Factory Settings in the far left menu The Restore Factory Settings page will appear see Fig 9 2 Check the Preserve Network Settings box if you would like to preserve the network settings 3 Click Fig 9 Restore Factory Settings Page Logging Out To exit the Configuration page and close the ...

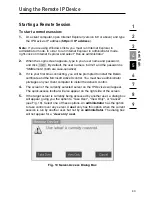
Страница 33: ...If it is your first time connecting you will be prompted to install the Belkin certificate and the Microsoft ActiveX control You must have administrator privileges on your client computer to install the ActiveX control 4 The screen of the currently selected server on the IP Device s will appear The quick access toolbar will also appear on the right side of the screen 5 If the target server is curr...

Страница 34: ...t server 2 Press F11 The Internet Explorer window will disappear leaving the Internet Explorer menu bar at the top 3 Right click the Internet Explorer menu bar and check Auto Hide The Internet Explorer menu bar will disappear and you will be in full screen mode see Fig 11 4 To exit full screen mode press F11 or move your cursor to the top of the window to display the Internet Explorer toolbar and ...

Страница 35: ...eyboard and change settings Adjust the video settings Adjust the bandwidth settings Select which server to access Hide or display the toolbar right click to open additional features Moving or Hiding the Quick Access Toolbar The quick access toolbar can be dragged and placed anywhere on the browser s screen To hide the toolbar double click or press F9 To display the toolbar repeat the same action T...

Страница 36: ...er Calibration Note This option is not necessary for Windows operating systems A target server may have a different mouse pointer speed than the client computer Calibration automatically discovers the mouse speed of the target server and aligns the two pointers When you calibrate pointers the IP Device saves the alignment so calibration is only needed once per target server To calibrate mouse poin...

Страница 37: ...changed or the operating system on the target server is Windows 2000 Linux Novell SCO UNIX or Sun Solaris To manually synchronize mouse pointers 1 In the quick access toolbar click 2 Select Manual Settings The Mouse Settings box will appear see Fig 13 Fig 13 Mouse Settings Box 3 Select the target server s operating system and click OK Instructions and sliders will appear ...

Страница 38: ...or servers running on Windows XP go to the Mouse settings in the Control Panel and uncheck Enhance pointer precision see Fig 14 Fig 14 Mouse Pointer Options Windows XP For servers running on Windows NT if mouse properties were ever changed even if they were returned to their original state uncheck Default 5 Click OK The mouse pointers should now be synchronized ...

Страница 39: ...tic mouse behavior i e if the mouse is making random clicks and jumping arbitrarily around the screen To change the mouse emulation settings 1 Click The Mouse Emulation box will appear see Fig 15 Fig 15 Mouse Emulation Box 2 Select the type of mouse physically connected to the local console port on the IP Device 3 In the Max Rate box choose the maximum mouse report rate For Sun Solaris systems the...

Страница 40: ... quick access toolbar click 2 Select a key sequence to transmit to the target server For example if you select the Ctrl Alt Del keyboard sequence for the target server it will allow you to initiate the server s shutdown login process from your client computer To add a keyboard sequence 1 In the quick access toolbar click 2 Click Add Remove The Special Key Manager box will appear see Fig 16 Fig 16 ...

Страница 41: ...e list To record a keyboard sequence 1 In the quick access toolbar click 2 Click Add Remove The Special Key Manager box will appear 3 Click Record New The Add Special Key box will appear see Fig 17 4 Assign a name to the key sequence in the Label box 5 Click Start Recording then click your mouse cursor on the recording window 6 Press the desired keys The keys will appear in the box 7 Click Stop Re...

Страница 42: ... 1 In the quick access toolbar click 2 Select Manual video adjust A slider bar will appear see Fig 18 A red frame will also appear around the screen This represents the screen area according to the server s screen resolution 3 Move the sliders to adjust and change the displayed image Click in the area of the sliders for fine tuning Brightness Contrast adjusts the brightness and contrast of the dis...

Страница 43: ...kground 2 In the quick access toolbar click 3 Select Auto video adjust The process will take a few seconds If the process runs for more than three seconds there may be an abnormal noise level Check the video cable and verify that no dynamic video application is running on the target server s desktop Perform this procedure where necessary for each target server or new screen resolution ...

Страница 44: ...dapts to the best compression and colors based on activity Low Provides high compression and 16 color support Medium Provides medium compression and 256 color support Medium is recommended when accessing the Switch over an Internet connection High Provides low compression and high 16 bit color support This setting provides optimal performance when working on a LAN Custom Allows you to select your ...

Страница 45: ...r 1 In the quick access toolbar click or right click A list of connected servers will appear see Fig 20 If a serial device is connected to the IP Device it will also appear on the list 2 Select the desired server or serial device The screen of the server or the serial device window will appear Fig 20 Server Selection Menu Note If security is enabled on the KVM switch remote switching will not be a...

Страница 46: ...rent version of software firmware of your IP Device Local Settings Opens the Client Configuration box Pointer Type Lets you change the client computer mouse pointer to appear as a dot or to not appear at all Hide Toolbar Hides the quick access toolbar starting with the next remote session To toggle the toolbar on and off press F9 Full Screen Mode Makes the screen appear in full screen mode startin...

Страница 47: ...ode 2 Wait 30 seconds for the IP Device to reboot 3 Log in with the default IP address of the unit http 192 168 2 155 config The blank login screen will appear no background picture Note Do not start the IP address with https 4 Type in the following default user name and password case sensitive and click Login This user name and password only work immediately after the reset procedure described ab...

Страница 48: ...ion that the IP Device supports The advanced video circuit in the IP Device supports a maximum resolution of up to 1600x1200 75Hz Increasing the cable length from your IP Device to your KVM switch or server will result in lower resolution support Do I have to install any software to use the IP Device No the IP Device does not require any drivers or software to be installed in your servers Simply c...

Страница 49: ...ce Ports 80 and 443 are used for standard web communication Three consecutive ports are used to send the remote video These can be user defined By default ports 900 901 and 902 are used Hz 56 60 65 66 70 72 73 75 76 85 86 640x480 x x x x x X 720x400 x X 800x600 x x x x X x 1024x768 x x x x x x x 1152x864 x 1152x900 x x 1280x720 x 1280x768 x x 1280x960 x x 1280x1024 x x x x x 1600x1200 x x x x x ...

Страница 50: ...ber you selected Problem The mouse does not sync after I align the mouse using the quick access toolbar Solution In the quick access toolbar click the mouse icon and select Manual Settings Check that the correct operating system and mouse settings are selected Refer to page 34 Use the quick access toolbar and select Auto video adjust under Video Settings Refer to page 39 Problem I can t switch to ...

Страница 51: ... toolbar and select Automated adjust under Manual video adjust Refer to page 39 Problem I forgot my password How can I reset the RIPM to factory defaults Solution Refer to the Restoring Factory Defaults section on page 44 Problem I changed the LAN settings to a static IP address but I cannot get into the web interface through the new IP address Solution Make sure you uncheck the Enable DHCP box Ch...

Страница 52: ...deo adapter Using DDC a monitor can inform a computer s video card about its properties such as maximum resolution and color depth to ensure that the user is presented with valid options for configuring the display DHCP Dynamic Host Configuration Protocol An Internet protocol that allows nodes to dynamically acquire lease network addresses for periods of time rather than having to pre configure th...

Страница 53: ...iple server ports MAC Media Access Control In computer networking a MAC address is a unique identifier attached to most forms of networking equipment Port An interface receptor on a server through which you can attach a device or plug in a device cable SSL Secure Sockets Layer Cryptographic protocols that provide secure communications on the Internet for such things as email and Internet banking T...

Страница 54: ...elkin International Inc Limited 2 Year Product Warranty What this warranty covers Belkin International Inc Belkin warrants to the original purchaser of this Belkin product that the product shall be free of defects in design assembly material or workmanship What the period of coverage is Belkin warrants the Belkin product for two years What will we do to correct problems Product Warranty Belkin wil...

Страница 55: ...and of such estimate shall be borne solely by the purchaser Damaged equipment must remain available for inspection until the claim is finalized Whenever claims are settled Belkin reserves the right to be subrogated under any existing insurance policies the purchaser may have How state law relates to the warranty THIS WARRANTY CONTAINS THE SOLE WARRANTY OF BELKIN THERE ARE NO OTHER WARRANTIES EXPRE...

Страница 56: ...4 0 1933 31 2000 fax Belkin Ltd 4 Pioneer Avenue Tuggerah Business Park Tuggerah NSW 2259 Australia 61 0 2 4350 4600 61 0 2 4350 4700 fax Belkin B V Boeing Avenue 333 1119 PH Schiphol Rijk The Netherlands 31 0 20 654 7300 31 0 20 654 7349 fax 2007 Belkin International Inc All rights reserved All trade names are registered trademarks of respective manufacturers listed Windows Windows Vista Internet...

Отзывы: