background image

1

2

3

4

5

6

7

8

9

10

10

Installation

se

ct

io

n

2

Your PRO2 PS/2 is now mounted securely into the bracket and you 
are ready to connect cables to the back of the unit.

Single PRO2 PS/2 Installation

This section provides complete instructions for the hardware setup of 
a single PRO2 PS/2. (F1DA104Pea, F1DA108Pea, and F1DA116Pea) 
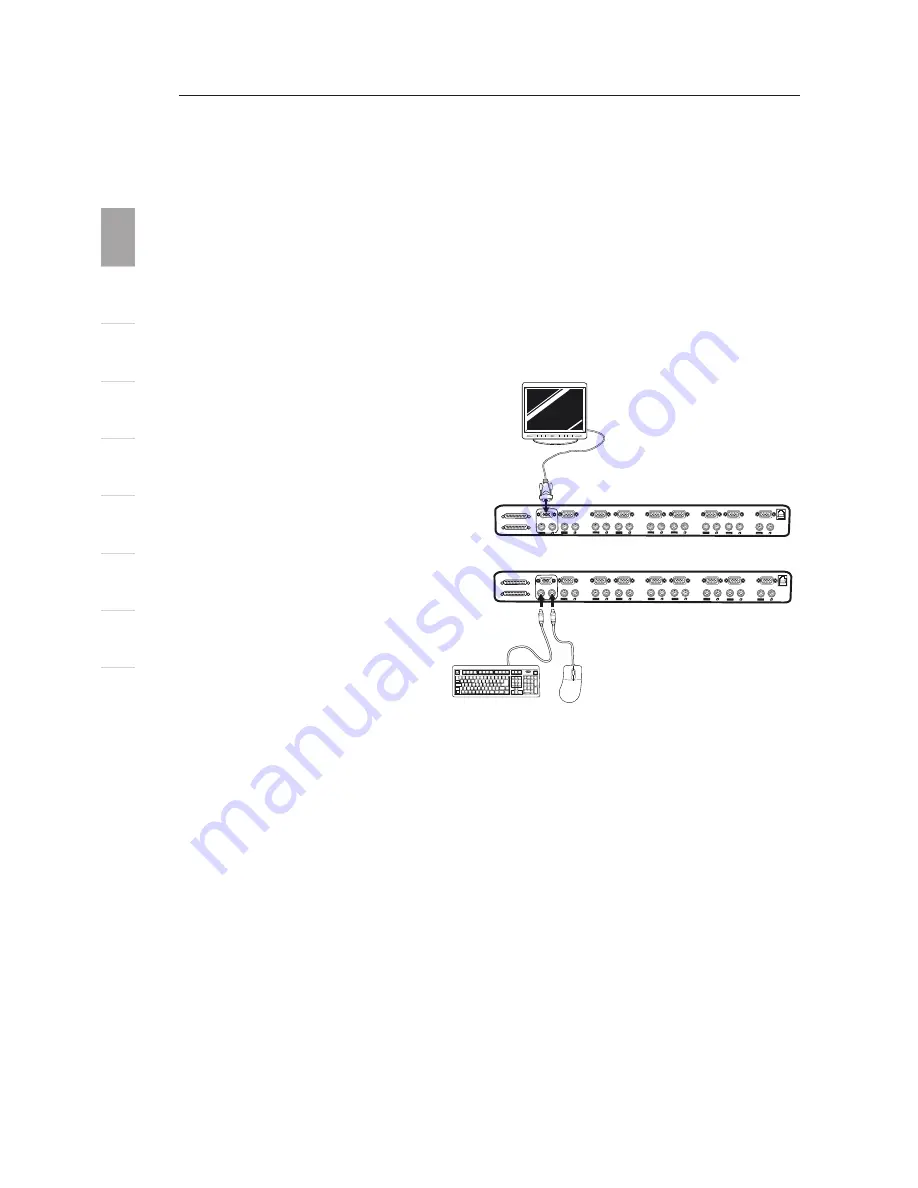
PS/2 Installation: Keyboard, Video, and Mouse Connections

Connect the Console:

1.   Connect the monitor to 

the PRO2 PS/2. Attach 
your monitor cable to the 
HDDB15 female port on 
the back of the PRO2 PS/2 
labeled “Console VGA”.

2.   Connect the PS/2 keyboard 

cable to the keyboard port 
on the back of the PRO2 
PS/2 in the “Console” 
section.

3.   Connect the PS/2 mouse 

cable to the mouse port on 
the back of the PRO2 PS/2 
in the “Console” section. 

Attach the power supply to the DC power jack labeled “DC 12V, 1A” 
located on the rear of the PRO2 PS/2. Once the power is connected to 
a power source, the LED for port 01 will begin flashing. Sequentially 
push the direct-access port selectors for ports 01 through 08 (04 for 
F1DA104Pea and 16 for F1DA116Pea). The corresponding LED should 
flash as each button is pressed, indicating that the port is ready for 
connecting your servers (computer connection).

��

��

��

Содержание OmniView F1DA104P

Страница 1: ...00 800 223 55 460 Belkin GmbH Hanebergstrasse 2 80637 Munich Germany 49 0 89 143405 0 49 0 89 143405 100 fax Belkin SAS 130 rue de Silly 92100 Boulogne Billancourt France 33 0 1 34 58 14 00 33 0 1 39...

Страница 2: ...l up to 16 computers from one PS 2 console FR Switch avec affichage l cran Contr lez jusqu 16 ordinateurs partir d une console PS 2 DE Masterswitch mit Bildschirmmen Zur Kontrolle von bis zu 16 Comput...

Страница 3: ...PRO2 PS 2s Daisy Chaining 12 Powering up the Systems 16 Using your PRO2 PS 2 Selecting a Computer Using Keyboard Hot Key Commands 17 AutoScan Mode 18 Selecting a Computer Using Direct Access Port Sele...

Страница 4: ...Offering intuitive port indicators direct access port selectors high video resolution support and flash upgradeable firmware The PRO2 PS 2 also comes with an unparalleled Belkin Three Year Warranty Th...

Страница 5: ...through the On Screen Display OSD menu For complete instructions on AutoScan usage please refer to page 18 Video Resolution Through a 400MHz bandwidth the PRO2 PS 2s support video resolutions of up t...

Страница 6: ...ect to the PRO2 PS 2 each PS 2 computer requires one VGA cable one PS 2 keyboard cable and one PS 2 mouse cable Keyboard and mouse cables must have PS 2 male to PS 2 male connectors Video resolution s...

Страница 7: ...perating Systems OmniView PRO2 PS 2 Series KVM Switches are for use on CPUs using Platforms Windows 95 98 2000 Me NT XP DOS Turbolinux and all Linux distributions Novell NetWare 4 x 5 x Keyboards Supp...

Страница 8: ...5 1 2 3 4 5 6 7 8 9 10 Overview section 1 Side View of the PRO2 PS 2 BANK DIP switch may be located on the back in some models FLASH DIP switch may be located on the back in some models...

Страница 9: ...oscan button LED for selected port identification 7 segment LED for selected BANK identification Direct access port selectors Manual BANK scroll buttons Console VGA Computer VGA port Slave Input Maste...

Страница 10: ...rd Input 6 pin miniDIN PS 2 Mouse Input 6 pin miniDIN PS 2 VGA Port 15 pin HDDB type Port LED Indicators 4 F1DA104Pea 8 F1DA108Pea 16 F1DA116Pea Enclosure Metal enclosure with high impact plastic face...

Страница 11: ...relation to your console and the lengths of the cables you use to connect your computers to the PRO2 PS 2 Cable Distance Requirements VGA signals transmit best up to 25 feet Beyond that length the pr...

Страница 12: ...the faceplate of the PRO2 PS 2 to mount flush to your rack mounted servers or to the rack Please follow these simple steps to achieve the desired adjustment The 4 Port PRO2 PS 2 requires an optional m...

Страница 13: ...ack of the PRO2 PS 2 labeled Console VGA 2 Connect the PS 2 keyboard cable to the keyboard port on the back of the PRO2 PS 2 in the Console section 3 Connect the PS 2 mouse cable to the mouse port on...

Страница 14: ...male connector of the VGA cable to the back of the PRO2 PS 2 labeled VGA 01 2 Connect the PS 2 keyboard and PS 2 mouse connectors of the cable to the keyboard and mouse ports on the computer Connect t...

Страница 15: ...chain cable F1D108 CBL is required to daisy chain each PRO2 PS 2 and is available through your Belkin reseller or online at belkin com All PRO2 PS 2s feature a BANK DIP switch The BANK DIP switch is u...

Страница 16: ...OFF OFF ON BANK 07 SLAVE ON ON ON ON ON OFF BANK 08 SLAVE ON ON OFF ON ON OFF BANK 09 SLAVE ON ON ON OFF ON OFF BANK 10 SLAVE ON ON OFF OFF ON OFF BANK 11 SLAVE ON ON ON ON OFF OFF BANK 12 SLAVE ON O...

Страница 17: ...Slave Switch 4 Using the daisy chain cable F1D108 CBL connect one end of the cable to the Master Input Slave Output port on the Master switch BANK 00 5 Connect the other end of the daisy chain cable t...

Страница 18: ...ches sequentially beginning with Bank 01 by connecting each unit s power supply Each switch should display its corresponding BANK address number as it is powered up Note If the PRO2 PS 2s do not enume...

Страница 19: ...y If you encounter an error check your cable connections for that computer and reboot If the problem persists please refer to the Troubleshooting section in this manual Using Your PRO2 PS 2 Now that y...

Страница 20: ...switch configuration no daisy chained switches you can switch directly to any port by entering the two digit number of the port you wish to access For example if you press Scroll Lock Scroll Lock 02 t...

Страница 21: ...keyboard Press any button on the front panel or any key on the keyboard to disable AutoScan Selecting a Computer Using Direct Access Port Selectors You can directly select which computer you wish to...

Страница 22: ...on Below is a complete list of hot key commands Note you will have approximately five seconds to complete each hot key sequence SL SL Up Arrow Switch to PREVIOUS ACTIVE port SL SL Down Arrow Switch to...

Страница 23: ...e PRO2 PS 2 it will display BANK 00 A symbol indicates that the computer is powered If a computer is connected and is powered up but the OSD menu does not display a symbol you will have to reset the P...

Страница 24: ...Enter to switch to that port Note If there are Slave units connected and the AutoScan time and OSD display time settings are set on the Master unit the settings will also apply to all slave units Upd...

Страница 25: ...yboard 2 OFF ON ON OFF F1DA116Pea Only Mouse 2 The DIP switch should be set to the specified settings when you are attempting to update a particular firmware For example set DIP switch 1 to ON to flas...

Страница 26: ...is innovative design provides built in cable management and saves space while adding a whole new sculpted look to your desktop The SOHO Series Switches allow you to control two or four PS 2 computers...

Страница 27: ...19 inch rack mountable 8 and 16 port models the OmniView PRO2 PS 2 Series KVM Switch expands easily for full control of as many as 256 CPUs through dedicated daisy chain ports Video resolutions of up...

Страница 28: ...name A ferrite bead reduces electromagnetic and radio frequency interference EMI RFI PC99 color coded connectors and modified thumbscrews have been added for easier installation PRO Series Plus The PR...

Страница 29: ...ith the latest features and enhancements See the section on firmware updates in this manual page 21 and when to use them Q Does the PRO2 PS 2 support Microsoft IntelliMouse A The PRO2 PS 2 supports mi...

Страница 30: ...tandard CAT5 UTP cable Q What is the maximum video resolution that the PRO2 PS 2 supports A The advanced video circuit in the PRO2 PS 2 supports a maximum resolution of 2048x1536 85Hz Q What video ban...

Страница 31: ...O2 PS 2 to switch video signals only A Yes you may use the PRO2 PS 2 to switch between video signals only without having to connect the keyboard and mouse The keyboard and mouse should be connected di...

Страница 32: ...ly Check that the monitor you are using supports the resolution and refresh rate setting on your computer Check that the graphics card you are using supports the resolution and refresh rate setting on...

Страница 33: ...er Mouse The mouse is lost when I switch to a different port Check that the mouse you are using is connected properly to the Console of the PRO2 PS 2 If you are using a mouse driver that was included...

Страница 34: ...h from one port to another mouse movement is completely erratic Make sure you do not have more than one mouse driver installed Make sure that the driver is either for a standard PS 2 mouse or a Micros...

Страница 35: ...il num rique de la classe B est conforme la norme NMB 003 du Canada Belkin Components Limited Three Year Product Warranty Belkin Components warrants this product against defects in materials and workm...

Страница 36: ...TO LOST PROFITS DOWNTIME GOODWILL DAMAGE TO OR REPROGRAMMING OR REPRODUCING ANY PROGRAM OR DATA STORED IN OR USED WITH BELKIN PRODUCTS Some states do not allow the exclusion or limitation of incident...

Отзывы: