


Connection to PC,Front Control
5
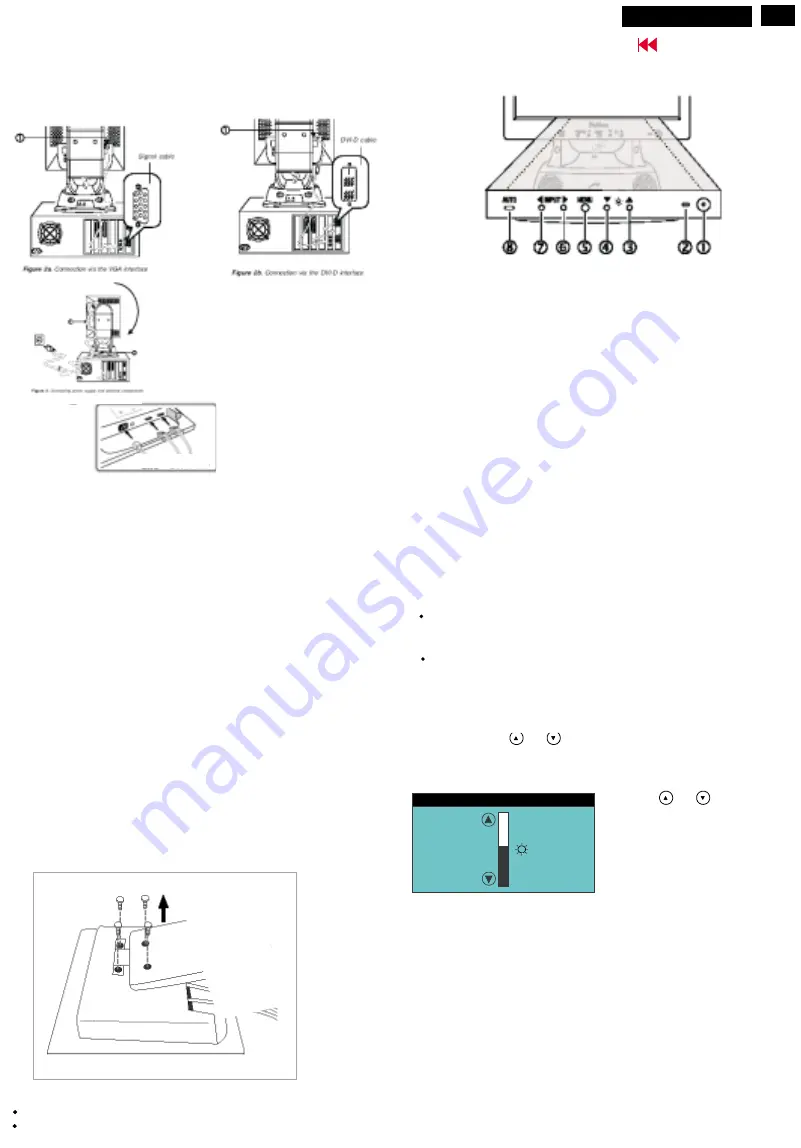
Connecting cables to the monitor
The monitor ports are protected by a cover.
1 = Power connector
2 = DVI-I connector
3 = D-SUB connector
The data cable supplied has two 15-pin D-SUB connectors for
the D-SUB connector of the monitor and of the computer.
Connect one of the D-SUB connectors of the data cable to the
D-SUB connector on the monitor (3) and secure the plug-in
connection by tightening the safety screws.
If instead of the data cable supplied you want to use a data cable
with DVI-I connector or if you want to connect the monitor to a
second computer, proceed as follows:
Connect the DVI-I connector of the data cable to the DVI-I
connector on the monitor (2) and secure the plug-in connection by
tightening the safety screws.
Data cables with DVI-I connectors are available from specialised
dealers.
After switching on the monitor you must select the desired input
with the OSD menu .
Switching the monitor on/off
The ON/OFF switch (1) is used for switching the monitor on and
off.
The power indicator (2) glows green when the monitor and
computer are switched on. The power indicator glows orange
when the monitor does not receive a video signal or is in the
energy-saving mode. The power indicator goes off when the
monitor is switched off.
3~8 = Buttons for the OSD menu(On-Screen-Display)
2 = Power indicator
1 = Power button
Monitor settings with the buttons of the control panel
With the buttons of the control panel, you can make the following
settings directly: auto-adjustment of the monitor, adjusting the
brightness and adjusting the contrast.
Other settings are carried out via an integrated OSD menu (On-
Screen Display).
Performing auto-adjustment of the monitor
Press the AUTO button.
The picture quality (
,
) and picture position will be
optimally adjusted for your system.
Press the MENU button to save the settings.
The brightness of the monitor is adjusted directly with the arrow
buttons.
PHASE CLOCK
Adjusting the brightness
Press the button
or
.
BRIGHTNESS
Press the
or
button to adjust
the brightness.
The setting window disappears after
approximately 60 seconds if no
further setting is made.
All changes are stored automatically.
B R I G H T N E S S
50
The window
with a setting scale is visualised.
Removing the monitor base
The monitor surface is susceptible to scratching!
Lay the monitor on its face on a soft surface.
Remove the four screws on the rear of the monitor.
1
2 3
Max 101830
Содержание 101830
Страница 30: ...9 Go to cover page 30 Max 101830 Schematic diagram Power...
Страница 32: ...Power Board C B A 31 Max 101830 Go to cover page...
Страница 33: ...9 Go to cover page 32 Max 101830 Schematic diagram Video Input Schematic diagram DC_Powers...
Страница 35: ...9 Go to cover page 34 Max 101830 Schematic diagram Scaler...
Страница 36: ...9 Go to cover page 35 Max 101830 Schematic diagram Frame_Beffer...
Страница 43: ...Inverter Diagram PWB AMBIT 9 Go to cover page 42 Max 101830...
Страница 44: ...43 Max 101830 Go to cover page Inverter Diagram PWB AMBIT...
Страница 45: ...44 Max 101830 Go to cover page Schematic diagram Control...
Страница 53: ...52 Max 101830 Go to cover page CA110 Application Continued...


