background image

1523.5-0000010 OM 


138

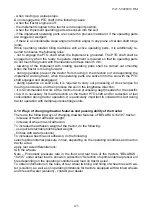
To lower and close mask 4, it is required to do the following: 
- uplift mask 4 a little to release link 3; 
- fix link 3 in the chuck on the mask; 
- lower mask 4 into the lower position until the specific click is heard (lock 1 functioning). 


Mechanism of mask lockup in the open posi-

tion 


Mechanism of hood lockup in the open 

position 


Mounting-dismounting of end trim side pieces 


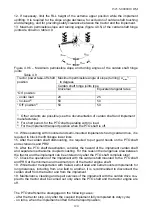
1 – lock; 2 – bracket; 3 – link; 4 – mask; 5 – monocyclone; 6 – hood; 7 – lock; 8 – 

left side bar; 9 – cable; 10 – lock; 11 – cable; 12 – link; 13 – bracket; 14 – bracket; 15 – 
detent; 16 – right side piece. 


Figure 5.2.1 – Mechanism of hood and mask lockup in the open position, mounting-

dismounting of end trim side pieces.  


Содержание 1523.5

Страница 1: ...BELARUS 1 5 2 3 5 1523 5 0000010 OM OPERATOR S MANUAL 2013 ...

Страница 2: ...tion and specifications of tractors Belarus 1523 5 produced by Minsk Tractor Works The main tractors operating rules are set forth the in formation about their adjustments and maintenance is provided Operator s manual is meant for tractor study operation rules and servicing of tractors BELARUS 1523 5 In view of P A MTW policy directed to constant upgrading of produced goods the con struction of so...

Страница 3: ...2 8 5 The order of the integrated indicator programming 36 2 9 1 General information 39 2 9 2 Adjustment of brightness and sharpness of the information display 39 2 9 3 Call up of changeable images and parameters on the screen of the information display 39 2 9 4 Engine control system panel 42 2 10 Steering 42 2 10 1 General information 42 2 10 2 Steering wheel adjustments 43 2 11 Parking brake con...

Страница 4: ... 70 2 26 Creeper control 71 2 26 1 Creeper control on tractors with GB16x8 71 2 26 2 Creeper control on tractors with GB 24x12 72 2 27 Gears and ranges shifting of GB 24х12 72 3 INTENDED USE OF TRACTOR 74 3 1 Safety measures while preparing tractor for operation 74 3 2 Tractor use 75 3 2 1 Boarding the tractor 75 3 2 2 Engine start and preparation for it 75 3 2 3 Start of tractor movement GB shift...

Страница 5: ...ther elements of hydraulically powered coupled machines and implements 115 4 6 Front ballast weight 117 4 7 Trailer brake drive 118 4 7 1 General information 118 4 7 2 Integrated pneumatic drive of trailer brakes 118 4 7 3 Hydraulic drive of trailer brakes 119 4 8 Determination of PTO shaft and cardan shaft applicability 121 4 9 Peculiarities of PTO shaft and cardan shaft applicability 121 4 10 Wa...

Страница 6: ...uel and lubrication materials 169 6 POSSIBLE FAILURES AND INSTRUCTIONS FOR THEIR TROUBLESHOOTING 174 6 1 Possible clutch failures and instructions for their troubleshooting 174 6 2 Possible failures in gearbox and instructions for their troubleshooting 177 6 3 Possible failures in the electronic control system for rear axle differential lock front driving axle drive front power take off shaft GB r...

Страница 7: ...nts for inter shift storage of machines 206 7 3 Requirements for short term tractors storage 206 7 4 Requirements for outdoors long term storage 207 7 5 Preservation 208 7 6 Depreservation and represervation 208 7 7 Putting tractor into operation after long term storage 208 7 8 Safety requirements for preservation 209 8 TRACTOR TOWING 209 Service bulletins 210 ...

Страница 8: ...onal notations ADL automatic differential lock AB accumulator battery DL differential lock RADL rear axle differential lock PLU pilot lamps unit FB fuse block FC fast coupling PTO power takeoff shaft PRS power reception shaft HSC hydrostatic steering control HLL hydraulic lift linkage HS hydraulic system FFVS frequency fuel volume sensor STM shift time maintenance RPTO rear power take off shaft SP...

Страница 9: ...nual control manipulations brake fast handbrake slowly audible beep forward alarm signaling reverse fuel accumulator charging coolant cab dome light heating plugs parking lights engine speed tractor turn indicator oil pressure in the engine tractor trailer turn indicator temperature of engine coolant upper beam low beam off stop working lights on start differential lock gradual adjustment PTO enga...

Страница 10: ...d level in main cylin der tanks air filter clogged oil pressure in HSC engine start beacon road train oil pressure in gearbox external cylinder retracting braking of gearbox external cylinder protracting air pressure in pneumatic sys tem external cylinder floating swivel lever up engine stop swivel lever down ...

Страница 11: ...ation grain crop harvesting as well as for load ing unloading and transportation work if combined with highly productive harvest complex es Tractor BELARUS 1523 5 is a general purpose wheeled tractor of traction class 3 with the wheel arrangement 4X4 Physical configuration of tractor BELARUS 1523 5 is shown in figure 1 1 1 Physical configuration of tractor BELARUS 1523 5 equipped with FPTO and FLL...

Страница 12: ...rated 2 116 1 2 operating 112 4 2 0 f crankshaft rated speed rpm 2 2100 g specific fuel consumption at operating power g kW h 222 7 h rated factor of torque backup at least 2 25 i max torque N m 2 660 20 4 Number of gears а for forward travel 16 3 b for reverse travel 8 3 5 Tractor travel speed design at crankshaft rated speed km h a for forward motion 1 least 1 73 3 2 highest 32 38 b for backward...

Страница 13: ...1950 20 2020 20 2120 20 b for rear wheels from 1600 to 1916 and from 1946 to 2445 12 Least radius of turning circle with brak ing m 5 5 13 Tractor base mm 2760 30 14 Maximum fordable depth m 0 85 15 Service life years 12 16 Overall dimensions mm a length with loads and rear lift linkage in transport position 4710 50 b width along the ends of rear wheel semi axles 2250 10 c cab height 3000 50 17 Ti...

Страница 14: ...__________________________________ ________________________________________ 1 Engine parameters not specified in table 1 1 shall comply with 260 S3В 0000100 OM document 2 For referential use 3 Without a creeper Installation of a creeper against order provides additional four speeds for forward travel and four speeds for the reverse 4 To be specified depending on configuration 5 With ballast mounte...

Страница 15: ...sor with a cantilever arrangement of wheels in relation to supports The system of air purification consists of a dry type air cleaner with two paper filtering ele ments Air ingress with an air cleaner is performed through the monocyclone which pro vides preliminary inertial air cleaning at the expense of tangential inflow and centrifugal forces arising at spiral air rotation in relation to the mon...

Страница 16: ...O drive FDA drive differential lock filtration of transmission oil pressure feed lubrication of gearbox bearings RA planetary gear reducer FDA bearings operation of the clutch hydraulic booster The steering is hydrostatic The feed pump is gear type the direction of rotation is left The dosing pump is gerotor type The type of rotation mechanism is two hydraulic cylinders Ц50x200 of bidirectional ac...

Страница 17: ... sun visor with electrical wipers for front and rear screens with front and rear screen washers with a roof lamp and a place to install a radio set with a system of heating and ventilation against order additional air conditioning Against order the tractor can be equipped with an additional seat The cab doors have got locks there are keys for the left door The right door is for emergency exit The ...

Страница 18: ... dB A External noise level conforms to Directive 2009 63 ЕС and does not exceed the value 89 dB A 1 6 Tractor and its component marking A metal nameplate is fixed at the rear of the cab on the right side as shown in figure 1 6 1 Additionally the tractor serial number is applied by means of percussion on the right side member and duplicated on the right plate of the front ballast weight Figure 1 6 ...

Страница 19: ...f clutch casing Number of gear box to the left along the tractor movement Transmission and rear axle serial number at the rear wall of rear axle casing on the left side below FDA number on the tube of the bar in front Cab serial number Serial number FDA serial number Gearbox configura tion num ber FDA configuration number ...

Страница 20: ...10 OM 20 2 CONTROLS AND INSTRUMENTS 2 1 Layout of controls and instruments of the tractor Controls and instruments located in the tractor cab are shown in figure 2 1 1 Figure 2 1 1 Tractor controls and instruments ...

Страница 21: ...ol pedal 27 right brake control pedal 28 fuel supply control pedal 29 range shifting lever of gearbox 30 gear shifting lever of gearbox 31 RLL control panel 32 rear axle DL and FDA drive control panel 33 engine control board 34 hydrolinkage system distributor control handles 35 rear PTO control lever 36 fuel supply control lever Against order your tractor may be equipped with a fan heater instead ...

Страница 22: ...eft turn according to figure 2 2 3 After tractor turning the lever automatically returns to the initial position To switch on road headlights set central light switch 5 fig 2 2 1 into the position III as it is shown below and set the under wheel switch lever into the intermediate position в lower beam according to figure 2 2 3 For switching on upper beam push the switch lever against the stop posi...

Страница 23: ...ments on the dashboard and also parking lights on a trailed machine are on intermediate position position III all consumers of II position and road headlights are on lower part of the button is pressed against the stop as in fig 2 2 1 While pressing the button of front working lights switch 6 fig 2 2 1 two front working lights located on front light brackets are actuated together with a light indi...

Страница 24: ...r screen washer are on simultaneously non fixed During tractor operation on forward motion cut out switch 8 fig 2 1 1 shall be in on po sition i e in the upper position Pressing cut out button 6 fig 2 3 1 activates Road train signal lights and an indicating lamp built in the button the Road train lights are installed against order 1 flash beacon cut out button 2 cut out button of front working lig...

Страница 25: ...N TRAC TOR FILLING AND LUBRICATION WITH FUEL AND LUBRICATION MATERIALS To set the conditioner into the heating mode do the following after refilling the cooling system with the cooling fluid start the engine and let the engine run at medium idle without opening the heater control valve to reach 70 80 C of cooling system temperature then open the heater control valve with handle 2 figure 2 4 2 to d...

Страница 26: ...coolant circulates through the heating radiator The heating radiator shall start warming up In this case the level of coolant in the engine cool ing system shall come down refill coolant in the expansion tank to the half of the expansion tank capacity switch on the heater fan with the help of switch 6 and direct the air flow with the help of deflectors 7 the volume of air ventilated into the cab c...

Страница 27: ... the transmission hydraulic system 1 figure 2 6 1 indi cates oil pressure in the hydraulic system of friction clutches control in tractor transmis sion The scale of oil pressure gauge has three zones operating from 800 to 1500 kPа green color emergency two from 0 to 800 kPa and from 1500 to 1800 kPa red color Normal operating oil pressure in the hydraulic system of the transmission is from 900 to ...

Страница 28: ...he tank drops below 1 8 of the total tank volume ATTENTION DO NOT LET THE TANK BECOME EMPTY THE GAUGE POINTER IS IN THE ZONE OF ORANGE COLOR 2 6 5 The gauge of engine coolant temperature 9 has three zones operating from 80 С to 105 С green color informational from 40 С to 80 С yellow color emergency from 105 С to 120 С red color Emergency temperature lamp red color 8 is built in the scale which op...

Страница 29: ...ilter is clogged to the max figure 2 7 1 lights up when the max permissible level of filter dirtiness is exceeded and the filter requires cleaning pilot lamp 2 to indicate emergency oil pressure drop in the system of hydrostatic power steering lights up when the oil pressure in the system of hydrostatic power steering drops below 0 08 MPa periodic lighting up of the lamp 2 with engine minimal spee...

Страница 30: ...uously with 2 Hz fre quency This means that there is a failure in the heating plug operation all heating plugs are closed circuit or their connection is disturbed disconnected from the heating plug con trol unit the heating plug control unit is not powered or the power supply wire is damaged In case of short circuit the heating plug control unit cuts power supply 12V to the heating plugs after the...

Страница 31: ...w color 11 pilot lamp to indicate headlights upper beam switching blue color 12 pilot lamp to indicate switching of trailer turn blinkers green color 13 pilot lamp to indicate switching of tractor turn blinkers green color 14 pilot lamp to indicate parking brake engagement red color 15 pilot lamp to indicate in creased voltage in on board system red color 16 pilot lamp to indicate low level of coo...

Страница 32: ... 1 indicates rotation frequency of the engine crankshaft on a needle indicator Information on engine speed comes from the electronic control unit The range of speed indications is from 0 to 3500 rpm 2 8 2 3 RPTO speed gauge 3 figure 2 8 1 displays the RPTO speed on a light indicator The rear PTO speed gauge is actuated by signals coming from a pulse speed sensor in stalled above the toothed washer...

Страница 33: ...2 7 1 1000 rpm 650 1150 4 580 1050 5 500 950 7 420 850 8 320 750 2 9 ______________________________________________________________________ _____________________________________ 1 the annunciator of the range of 540 rpm of the rear PTO speed scale is actuated only if there is a signal from the sensor and switches off when the annunciator of the range of 1000 rpm of the rear PTO speed scale turns o...

Страница 34: ...om the engine control unit and stores it when the power supply is off The range of engine time indications is from 0 to 99999 hours Instant fuel flow l h In this mode a current value of the instant fuel flow with a resolution of 0 1 l h is displayed On board voltage V In this mode a current value of on board voltage with an accuracy of 0 1 V is displayed in a digital form Remaining fuel vol ume in...

Страница 35: ...2 of the multifunction display irrespective of the information currently dis played With successive pushing the Mode button of the integrated indicator control module the messages shall be listed in turn After listing the last message and the repeat ed pressing Mode button the multifunction display changes into displaying the cyclic mode of the operating parameters specified before The fault messa...

Страница 36: ...he parameters on LCD A diagnostic connector ХР1 located on the front surface of the control panel makes it possible to perform automatic programming reprogramming of the integrated indicator II by means of a special device if provided In case such a device is not pro vided the programming shall be performed by means of the above mentioned buttons On BELARUS 1523 5 tractors the ХР1 connector is not...

Страница 37: ...g When the Mode button is pressed once in the programming mode entering of an arbi trary parameter value is not possible When none of the buttons Mode Parameter or Value is pressed for seven seconds in the mode of unfixed value input the II automatically switches to the main multifunction in dicator operation mode and all set parameter values are saved It is allowed to enter one unfixed parameter ...

Страница 38: ... of the engine This parameter cannot be modified it is the precise number to 0 01 of hour of en gine service hours ______________________________________________________________________________ __________ 1 830 is the value for tires 520 70R38 When mounting another type of tires it is required to set the parameter value R which corresponds to the rolling radius of the mounted tires 2 On tractors B...

Страница 39: ...ess and sharpness 7 figure 2 9 1 press button 5 Images of buttons are given in the screen lower part Pressing button 1 decreas es brightness pressing button 2 increases brightness pressing button 3 decreases sharp ness pressing button 4 increases sharpness and pressing buttons 1 2 3 4 at the same time adjusts to an average value of sharpness and max brightness Repeated pressing button 5 exits the ...

Страница 40: ... 1 changes the parameters displayed in the upper left corner pressing button 2 changes the parameters in the upper right corner button 3 in the lower left corner button 4 in the lower right corner The parameter choosing mode is exited with short time pressing button 5 After calling up the button panel by pressing button 3 graphical displaying of parameters in the course of time is activated functi...

Страница 41: ...y the engine electronic control unit V Fuel consumption l h Fuel delivery pressure kPa Air pressure at the inlet pipe kPa Engine oil pressure kPa Barometer pressure kPa Engine oil temperature С Fuel temperature С Temperature of coolant in the en gine С Air temperature at the inlet pipe С Accelerator position Use of turning torque rpm Engine torque requested by the driver Torque consumption Engine ...

Страница 42: ...side as it is shown in figure 2 9 2 After turning the key of the starter and instrument switch from the position Off into the position Instruments are on the system is powered After powering the system it carries out a self check If there are no errors in the system operation fault testing annunciator 2 on the panel of engine control system shall turn on and go out which shows the workabil ity of ...

Страница 43: ...e steering column Figure 2 10 1 Steering wheel adjustment ATTENTION WHEN FIXING THE STEERING COLUMN IN THE EXTREME FRONT PO SITION SET THE GEAR SWITCH LEVERS OF GEARS AND RANGES INTO A NEU TRAL POSITION START THE ENGINE AND WITH THE TRACTOR NOT MOVING MAKE SURE THE STEERING CONTROL OPERATES WELL 2 11 Parking brake control Upper position of the lever 22 figure 2 1 1 parking brake On Lower position ...

Страница 44: ...schemes 2 and 4 as it is shown in figure 2 14 1 1 lever to switch ranges of gearbox 2 scheme of switching GB ranges 3 lever to switch gears of gearbox 4 scheme of switching GB gears Figure 2 14 1 GB 16х8 control 2 14 2 Velocity diagram of tractor with GB 16х8 The table of BELARUS 1523 5 tractor velocity diagram figure 2 14 2 on tires of basic configuration is attached to the cab right window Figur...

Страница 45: ...0 annunciator of FPTO activation 11 FPTO con trol switch Figure 2 15 1 Control panel for rear axle DL FDA and FPTO drives Annunciators of activation of GB reduction unit higher and lower pass 6 and 7 fig ure 2 15 1 are mounted only on tractors with GB 24x12 The operation order of annuncia tors of GB reduction unit pass activation is given in subsection 2 27 Switching of GB 24x12 ranges and gears O...

Страница 46: ...r position The mode FDA off is used when moving on roads with hard surface when the traveling speed is above 13 km h in order to avoid increased wear of front wheel tires In the position FDA automatic control the FDA drive is automatically engaged when the rear wheel skidding limit is exceeded The FDA drive is disengaged automatical ly as the rear wheel skidding drops below the limit Annunciator 2...

Страница 47: ...ngaged automatically when the guide wheels turn to the angle above 13 or when any or both brake pedals are depressed In this case annunciator 4 goes out The mode DL automatic control is disengaged by setting switch 5 into the position DL off Annunciator 4 goes out Use the mode DL automatic control when carrying out operations with significant relative skidding of rear wheels If rear axle DL short ...

Страница 48: ...ENDENT DRIVE INTO THE NEUTRAL POSITION IS PERFORMED IN THE SAME WAY Note The PTO control lever 2 in figure 2 16 2 is set into the position PTO off 1 instruction plate for rear PTO control 2 rear PTO control lever Figure 2 16 2 Rear PTO control lever Switching between the rear PTO speed of 540 and 1000 rpm is carried out exclu sively by installing the corresponding PTO shaft end extensions that hav...

Страница 49: ...on tractors BELARUS 1523 5 with GB 24x12 Note In figure 2 16 3 the position PTO standard mode on is set Note The RPTO operation is controlled with the integrated indicator as specified in sub section 2 8 2 Assignment and operation principle of the integrated indicator gauges While tractor operation without using the RPTO it is required to set the handle of the RPTO drive activation into the neutra...

Страница 50: ...r of RLL control is the following set a method of control depending on type of operation with handle 8 figure 2 17 1 Turning the handle clockwise against the stop is a position method of control contraclock wise against the stop draft control in between combined control the combined control is preferential set the required admissible height of implement uplifting in transport condition with han dl...

Страница 51: ...FIGURE 2 17 1 INTO THE POSITION OFF AFTER STARTING THE MOVEMENT SHIFT THE HANDLE INTO THE POSITION LOWERING THE IMPLE MENT WILL PENETRATE TO THE DEPTH SET BEFORE It Is required to know the following operation peculiarities of RLL control system after the engine start diagnostics annunciator 5 lights up indicating the control system workability and blocking to unblock the system set handle 11 into ...

Страница 52: ...cator 11 figure 2 17 2 is not used on BELARUS 1523 5 tractors The rules on using the RLL control panel ПУ 03 manufactured by Izmeritel plant are sim ilar to the rules on using the RLL control panel produced by BOSCH company shown in figure 2 17 1 2 17 3 Remote buttons of RLL control system Remote buttons of RLL control are used as a rule for coupling agricultural implements and machines to the rea...

Страница 53: ...r the engine start annunciator 5 begins to show code information of the failure If necessary the system gets blocked The failure code is displayed as a two digit number where the first digit is equal to the number of flashings of annunciator 5 after the first long pause and the second digit is equal to the number of flashings after the second long pause For example the operation algorithm of annun...

Страница 54: ... system is the same 2 17 5 Front lift linkage control The front lift linkage installed against order is controlled by handle 2 or 3 figure 2 19 1 which in their turn control the second and the third sections of the hydraulic valve group respectively Note Connection of the FLL control to the first section of the hydraulic valve group having the fixed position uplift is not reasonable as this sectio...

Страница 55: ...eached from 17 5 to 19 5 MPa Your tractor can be equipped with a valve group of the hydraulic unit RP70 1523 1 where handle 1 does not have the mechanism of auto matic return from the uplift position In this case after performing the uplift operation handle 1 shall be returned to the neutral position manually а for tractors with the integrated block of b for tractors with the hydraulic unit RP70 1...

Страница 56: ...y not be equipped with free drain outlet 2 20 Switching unit and electric cutout fuses 2 20 1 General information Electric cutout fuses are intended for the protection of electrical lines against overloads and short circuit WARNING TO AVOID BURNING OF TRACTOR WIRING NEVER USE FUSES WITH CURRENT RATING HIGHER THAN THE RATINGS SPECIFIED IN THIS SECTION IF A FUSE OFTEN BURNS OUT FIND OUT THE CAUSE AN...

Страница 57: ... 1 screw 2 cap 3 switching unit 4 instrument panel Figure 2 20 1 Switching unit mounting The unit consists of thirty cutout fuses 1 figure 2 20 2 FU1 FU30 and eighteen electro magnetic relays 4 K1 K7 K9 K19 relay K8 is not mounted commutating current supply for consumers a set of spare fuses 5 Signal led lamps of red color 2 located on the front board near each fuse are intended for indication of ...

Страница 58: ...formation on fuses and relay assignment as well as fuse ratings is given in tables 2 8 and 2 9 Table 2 8 Assignment of switching unit fuses Fuse designa tion Fuse assignment protected electric circuit Fuse rating FU1 Reserve 20А FU2 Lower beam of right road headlight 7 5А FU3 Lower beam of left road headlight 7 5А FU4 Road headlights upper beam 15А FU5 Reserve 20А FU6 Rear screen washer and wiper ...

Страница 59: ...U28 Annunciation of tractor and trailer turning 7 5А FU29 Remote disconnect switch of accumulator battery 15А FU30 Power supply of relay coil of instruments illumination and tractor parking lights engagement 20А Table 2 9 Relay assignment Relay desig nation Relay assignament К1 Radioset stereo recorder К2 Rear working lights a pair of inner lights К3 Conditioner К4 Rear working lights a pair of ou...

Страница 60: ...pment harnesses to the swithing unit is shown in figure 2 20 5 а connection of electrical harnesses to BKА 7 3722 b connection of electrical harnesses to BK 1 Figure 2 20 5 Diagram of equipment harnesses connection to the switching unit Power supply harness Orange wire for starter coil Dashboard harness Green wire for starter coil Dashboard harness Load wire Harness of roof EE Harness of EE on the...

Страница 61: ... 20 7 1 power fuse of the instrument board before engine start and of the main accumulator battery charging circuit with rated value of 80 А 2 duplicate fuse 3 additional sus pended power fuse of a radio recorder with rated value of 25A 4 power fuse of a radio recorder with rated value of 60A 5 EECS constant supply fuse in any position of the ac cumulator battery switch with rated value of 60А 6 f...

Страница 62: ... 4 power fuse of the switching unit with rated value of 60А 5 fuse block Figure 2 20 9 Fuses located in the engine area Fuse 2 figure 2 20 10 of voltage converter 1 is built in the VC casing 1 voltage converter 2 voltage converter fuse with rated value of 20А Figure 2 20 10 Installation of voltage converter fuse Voltage converter 12 24W is installed before the radiator block on the right as viewed...

Страница 63: ... 2 20 13 Fuses for ECS of DL FDA GB reduction unit FPTO and RLL Five cutout fuses figure 2 20 13 protect the following electric circuits from overcharge 1 FDA drive control 7 5 А 2 rear axle DL control 7 5 А 3 FPTO control if mounted 7 5 А 4 RLL control 7 5 А 5 GB reduction unit control if mounted 15 А 6 duplicate 7 5 А GB reduction unit FPTO FDA DL Cable colors K red O orange P pink Ч black Ж yel...

Страница 64: ...ew 3 figure 2 20 14 on cap 2 of side console 1 and open the cap The EECS block fuse is fixed to the element of the cab housing 1 side console 2 cap 3 screw 4 EECS block fuse Figure 2 20 14 The location of EECS fuses The EECS fuses are shown in figure 2 20 15 1 block fuse 2 power fuse of the engine electronic control box 3 4 duplicate fuse 5 power fuse of the reagent AdBlue hose pipe heaters discha...

Страница 65: ...o close it from outside do the following insert key 1 into the hole of the cylinder mechanism which is located in button 2 without pressing button 2 turn the key into the position close To open the left door lock outside the cab it is necessary to insert key 1 into the hole of the cylinder mechanism which is located in button 2 and without pressing button 2 turn the key into the position open then...

Страница 66: ...ment push board 2 up until hatch 1 is fixed in an open position To close hatch 1 pull board 2 down until the hatch is fixed in the closed position 1 hatch 2 board 3 detent Figure 2 19 4 Opening of hatch with the detent To open the hatch with the handle move handle 2 figure 2 19 5 down and push it up Then fix hatch 1 in an open position pressing handle 2 to the right as viewed along tractor movemen...

Страница 67: ... reciprocal movement longitudinal adjustment It is carried out by means of handle 2 within the range of 80 mm from the middle position To move the seat forward backwards it is required to pull handle 2 up move the seat and then release the handle The seat will automatically get locked in a required position adjustment of the backrest tilt angle a For the seat BELARUS 80 6800010 the backrest tilt a...

Страница 68: ...o pull handle 2 up move the seat and then release the handle The seat will automatically get fixed in a required position adjustment of the backrest tilt angle The backrest tilt angle is adjusted by means of lever 4 within the range from minus 10 to plus 35 To change the backrest tilt angle it is required to pull handle 4 up against the stop move the backrest to the necessary direction to achieve ...

Страница 69: ...ve as sembly 4 and then fix lever 1 in the position I again Note Figure 2 23 1 shows the position the transmission hydraulic system pump drive on ATTENTION TURN THE TRANSMISSION HYDRAULIC SYSTEM PUMP DRIVE ON AND OFF ONLY WITH THE ENGINE NOT RUNNING OR WITH MIN IDLE SPEED OF THE ENGINE 2 24 Control of the pneumatic system compressor Handle for the pneumatic system compressor engagement 1 figure 2 ...

Страница 70: ...ic units the activity of which can influence the readings of tractor instruments Thus the used electrical instru ments shall have a certificate of electromagnetic compatibility according to international requirements Connect electrical equipment of coupled machines to the following elements of trac tor electrical equipment 1 Seven pin socket type 12N GOST 9200 figure 2 25 1 permissible input curre...

Страница 71: ...e the required gear with the gear levers and re leasing the clutch pedal smoothly shift up link 2 of the creeper farthest from the driver s seat to change the gear depress the clutch pedal engage the required gear with the gear lev ers and release the clutch pedal smoothly to turn off the creeper force link 2 in and pull link 1 out until pushers of both links get se cured by the securing mechanism...

Страница 72: ...r of GB reduction unit 3 diagram of GB reduction unit gear and pass shifting 4 diagram of GB range shifting 5 button of GB reduction unit lower pass L activation 6 button of GB reduction unit higher pass H activation 7 annunciator of GB reduction unit lower pass activation 8 annun ciator of GB reduction unit higher pass activation Figure 2 27 1 Gearbox 24х12 control Setting the required gear is pe...

Страница 73: ...r and pass shifting lever of GB reduction unit 2 into the position Neutral The velocity diagram table of tractor BELARUS 1523 5 on tires of basic configuration is attached to the cab right window and is shown in figure 2 27 2 Figure 2 27 2 The velocity diagram of tractor BELARUS 1523 5 with GB 24х12 ...

Страница 74: ...latform with the nuts of basic wheel configuration at tached in a set of spare parts tools and accessories Tighten the nuts with a torque of 200 250 Nm The tractor shall be run in in accordance with the requirements under subsection 3 4 Tractor final assembly and run in The tractor shall be completely outfitted and in good working order DO NOT dismantle design stipulated protective enclosures or s...

Страница 75: ...f there are no errors in the sys tem operation the fault testing annunciator on the engine control system panel shall light up and go out it confirms the annunciator lamp workability and its correct connection to the tractor on board system If any errors are detected the testing annunciator provides a light code of the fault The detected faults shall be eliminated before the engine start 3 The inf...

Страница 76: ...ation a pilot lamp indicating the charge of additional AB with the voltage of 24W shall go out after the engine start it indicates that the additional AB with the voltage of 24W is being charged through the voltage converter If the pilot lamp indicating the charge continues to glow after the engine start it indicates that the additional AB is not being charged and it is required to eliminate the f...

Страница 77: ... according to the speed shifting diagram before setting the required gear on tractors equipped with GB 24x12 if necessary press the GB reduction unit higher pass H activation button In this case a LED lamp of red color lights up on the handle of GB reduction unit gear and pass shifting lever and the an nunciator of GB reduction unit higher pass activation lights up on the control panel of rear axl...

Страница 78: ... brakes engage the parking brake ATTENTION FOR TRACTOR EMERGENCY STOP PRESS THE CLUTCH AND BREAK PEDALS TOGETHER SHARPLY 3 2 5 Engine stop ATTENTION BEFORE STOPPING THE ENGINE LOWER LIFT LINKAGES UNTIL THEY REACH THE GROUND IF THEY ARE UPLIFTED LET THE ENGINE RUN AT 1000 100 RPM FOR 3 TO 5 MINUTES THIS ALLOWS TO REDUCE ENGINE COOL ANT TEMPERATURE To stop the engine do the following set the rear PT...

Страница 79: ...ents ATTENTION TO EXCLUDE IMPACT LOAD ENGAGE THE REAR PTO AT ENGINE SPEED CLOSE TO MINIMUM BETWEEN 1000 AND 1100 RPM THEN ENGINE SPEED SHALL BE INCREASED The rear PTO has 6 changeable shaft end extensions One shaft end extension of type 3 20 splines 45mm or of type 2 21 splines 35mm is mounted on the tractor the others are attached to the spare parts tools and accessories kit of the tractor agains...

Страница 80: ...n Clockwise _____________________________________________________________________________ _________ 1 Can be completed against order 2 PTO shaft end extension rotation speed when the engine crankshaft rated speed is 2100 rpm Table 3 2 Specifications of the rear PTO shaft end extension operation when the syn chronous drive is on with rear tires 520 70R38 basic configuration when the engine rat ed s...

Страница 81: ...TS AND TOOLS FOR CONNECTING CARDAN SHAFT TO THE SHAFT END EXTENSION OF TYPE 3 ARE REQUIRED The rules for FPTO activation and deactivation mounted against order are given in sub section 2 15 RADL FDA and FPTO drives control panel The rules for FPTO coupling with different types of agricultural machines and implements are given in section 4 Coupling of implements FPTO is completed with the shaft end...

Страница 82: ...ire turning on rims wearing of tire bead against rim edge cracks on tire sides appear ply separation or rupture of a tire tear out of tire valve for tubed tires Operation with tire pressure set higher than the norm results in the following wheel fail ures noticeable increased wear of tires stretching of carcass layers and decrease of tire flexibility increased skidding of wheels increased sensitiv...

Страница 83: ...0 km h Total loading capacity of twinned tires shall not exceed the loading capacity of a single tire by more than 1 7 times When twinning tires make sure the pressure in outer tires is 1 2 1 25 times lower than the pres sure in inner tires Rear wheel tires 18 4R38 is an alternative configuration 3 2 8 2 Tire inflation Inflate tires through an air bleed valve of pressure regulator 1 figure 3 2 3 f...

Страница 84: ... tie bolts Remove the blind plugs from the dis mounting holes Screw in the bolts which were screwed out from the bushings into the dismounting threaded holes in case it is impossible to squeeze out the bushings with the help of tie bolts 1 fill kero sine or other penetrant into the split between the bushings and the hub group housing wait for some time and then screw in the dismounting bolts tappi...

Страница 85: ...6 160 0 2 1946 2445 250 0 ATTENTION WHEN SHIPPED FROM THE WORKS REAR WHEELS ARE MOUNTED ONTO THE WHEEL TRACK ACCORDING TO DIAGRAM 1 FIGURE 3 2 5 Note To get information on the rules of rear wheel track setting on tires 18 4R38 alterna tive configuration address your dealer 3 2 10 Rear wheel twinning With an aim to improve gripping properties of the tractor when coupled with heavy agricul tural imp...

Страница 86: ...e 3 5 Front wheel track adjustment Variants of mounting the disk and the rim Disk offset Х mm Tractor track К mm tire 420 70R24 Description of mounting method Standard disk mounting with rim displacement 140 1535 Main position The inner surface of the disk mates with the gear group flange the disk is located from the outer side of the wheel support 90 1635 Ex works condition The rim is displaced i...

Страница 87: ...ining nuts of the wheel disk to the gear group flange take the wheels off and change from one sideboard to the other one to obtain the track by changing disk position in relation to the rim with the wheels taken off the tractor unscrew the retaining nuts of the wheel rim to the disk and depending on the track re quired set mutual arrangement of the rim and the disk as shown in the diagram in table...

Страница 88: ...n your country Transport operations may be carried out by operators having not less than two years of tractor operation experience and those who have passed exams on traffic regula tions Drive the tractor on slippery roads with automatic DL engaged only at a speed of not higher than 10 km h Using the tractor for transport operations do the following set a track 1635 20 for front wheels and 1840 20...

Страница 89: ... the engine running Operate the tractor at night time with lighting devices on and being in good working order If used improperly your tractor can be dangerous for you and for other people Avoid using equipment not intended for installation on the tractor Make sure any additional equipment or auxiliary units are mounted correctly and that they are intended to be used with your tractor To prevent t...

Страница 90: ...rque from the tractor PTO to the implement working units shall be safeguarded While operating with stationary machines driven by the PTO always engage the parking brake and lock rear wheels at the front and at the back Make sure the machine is securely fixed Make sure the safeguards of the PTO shaft end extensions are mounted and if the PTO is not used put back the cap of the PTO shaft end extensi...

Страница 91: ...other protective units removed from heated parts of the engine Do not use open fire to warm up oil in the engine sump to fill in fuel tanks to burn out dirt in a radiator cell In case a fire bed occurs cover it with sand canvas cloth sackcloth or other dense tex ture Use a carbon dioxide fire extinguisher Do not pour water over burning fuel and oil Make sure there are no flammable materials near t...

Страница 92: ...available check engine lighting and warning devices workability brakes and steering control work ability and functioning of other systems and units of the tractor using standard control gages Before starting to run in check tightness of retaining bolts of the hubs the tightening torque shall make from 360 to 450 Nm tightness of the retaining nuts of rear wheels to the hub the tightening torque sha...

Страница 93: ...torque of 100 to 140 N m and two crown nuts M20x1 5 of the steering link ball pins To tighten the crown nuts remove the cotter pin first tighten each crown nut with a torque of 100 to 140 N m then turn each crown nut until the nearest notch on the nut coincides with a hole in the ball pin and then fasten with a cotter pin check and if necessary tighten outer threaded links drain condensate from th...

Страница 94: ...dows it is required to turn the handle for opening the window to the working position working position the window is opened then press the handle in the direction opposite to the tractor forward movement until the guide pin fully goes out and open the window completely If it is not possible to open the emergency exits break the window of an emergency exit with a heavy subject at hand and leave the...

Страница 95: ...ons and also local con ditions i e agrotechnical requirements soil conditions personal experience guidelines of corresponding regional advisory centers and institutions of agricultural industry ATTENTION INSTRUCTIONS AND INFORMATION ON SPECIFIC ASPECTS OF THE IMPLEMENTS USE WITH THE TRACTOR INCLUDING GUIDELINES ON THE REC OMMENDED TRACTOR SPECIFICATIONS ARE PRESENTED IN OPERATIONAL DOCUMENTATION F...

Страница 96: ...sport position do not touch the ground While changing the implement position from operating to transport the point of the implement connection to the tractor is forcedly displaced up to the new point semi mounted implement is fixed in three points to the LL upper and lower links or only in two points to the LL upper and lower links The tractor can carry the weight of an imple ment in transport pos...

Страница 97: ...38 both sin gle and twinned mounted on the tractor and with standard static radius specified by the tire manufacturer Rear lift linkage consists of three links upper and two lower links coupled with the tractor with front ends by means of hinged joint and with rear ends with free hinged joints for connection to the link pins of the implements coupled RLL is designed for connection of rear position...

Страница 98: ... least 100 mm 4 Adjustment of both buckles length The adjustment is carried out in the following cases during transportation of the implement buckles shall be blocked to limit the implement swaying to avoid tractor elements damage in case of an accident during tractor operation with mounted semi mounted tilling machines it is required to use the adjustment buckle locked or buckle unlocked accordin...

Страница 99: ...ovides the following performance capa bilities for RLL adjustment of lower links lifting and lowering speed limiting of lower links rising height choice of the required way of adjustment of lower links positions adjustment of soil processing depth possibility to work with implements with depth control of operating parts travel height depth adjustment is carried out by the implement support wheel N...

Страница 100: ...ts 5 Lower links length mm 1060 1060 6 Hinged joint width of the upper lower link mm 51 45 51 45 7 Diameter of a rear end hinged joint pin of the upper link mm 32 25 8 Diameter of holes in rear hinge joints of lower links mm 37 28 7 9 Distance between PTO shaft end extension butt end and suspension axis mm 585 597 10 Column height 1 mm 685 610 11 Length of the suspension axis along the shoulders 1...

Страница 101: ... one plane а buckle locked b buckle unlocked 1 screw 2 guiding pin 3 linch pin 4 slide piece Figure 4 3 4 Setting of buckles While tractor operation buckles shall always be locked in one of the two positions buckle locked buckle unlocked Setting of buckles shall be carried out with the implement mounted on lower links rear ends and lowered onto the supporting surface Setting of buckle locked shall...

Страница 102: ...0mm During shipment from the works pins 5 are mounted into the upper holes of yokes 3 lifting rods are adjusted for the length of 780mm While setting pin 5 into the lower hole of yoke 3 the lifting rod length shall be adjusted within 700 to 900mm Setting of the lifting rod shall be carried out in the following way while tractor operation with mounted and semi mounted implements and machines except...

Страница 103: ...ts of category 2 coupling to the tractor RLL it is required to do RLL adjustment in the following way if lower and upper links are completed with grippers mount the corresponding hinge joints of category 2 included into SPTA into the grippers if lower and upper links are completed with hinge joints mount the corresponding reduc ing bushings included into SPTA into the hinge joints set the distance...

Страница 104: ...ation of lower links and adjust it by means of buckles if necessary WARNING SOME TYPES OF MOUNTED OR SEMI MOUNTED IMPLEMENTS CAN TOUCH THE CAB AND DAMAGE IT IT CAN RESULT IN DAMAGE OF THE CAB WIN DOWS AND CAUSE INJURY TO THE OPERATOR CHECK AVAILABILITY OF CLEAR ANCES AT LEAST 100 MM BETWEEN THE UPLIFTED IMPLEMENT AND THE OP ERATOR S CAB Mounting of machines implements to the tractor shall be carri...

Страница 105: ...r 9 is mounted on the turning shaft as well as swivel levers 6 7 Upper link 8 is con nected to lever 9 Lever 9 turns around together with levers 6 7 which provides FLL speci fications improvement while uplifting implements along the whole height of LL operation 1 2 oil pipe 3 4 plate 5 turning shaft 6 7 swivel lever 8 upper link 9 lever 10 hydraulic cylinder 11 lifting rod 12 front power take off ...

Страница 106: ...mounted im plements and quick detachable mounted loads 4 Lower links Dismountable with hinge joints without on board control system 5 Lower links length mm 885 6 Free front hinge joints width for upper lower link mm 51 45 7 Hinge pin diameter of the upper link mm 25 8 Pivot pin bore diameter of lower links mm 28 7 9 Distance between the PTO butt end and suspen sion axis mm 576 10 Column height 1 m...

Страница 107: ...led implement swaying The procedure differs a little while FLL lower links coupling to agricultural implements that have no single lower axle but have ears with pins for coupling For FLL lower links coupling to the implements ears it is necessary to do the following it is necessary to set the dimension 870 mm between the hinge joints centers unscrew turnbuckles counter nuts set the dimension 870 m...

Страница 108: ... turnbuckles 4 figure 4 3 11 of lower links 3 5 loosen the turn buckles take the locating fixtures out of the implement axle release connecting hinge joints of lower links separate lower links take FLL connecting hinge joints off the implement axle uplift FLL and tighten the nuts on turnbuckles turn upper link 2 to the side and put it on detent 1 fixed on the FLL lever pin 1 detent 2 upper link 3 ...

Страница 109: ...unting device of lift type in the form of vertical guiding plates with several openings fixed to the rear joint face of the rear axle body The device is designed for mounting drawbar hitches and provides height ad justment of DH 2V short towing yoke DH 2R python and DH 3V long towing yoke Installation variant diagram of DH 2V short towing yoke is shown in figure 4 4 1 Installation variant diagram ...

Страница 110: ...t c yoke gap depth 40 85 70 d yoke position1 for the implements driven by rear PTO shaft Extreme lower position e distance between the PTO butt end and the connecting pin axis mm 110 160 6 Trailing device for coupling to DH а type Rigid with tractor drawbar clevis b vertical load in hitch point kN not more than 25 c turning angle of the implement trailing device in horizontal plane degrees not les...

Страница 111: ...TO shaft c distance between the PTO butt end and the connecting pin axis 40 Extreme lower position as shown in figure 4 4 2 400 5 Trailing device for coupling to DH а type Rigid with tractor drawbar clevis b vertical load in hitch point kN not more than 20 c turning angle of the implement trailing de vice in horizontal plane degrees not less than 60 d protective device type Safety chain rope 2 e c...

Страница 112: ...nts of tractors semi trailers types having hitch clevis es 4 Distance between the PTO butt end and the connecting pin axis mm 108 5 Connecting pin diameter mm 40 6 Vertical load on DH in hitch point kN not more than 25 7 Protective device type Safety chain rope 1 8 Connection point of the protective device on the tractor Lifting device openings _____________________________________________________...

Страница 113: ...y to change its horizontal position in relation to the RPTO butt end 5 Distance between the PTO butt end and the connecting pin axis mm 400 500 6 Vertical load on DH in hitch point kN not more than 15 12 7 Turning angle of the implement trailing device in horizontal plane degrees not less than 60 8 Connecting pin diameter mm 30 9 Protective device type Safety chain rope 1 10 Connection point of th...

Страница 114: ...ing of trailed semi trailed and semimount ed implements equipped with towing yokes 4 Distance between the PTO butt end and the connecting pin axis mm 668 5 Diameter of crossbeam openings for the con necting pin mm 32 5 6 Vertical load on DH in hitch point kN not more than 3 5 7 Protective device type Safety chain rope 1 8 Connection point of the protective device on the tractor Lifting device open...

Страница 115: ...OTOR CERTAIN OIL SUPPLY IS REQUIRED HYDRAULIC FLU ID SUPPLY ON THE TRACTOR BELARUS 1523 5 DEPENDS ON THE ENGINE RPM FOR THIS REASON THE IMPLEMENT HYDRAULIC DRIVE SHALL BE EQUIPPED WITH ITS OWN FLOW ADJUSTING VALVE In case of using tractor hydraulic system outputs for the coupled implement service it is necessary to ensure the required volume of oil in the tank Oil extraction by cylinders of the co...

Страница 116: ... hydraulic liquid extraction from the tank l not more than 8 0 8 Permissible hydrostatic power take off GSPTO kW not more than 15 0 9 Coupling thread of fast coupling joint sleeves mm oil pressure pipeline and oil drain pipeline free drain oil pipeline М20 1 5 М24 1 5 ________________________________________________________________________ ________________________________________________________ 1...

Страница 117: ...iguration ballast with one row of additional weight of 360kg 8 pieces at 45kg each is shown in fig ure 4 6 1 configuration against order ballast with two rows of additional weight total of 990 kg is shown in figure 4 6 2 configura tion against order 1 additional weight 2 string 3 towing device 4 tension bolts of additional weight and a towing device 5 nut 6 plate 7 bracket Figure 4 6 1 Ballast wit...

Страница 118: ...ic drive as well as tire inflation The diagram of the integrated pneumatic drive is shown in figure 4 7 1 1 compressor 2 line from the engine inlet manifold 3 brake valve double wire 4 brake valve single wire 5 connecting line 6 feed line 7 8 9 connecting heads 10 control line 11 condensate drain valve 12 tank 13 air bleed valve 14 pressure regulator 15 air pressure indicator 16 emergency air pres...

Страница 119: ...e quired to connect the tractor and trailer pneumatic lines when there is no pressure in tank 12 of the tractor ATTENTION BEFORE CONNECTING OR DISCONNECTING THE TRACTOR OR TRAILER PNEUMATIC LINES ENGAGE THE PARKING BRAKE CONNECTION OF TRACTOR AND TRAILER PNEUMATIC LINES SHALL BE CARRIED OUT WHEN THERE IS NO PRESSURE IN THE TRACTOR PNEUMATIC SYSTEM 4 7 3 Hydraulic drive of trailer brakes Tractors B...

Страница 120: ... oil feed line from the HLL pump to the brake valve 7 distribution valve 8 brake liquid feed line 9 oil feed line from the brake valve to the connecting coupling Figure 4 7 2 Hydraulic drive of trailer brakes ATTENTION WHILE THE HYDROSTATIC CONTROL BLEEDING BY MEANS OF OP ERATING BRAKES WHEN THE HYDRAULIC DRIVE OF TRAILER BRAKES IS MOUNT ED IT IS ADDITIONALLY REQUIRED TO LET OUT AIR FROM BRAKE VAL...

Страница 121: ...the implement rotating masses to prevent it from the drive failure during the PTO shaft deactivation There are also integrated safety clutches An integrated safety clutch is a safety clutch which is structurally combined with a clutch of other type for example with a free wheeling clutch ATTENTION MANUFACTURER OF THE IMPLEMENT WITH CARDAN DRIVE FROM THE TRACTOR PTO SHALL INFORM YOU IN ADVANCE ABOU...

Страница 122: ...STRUMENTS OR DEVICES FOR CONNECTING THE CARDAN SHAFT TO THE SHAFT END EXTENSION OF TYPE 3 ARE REQUIRED While the implement cardan shaft connection to the PTO shaft end extension the follow ing rules and requirements shall be observed 1 Check the engaged PTO shaft speed mode for compliance according to the tractor PTO shaft end extension type and the implement PRS installed check the engaged rear P...

Страница 123: ...the cardan shaft manufacturer when needed 9 The length of the cardan shaft maximally driven apart which is permitted for operation shall be of such type when one part of the cardan shaft enters the other for not less than L2 150 mm If the value is below L2 150 mm figure 4 9 4 view А the cardan shaft shall not be operated Sufficiency of overlapping L2 can be checked by rotating or lifting the coupl...

Страница 124: ... mounted implements having cardan drive it is required to block the lift linkage lower links 15 After the cardan shaft dismounting it is required to put guard hoods on the PTO shaft end extensions and PRS 16 After the PTO shaft deactivation consider the hazard of the implement cardan shaft and separate mechanisms coupled coasting For this reason the dangerous area between the tractor and the imple...

Страница 125: ...ing in enclosure and then process the soil in the lengthwise direction it is recommended to work at the minimum soil processing depth needed for the specific crop It is necessary for load reduction on the tractor PTO shaft and for reduction of fuel consumption during tractor operation It is particularly important to consider this fact during tractor operation with multiple purpose tillage units 4 ...

Страница 126: ...CT OF SUBSTANCES USED FOR CHEMICAL TREATMENT OF AGRICULTURAL PLANTS AND SOILS INCLUDING SPRAY TREATMENT FOR THIS REASON WHEN OPERATING WITH CHEMICAL SUBSTANCES THE OPERATOR SHALL WEAR INDIVIDUAL PROTECTIVE EQUIPMENT ACCORDING TO OPERATING CONDI TIONS IT IS FORBIDDEN TO PUT SUBSTANCES USED FOR CHEMICAL TREATMENT OF AGRI CULTURAL PLANTS AND SOILS IN THE CABIN IT IS FORBIDDEN TO ENTER THE TRACTOR CAB...

Страница 127: ...following formula is used for load determination where Т is load N M is mass kg g 9 8 is gravity acceleration m s2 Calculation of load on front tractor axle where Тf is load on front tractor axle N is the amount of tractor operating weight with ballast the unit installed distributed on tractor front axle kg g 9 8 is gravity acceleration m s 2 Calculation of load on the rear tractor axle where Тz i...

Страница 128: ...M is tractor operating weight during calculation ballast weights in the tractor oper ating weight М are not taken into account kg ATTENTION COUPLING OF IMPLEMENTS TO THE TRACTOR SHALL NOT RESULT IN EXCESS OF PERMISSIBLE AXLE LOADING AND LOADS ON THE TRACTOR TIRES ATTENTION MINIMUM WEIGHT OF COUPLED IMPLEMENTS AND BALLAST WEIGHTS SHALL ALWAYS MAKE NOT LESS THAN VALUES AT WHICH LOAD ON THE FRONT TRA...

Страница 129: ...ush force in cutting mode kN not more than 27 0 Overloading protection when in cutting mode Automated protection in loader design Speed of tractor movement with a loader in stalled km h not more than operation speed with load operation speed without load transport speed 6 12 20 Tractor ballasting with a loader installed when necessary 1 Ballast weight on rear lift linkage 2 Water solution in rear ...

Страница 130: ...ss than 60 of tractor op erational weight considering the installed loader weight The right proportion of loads on tractor axles can be achieved by rear axle ballasting with loads solution filled in wheel tires rear counterweight hook on bucket with ballast load attached to rear lift linkage ATTENTION IN THE LOADER OPERATION MANUAL DESIGNED FOR CONSUMERS LOADER MOUNTING ORDER SHALL BE SPECIFIED WI...

Страница 131: ...on with the loader installed it is required to observe safety requirements listed in subsection 3 3 Safety measures while tractor operation Additionally during loader operation it is forbidden to uplift load with weights exceeding those specified in the loader OM fill the loader bucket amain and to work on soft soils place the bucket outside the slope crest when throwing off soil aslope in order t...

Страница 132: ...ds of operation depend ing on specific conditions It is forbidden to let other people drive the tractor with loader Before starting the movement or engaging reverse gear it is necessary to set the signal and make sure there are no people in the area of loader operation It is required to be very careful while moving on the enterprise territory the maximum speed shall be determined by the enterprise...

Страница 133: ...Length Designation 26 27 28 29 30 Diameter М16 М16 М16 М16 М16 Length 23 23 23 23 Designation 31 32 33 34 35 Diameter М16 М16 М16 М16 20 Length 23 23 Designation 36 37 38 39 40 Diameter 20 18 18 М22 М22 Length 54 54 Designation 41 42 43 44 45 Diameter М22 М22 М10 М10 М10 Length 54 54 15 15 15 Designation 46 47 48 49 50 Diameter М10 М20 М20 М20 20 Length 15 40 40 40 28 Designation 51 52 53 Diameter...

Страница 134: ...ng holes arrangement scheme for tractors BELARUS 1523 5 Right Side A BRACKET B FRONT BAR C1 RIGHT SIDE MEMBER C2 LEFT SIDE MEMBER D1 RIGHT PLATE D2 LEFT PLATE E1 RIGHT TUBE E2 LEFT TUBE K REAR AXLE HOUSING Left Side View A View Б View В Bushing ...

Страница 135: ... MAINTENANCE OR ADJUSTMENT SERVICES ETC STOP THE ENGINE AND EN GAGE PARKING BRAKES IN CASE SAFETY GUARDS AND COVERS ARE OFF MAKE SURE THEY ARE MOUNTED BACK AFTER CONDUCTING MAINTENANCE SERVICES BEFORE YOU START OPERATING THE TRACTOR In the process of conducting maintenance services of the hydraulic lift system steering and the transmission hydraulic system it is strictly required to observe oil ch...

Страница 136: ...paration of tractor opera tion in special conditions Maintenance service during storage 2 In case of long term storage _________________________________________________________________________________________________________ __________________________________________________ 1 Information on maintenance services carried out by the operator before during and after tractor run in is given in subsect...

Страница 137: ...emove side piece 8 To remove right side piece 16 it is necessary to open two locks 7 on the right and remove side piece 16 To open hood 6 and fix it in the open position it is necessary to do the following close mask 4 if it was in the open position remove monocyclone 5 open lock 10 by pulling cable 11 take the edges of hood 6 near the cab and open it into the extreme upper position fix hood 6 by ...

Страница 138: ...d lock 1 functioning Mechanism of mask lockup in the open posi tion Mechanism of hood lockup in the open position Mounting dismounting of end trim side pieces 1 lock 2 bracket 3 link 4 mask 5 monocyclone 6 hood 7 lock 8 left side bar 9 cable 10 lock 11 cable 12 link 13 bracket 14 bracket 15 detent 16 right side piece Figure 5 2 1 Mechanism of hood and mask lockup in the open position mounting dism...

Страница 139: ...pper tools of RLL X 14 Check breaks functioning in running order engine steering light alarm devices operability X 15 Drain condensate water from the pneumatic sys tem balloon X 16 Check the condition of wiring wire bundles of the electric equipment in the engine compartment in the cab front area and the condition of visible parts of the wiring X 17 Drain condensate water from the radiator tanks o...

Страница 140: ... 44 Adjust the service brake control X 45 Adjust the parking brake control X 46 Check adjust brake valve actuators of the pneu matic system X 47 Check all joints of the air cleaner and inlet duct for hermiticity X 48 6 Clean and lubricate FPTO spline joints X 49 Check adjust wheel hub drive bearings of FDA X 50 Check adjust bearings of pivot axis of FDA wheel hub drives X 51 Check oil level in the...

Страница 141: ...tion or once a year 80 Adjust the valve adjusting operating pressure in the hydraulic system of transmission located the gearbox centrifuge Depending on oil pressure de viance in the transmission hy draulic system 81 Carry out maintenance service of the engine air cleaner Depending on dirtiness ________________________________________________________________________ __________________ 1 The operat...

Страница 142: ...ired top up the oil through neck 1 after removing cap 2 put cap 2 back 1 oil filler neck 2 cap 3 dipstick Figure 5 4 1 Check of oil level in the engine crankcase ATTENTION DO NOT RUN THE ENGINE WITH THE OIL LEVEL BELOW THE LOWER MARK ON THE DIPSTICK ATTENTION DO NOT TOP OIL ABOVE THE UPPER MARK OF THE DIPSTICK THE OIL BURNS OUT CREATING WRONG IMPRESSION OF LARGE OIL CONSUMPTION 5 4 1 3 Operation 2...

Страница 143: ...he tractor 1 oil filler hole plug 2 oil level indicator 3 HLL tank Figure 5 4 3 Check of oil level in the HLL tank ATTENTION OIL LEVEL CHECKING OPERATION IN THE HYDRAULIC LIFT LINKAGE TANK SHALL BE CARRIED OUT ONLY WITH THE RETRACTED RODS OF RLL HYDRAULIC CYLINDERS AS WELL AS OF THE IMPLEMENTS COUPLED WITH THE TRACTOR 5 4 1 5 Operation 4 Check of oil level in the HSC tank Before checking the oil l...

Страница 144: ...ater radiator 2 lower sealer 3 water radiator plug 4 fan casing 5 junction pipe from the water radiator to the engine 6 bracing 7 drain valve 8 junction pipe from the engine water pump to the water radiator 9 expansion tank 10 expansion tank plug 11 expansion tank fixing clamp 12 steam discharging and compensating pipe Figure 5 4 5 Installation of the engine cooling system elements WARNING THE ENG...

Страница 145: ... for retreading If the tires have defects beyond repair replace the tire A defective tire shall be sent to recycling 5 4 1 9 Operation 8 Check of air conditioner hose fixtures Note The operation shall be carried out while mounting of an air conditioner instead of a fan heater on the tractor Carry out visual inspection of air conditioner hose fixtures Air conditioner hoses shall be properly fixed w...

Страница 146: ...ressure of not more than 0 2 MPa and blow it off by compressed air carry out water radiator cleaning with compressed air Direct the air flow perpen dicular to the water radiator plane from top downward In case of severe water radiator clogging rinse it with hot water under pressure of not more than 0 2 MPa and blow it off by compressed air radiator cores shall be cleaned both from the hood mask si...

Страница 147: ...ndition of visible parts for abrasion melt or damage of outer insulation In case of detection of the above mentioned faults do the following restore the damaged areas using insulation tape eliminate the cause of insulation damage 5 4 1 18 Operation 17 Drainage of condensate water from the radiator tanks of die sel CAC The operation shall be carried out in autumn and winter period every 8 10 hours ...

Страница 148: ...hub bolt retaining nuts and if necessary tighten them up tightening torque for bolts 4 figure 5 4 10 of rear wheel conic hubs shall be from 360 to 450 Nm tightening torque of nuts 3 for rear wheels mounting on hubs shall be from 300 to 350 Nm tightening torque of nuts 1 for front wheels mounting on reducing gear flanges of FDA shall be from 200 to 250 Nm tightening torque of nuts 2 for front wheel...

Страница 149: ...SILICONE CONNECTING PIPES OF THE CAC SYSTEM FOR DAMAGES AND LEAKAGES IN CASE OF DETECTION ANY FAILURES AND DAMAGES IT IS REQUIRED TO FIND OUT THE REASON FOR THEIR APPEARANCE AND TAKE MEASURES TO ELIMINATE THEM IT IS FORBIDDEN TO OPERATE THE TRACTOR WITH THE CAC SYSTEM FAULTY 5 4 2 5 Operation 21 Check of pneumatic pressure in tires Value pressure in front and rear tires shall be chosen according t...

Страница 150: ...ABOUT PRESENCE OF WATER IN THE COARSE FUEL FILTER APPEARED ON THE INFORMATIONAL DISPLAY DRAIN SEDIMENT FROM THE COARSE FUEL FILTER NOT WAITING FOR THE DAY OF REGULAR MAINTENANCE 5 4 2 8 Operation 24 Check of generator and water pump drive belt tension Generator belt tension is considered normal if its deflection on the crankshaft pulley branch the generator pulley is located within 13 18 mm when p...

Страница 151: ...lean the filter cartridge with compressed air under the pressure of not more than 0 1MPa It is required to hold the pipe head at the distance not closer than 300mm from the filter cartridge in order not to damage it mount filter cartridges 7 into frame 8 then mount frame 8 and protection net 5 onto the cab put caps 1 and 3 on bolts 2 and 4 correspondingly perform the above mentioned operations for...

Страница 152: ...ctor 1 Check of air conditioner compressor drive belt tension Belt 2 tension figure 5 4 15 is considered normal if deflection of its side tension lever pulley compressor pulley measured in the middle is within 4 to 6 mm when pressing it by force of 39 2 2 0 N In case this condition is not observed it is necessary to adjust air conditioner compressor drive belt tension 2 Adjustment of air condition...

Страница 153: ...ze Г tighten up nut 8 with the torque from 30 to 50 Nm and splint pin 6 2 Adjustment of clearing И figures 5 4 16 and 5 4 17 between rod 24 of main cylinder 23 and pusher 25 of hydraulic booster 26 remove operating cylinder 23 from bracket 13 after taking out pin 15 set rod 24 in cylinder 23 into the extreme right position against the stop into cover 20 set cylinder 23 into pusher 25 of hydraulic ...

Страница 154: ...ove the hose pipe and mount protection cap 21 check the brake fluid level in tank 1 and if necessary refill it ATTENTION WHILE BLEEDING THE HYDRAULIC SYSTEM OF CLUTCH CONTROL IT IS REQUIRED TO MAINTAIN BRAKE FLUID LEVEL IN TANK 1 BETWEEN THE MARKS MIN AND MAX 1 tank 2 spring 3 bolt 4 8 19 30 nut 5 31 yoke 6 15 32 pin 7 pedal 9 25 pusher 10 piston 11 main cylinder 12 oil pipe 13 27 bracket 14 suppo...

Страница 155: ...d unscrew overflow valve 22 for of the revolution draining brake fluid surplus with air bubbles into the container with brake fluid screw in overflow valve 22 and release the clutch pedal bleed the system until the drained brake fluid has no bubbles remove the hose pipe and mount protection cap 21 check the brake fluid level in tank 1 and if necessary refill it ATTENTION WHILE BLEEDING THE HYDRAUL...

Страница 156: ...ation of which shall be clear without unwanted sounds and rattle In case there are unwanted sounds or rattle it is required to check and if necessary make adjustments specified in subclause 5 4 2 12 2 1 again Pedal 7 figures 5 4 16 and 5 4 17 shall not bear against panel Ж figures 5 4 16 and 5 4 17 After bleeding of the hydraulic system with the engine off the total pedal 7 free travel shall make ...

Страница 157: ...2 The operations of special maintenance shall be performed every 2000 hours of tractor op eration together with the operations of STM TM 1 2TM 1 TM 2 and TM 3 5 4 3 2 Operation 33 Check adjustment of clearances in steering joints To check the backlash and clearances in steering joints 1 figure 5 4 19 of steering link 4 it is necessary to turn the steering wheel to both sides when the engine is run...

Страница 158: ...ovement 3 Measure distance А figure 5 4 20 between rim edges of front wheels 1 and 5 figure 5 4 20 at the height of front wheel centers and make visible marks in the measured plac es 4 Disengage the parking brake drive the tractor forward so that front wheels turn by half revolution and measure distance B between wheel rim edges at the height of wheel cen ters at the back in the marked points 5 If...

Страница 159: ...e cylinders 1 and 2 to get the required pedal free movement lock nuts 7 set pins 6 and splint them Free travel of pedals within 4 to 8mm corresponds to the clearance between the pusher and the piston of each main brake cylinder from 0 6 to 1 3mm the pedals shall not contact with the cab elements The arrangement of pedal cradles along the height shall be adjusted by means of bolts 5 and the length ...

Страница 160: ...d take off pipes from the valves and put on protection caps Check the value of the unlocked pedals full travel separately with the applied force 300 30 N which shall be within 100 to 120mm In case the value of the pedal full travel exceeds the specified limits it is required to make adjustments doing the following operations unscrew counternuts of bolts links 6 and 10 for several revolutions screw...

Страница 161: ...mer into the mounting hole in bracket 8 against the stop unscrew counternuts 9 of bolts 10 of the right and left levers 11 and 12 Rotating bolt 10 of the right brake choose the clearance between bolt 10 and the plate of lever 13 For the left brake set the clearance between bolt 10 and the plate of lever 14 equal to 3 5 0 5 mm to compensate twisting of shaft 15 while the right brake tightening lock...

Страница 162: ...be from 0 77 to 0 83 MPa and can be adjusted by mounting washers 9 Lubrication valve 12 is adjusted for pressure from 0 2 to 0 25 MPa and maintains oil pressure in GB lubricating system Valve adjust ment can be performed by means of washers 11 To increase pressure it is required to increase the number of washers to reduce pressure decrease the number of washers 1 GB centrifuge 2 valve for adjustme...

Страница 163: ...ge 3 gasket 4 winged nut 5 ring 6 sump 7 housing 8 monocyclone Figure 5 4 25 Air cleaner An air stream shall be directed at an angle to the surface of the filter element While maintenance services it is necessary to protect the filter element from mechanical failures or greasing It is forbidden to blow over the filter element with releasing gases or wash it off in diesel fuel Clean the feed pipe i...

Страница 164: ...en changing into autumn winter period with fixed daily average temperature 5С When changing into spring summer period with fixed daily average temperature above 5С Replace in accordance with table 5 4 sum mer oil grades by winter in transmission and brake housings Replace in accordance with table 5 4 summer oil grades by winter in transmis sion and brake housings Replace in accordance with table 5...

Страница 165: ...facturing works Otherwise the tractor after sales service warranty is no longer valid 5 6 2 Safety precautions for exclusion of hazardous situations related to accumula tor batteries and a fuel tank During maintenance of the accumulator battery do the following avoid skin contact with electrolyte clean the batteries with wiping material moistened with aqua ammonia solution ammonium hydroxide while...

Страница 166: ...e 5 6 1 Sign of a place for leveling jack installation To lift tractor rear elements set leveling jacks or a single jack under the rear semi axle tube as illustrated in figure 5 6 2 а Tractor rear view b Tractor view underneath Arrangement of signs Leveling jack Places for leveling jack installation Figure 5 6 2 Scheme of leveling jack installation for lifting tractor rear elements To lift tractor...

Страница 167: ...e the gear and put cotters under front wheels do not put the jack on soft or slippery surface as it may cause the tractor falling off the jack When needed use steady and relatively large support after lifting the tractor put the limit stops under the front axle beam rear wheel semi axles or tractor frame base components to exclude tractor falling or rolling movement IT IS FORBIDDEN TO START THE EN...

Страница 168: ... not more than 30 of the controlled access manometer MD 124 GOST 9921 81 for tire inflation pressure control other devices hav ing metrological specifications similar to the manometer MD 124 for tire inflation pressure control may be used manometer 1 6 MPa 1 GOST 2405 80 for pneumatic system pressure control other devices having metrological specifications similar to the manometer M 1 6MPa 1 for p...

Страница 169: ...ding 50 mg kg 0 005 At ambient temperature of minus 5ºС and more Diesel fuel STB 1658 2006 with sulfur content not exceeding 50 mg kg 0 005 Grade C Not availa ble Not available Diesel fuel ЕN 590 2009 A1 2010 with sulfur content not exceeding 50 mg kg 0 005 At ambient temperature of minus 20ºС and more Diesel fuel STB 1658 2006 with sulfur content not exceeding 50 mg kg 0 005 Grade F Not availa bl...

Страница 170: ...arks П and П 7m m sea sonal but at least 1000 without a creeper 55 0 4 with a creep er 2 4 Brake housing Engine oil М 10Г2 GOST 8581 78 summer Engine oil М 8Г2 GOST 8581 78 winter Engine oil М 10В2 GOST 8581 78 летом Engine oil М 10Г2к летом GOST 8581 78 Engine oil М 8Г2к зимой GOST 8581 78 Engine oil is the same as filled in the engine crankcase Engine oil is the same as filled in the en gine cra...

Страница 171: ...her oils hydraulic BECHEM Staroil 32 68 ADDINOL Hydraulikol HLP 32 HLP 68 ТНК Hydraulic HLP 32 HLP 68 HYDROL HLP 32 HLP 68 VITTOL HLP 32 LUKOIL Geiser 32СТ 68СТ Gazpromneft Hydraulik HLP 32 HLP 68 4 Not avail able Not available Not available 30 0 0 5 1000 2 9 HSC tank with hy draulic unit 1 All weather oils hydraulic BECHEM Staroil 32 68 ADDINOL Hydraulikol HLP 32 HLP 68 ТНК Hydraulic HLP 32 HLP 6...

Страница 172: ...A spider bearing of twinned hinge joint 2 Grease 158М ТУ 38 301 40 25 94 Grease AZMOL 158 ТУ У 00152365 118 2000 Not available 0 0112 0 001 One time Filled by the manu facturer not refilled during operation 3 6 FDA drive cardan shaft spider bearing 1 Grease 158М ТУ 38 301 40 25 94 Grease AZMOL 158 ТУ У 00152365 118 2000 Not available 0 0056 0 001 One time Filled by the manu facturer of cardan shaf...

Страница 173: ...FL 3 Sort S 735 Eng land 33 5 0 5 Onc e in two yea rs 4 4 Tank for fluid of SCR system 1 Agent AUS 32 for reduction of NOX emissions as per STB ISO 22241 1 2009 Not availa ble Not availa ble Not available 20 0 1 0 Shif t time fill ing __________________________________________ 1 According to Directive 2004 26 ЕС and Regulations of EEC of UN 96 02 stage IIIA it is allowed to use fuel with sulfur co...

Страница 174: ...nge facings or driven disks assembled Clutch driven disk facings are oiled up due to ingress of oil into the dry section Detect and eliminate the cause of oil ingress into the dry compartment Poor compression spring force spring shrinks due to continuous skidding and clutch overheating Change compression springs Clutch coupling can not be fully disengaged clutch grabs and shudders Clearance betwee...

Страница 175: ...trokes are carried out with difficulty Replace the hydraulic push rod Clogging of compensating port A fig ure 6 1 1 in the main cylinder Unclog the compensating port of main cylinder and bleed the hydraulic system of clutch con trol Loss of pullback spring power 29 fig ures 5 4 16 and 5 4 17 Replace the pullback spring Full clutch lever 34 stroke can not be achieved figures 5 4 16 and 5 4 17 when ...

Страница 176: ...g the opening Bleed the clutch control hydraulic system Clogging of pipelines of the hydraulic drive system due to dent or blockage Replace pipelines Bleed the clutch control hydraulic system Oil leakage through O rings of the hy draulic booster Replace O rings in the hydraulic booster No clutch pedal force Air presence in the hydraulic system Cups and an O ring in the main and operating cylin der...

Страница 177: ...e synchronizer and worn out parts Increased noise Not enough oil in the transmission Refill oil up to the required level mark Wear or damage of bearings and other transmission components Replace worn out bearings and other damaged parts The engine fails to start when the range shifting lever is set in neutral position or starts when a range is engaged Faulty switch for engine start up lock with th...

Страница 178: ...gagement If the cylinder rod is moving FPTO shaft electric control is operating in a proper manner Rear axle DL can not be engaged in an automated mode when guide wheels are in the forward motion position Electric circuit breakage to drive wheels rotation angle sensor Check electric circuits according to the electric connections diagram Drive wheels rotation angle sensor is not adjusted properly A...

Страница 179: ... structions for their troubleshooting Faulty oil pressure sensor of GB reduction unit higher or lower pass respectively or the pilot lamp for GB reduction unit actuation has burnt out or GB reduction unit led lamp has burnt out Replace faulty parts pressure sensor or pilot lamp or led lamp Circuit breakage from the sensor to the pilot lamp or circuit breakage from the sensor to the led lamp Accord...

Страница 180: ...sion casing and refill oil to the oil level mark if necessary Gear teeth damage Check the condition of the gear tooth ring Chip ping and damage are not allowed Gears with damaged teeth shall be replaced in pairs Differential lock fails to operate Friction facings of lockup clutch disks are worn out Replace the disks Lockup clutch diaphragm is dam aged Replace the diaphragm Low pressure of oil runn...

Страница 181: ...al disks Rinse friction coupling components in pure diesel fuel replace frictional disks if necessary While the PTO brake engagement the shaft end extension goes on rotating There is no oil pressure at valve in put or at the output to the PTO brake Check pressure at control valve input in case there is no pressure eliminate the transmission hydraulic system failures In case there is no pressure at...

Страница 182: ...If the distribution valve spool shifts and the cylinder rod remains fixed check pres sure in the tractor transmission hydraulic system Operating pressure shall be within 0 9 to 1 0 MPa In case the pressure is below the required value elimi nate the transmission hydraulic system failure as specified in subsection 6 9 Possible failures of the transmission hydraulic system and instructions for their ...

Страница 183: ... inder bearing surface has sharpened edges ridges or pits Bleed the hydraulic system with brake fluid Hydraulic brake fluid leakage in junctions or pipelines in the hy draulic drive system Air inflow into the hydraulic brake control system Tighten up junctions replace damaged parts then bleed the hydraulic system with brake fluid Clogging of the opening in main cylinder tank fitting causing de pre...

Страница 184: ...with brake fluid Clogging of compensating open ing in the main cylinder Unclog the compensating port of the main cylinder and bleed the hydraulic system with brake fluid Weakening or breakage of pres sure discs pullback springs Replace pullback springs of pressure discs Presence of wear and tear signs on working surfaces of pressure discs Clean working surfaces of pressure discs Presence of wear a...

Страница 185: ...ulator filter for pressure regulator is clogged faulty pneumatic compressor Detect leakages and eliminate them by tightening junctions or replacing damaged parts Replace the damaged sealing Screw up the nut Clean Eliminate Adjust the brake valve drive Dismount pressure regulator from the tractor and send it to a repair workshop Rinse the pressure regulator Contact your dealer Rapid decrease of pre...

Страница 186: ... jamming Disassemble the pressure regulator and eliminate jamming Clogged outlet ports in the pres sure regulator adjusting cap Unclog outlet openings There is no air feeding in the connecting hose through air bleeding valve of pres sure regulator Insufficient sinking of air bleeding valve rod in the pressure regulator Screw the nut of the connecting hose on the outlet and tighten it Pressure regu...

Страница 187: ...f valve Shrinkage of the distributor filter overflow valve spring Adjust pressure by means of adjusting washers If it is not possible replace the spring No oil pressure in the transmission hydraulic system Breakdown of the gear wheel pump in the transmission hydraulic system Replace the gear wheel pump in the transmission hydraulic system Transmission hydraulic system pump drive is off Engage the ...

Страница 188: ...ue No pressure in the clutch booster Disassemble the distribution valve rinse the case and spool Failure of system electrics Detect and eliminate the failure in ECS of FDA Insufficient value of torque transferred Low pressure in the transmission hydraulic system Adjust pressure in the transmission hydraulic sys tem to the value from 0 9 to 1 0 MPa Increased leakage in drive control hydraulic syste...

Страница 189: ...ation angle Improper wheel rotation limit angle Check and adjust the FDA reduction unit rotation angle Hammering in pivot while moving Pivot bearing got out of adjustment Check and adjust Hammering in FDA while abrupt wheel turning Clearances in the steering link pins and in rotation hydraulic cylinders Check and adjust ATTENTION AFTER ANY DISMOUNTING OF STEERING LINK AND ITS SUBSE QUENT INSTALLAT...

Страница 190: ...onents Stop abrasion in the steering column for which do the following loosen upper nut lubricate friction surfaces of plastic bushings eliminate contact of universal joint yoke with steering column bracket walls Increased torque of FDA reduction unit turn Make repair of FDA Steering wheel is rotating without driven wheels turning There is no oil in the tank Fill the tank with oil to the required ...

Страница 191: ...selected direction Spool recentering springs of dos ing pump have lost spring power or broken Contact the dealer Replacement of springs assem bly and check of operability shall be performed only by maintenance department in accordance with man ufacturer s instruction 1 One of anti shock valves setting springs is broken or gerotor pair is worn out Contact the dealer Replacement of faulty compo nent...

Страница 192: ...relief valve low pressure faulty feed pump the pump fails to increase pressure because of low efficiency factor Contact the dealer Adjust the pressure relief valve for the required pressure1 The operation shall be per formed only by maintenance department Contact the dealer Increased FDA reduction unit steer ing torque Make repair of FDA Breakdown of feed pump High pressure in the HSC hydraulic sy...

Страница 193: ...g are shown in table 6 12 ATTENTION DISCONNECTION OF THE ELECTRIC SOCKETS OF THE REAR LIFT LINKAGE ELECTRONIC CONTROL SYSTEM SHALL BE CARRIED OUT WHEN THE ENGINE IS NOT RUNNING ONLY ATTENTION ALTERATIONS OF THE SPECIFIED VOLTAGE VALUES SHALL BE DONE WITH THE ENGINE RUNNING WITH DUE ATTENTION TO THE SAFETY MEASURES IF OPERATING WITH ELECTRIC UNITS ON LOAD ATTENTION TERMINALS IN THE CABLE SOCKETS AR...

Страница 194: ... one of the sole noids or short circuit of the solenoids control wires in the cable Disconnect the cable from the solenoid and test the solenoid with a testing apparatus to detect a short cir cuit Solenoid resistance shall not exceed 2 4 Ohm Or measure the solenoid useful current applying the current of 6 V The current shall not exceed 3 2A Dis connect the socket from the electronic unit check the...

Страница 195: ...ermost position make the position sensor a little bit further and try to check again If the adjustment was made in a proper manner LL shall be lowered and lift ed by means of the control panel to the extreme positions The lift indicator shall be out in an uppermost position 2 Failure of the position sensor 2 1 To check the operability of BOSCH position sensor dismount it from the tractor According...

Страница 196: ...nsors left and right and interchange their positions the socket from the left sensor to the right sensor channel and the socket from the right sensor to the left sensor channel If after that the er ror code has changed 31 was replaced by 32 or 32 was replaced by 31 that means that the sensor is out of order if the error code is still the same that means that the cable is out of order 32 Failure of...

Страница 197: ... To the LL position sensor black socket To the right force sensor grey socket connector To the left force sensor grey socket connector To the right remote panel To the electronic unit To the main control panel Power minus load To the fuse block To the uplift solenoid operated valve yellow socket connector To the lowering solenoid operated valve black socket connector Joints cab transmission ...

Страница 198: ...t lowering power power signal signal load load load power power signal load 0 V 0 V 0 V 10 V 10 V 0 10 V 0 10 V 0 10 V 0 10 V Off 0 V On 10 V 0 2 V 1 3 V 2 5 V 3 7 V 20 mA 20 mA 1 2 3 2 A 1 2 3 2 A 1 2 3 2 A 2 2 7 2 V 12 15 V 12 15 V 5 V not charged 5 V not charged Position sensor Force sensor Л Force sensor П O orange P pink C grey Ф violet Ч black Electromagnetic hydraulic governor Cable colors ...

Страница 199: ... manifestation cause Troubleshooting LL hydraulic system pressure loss RLL can not be lifted pressure loss or no pressure of pressure at external outputs overheating and or foaming of hydraulic oil takes place Loss of pump efficiency Replace the pump Air inflow in the hydraulic system Check and tighten the suction line clamps if neces sary If the failure can not be eliminated replace the oil sucti...

Страница 200: ...pressure loss or no pressure of pres sure at external outputs hydraulic system overheating does not occur Locking of differential pressure control valve overload relief valve in access cap of integrated unit Perform the following actions rinse the valve check pressure at any external output which should be 20 0 2 5 MPa valve rinsing should be carried out at the dealers center by specially trained ...

Страница 201: ...noid 13 Figure 7 13 1 then withdraw the solenoid withdraw the lift spool 14 and the spring 15 rinse the mentioned components and the bore in the section housing assemble the lift valve in reverse sequence Deadlock of the lift spool of a regu latory section if hydraulic unit RP70 1523 1 is installed To eliminate failure contact your dealer Failure diagnostics signaling device located on the RLL con...

Страница 202: ...dition of all fuses wires and electrical connections of the circuit before starting the specific check of the elements failures In case of using test instruments for detecting a failure plan carefully in accordance with the applied electrical diagram the succession of the instrument connection to the circuit to detect the failure most effectively The main test instruments include a tester multimet...

Страница 203: ...able or terminal which is being checked If the lamp lights up grounding is normal and vice versa If the minus supply circuit of the high current consumer is under checking it is required to use the continuity test lamp with the power not less than 21V because with the bad contact of the load the consumer fails to operate and the lamp with small power will light up 6 14 4 Check of electrical circui...

Страница 204: ...ED CIRCUIT AIR CONDI TIONING SYSTEM MAY BE DETACHED BY MEANS OF SEPARATION OF A QUICK DISCONNECT COUPLER DISCONNECTION SHALL BE PERFORMED BY UNSCREW ING CAP NUT B FIGURE 6 15 1 WITH HEXAGON SCREW KEY SIZE 30MM FROM VALVE A WITH HEXAGON SCREW KEY SIZE 29 MM WHILE CONNECTING THE DUCT IT IS NECESSARY TO PUT SILICONE SEALANT ON THE THREAD AFTER THREE OR FIVE DISCONNECTIONS A LEAKAGE CAN OCCUR IN THE J...

Страница 205: ...Minsk tel fax 8 017 262 40 75 8 029 662 97 69 8 029 628 67 98 Non operable conditioner fan electric motor Electric equipment failure Check up operability of the corresponding fuse el ement located in the switching unit Replace if it is faulty If the safety lock is properly operating check by means of indicating lamp power supply on the electric motor of air conditioner fan when the switch is on an...

Страница 206: ... Accumulator batteries shall be switched off 7 3 Requirements for short term tractors storage Put the tractor in storage in complete set without dismounting parts and assembly units Disconnect accumulator batteries Carry out regular maintenance of accumulator batteries To carry out AB maintenance perform the following actions open tractor hood remove the accumulator box housing for which unscrew t...

Страница 207: ...LL and HSC FPTO if installed oil tank Run the tractor for 10 15 minutes Put accumulator batteries in long term storage after conducting control training cycle in accordance with GOST 9590 76 Projecting joints threaded connections of lift linkage mechanism steering geometry splined surfaces of PTO shaft end extension and of cardan shafts and projecting parts of cylinder rods and shock absorbers fro...

Страница 208: ...ervation shall be carried out with preservation grease КС У according to TU RB 600125053 019 2004 When a tractor is stored outside specific surfaces shall be preserved with grease BELA COR of type А according to TU RB 600125053 020 2004 Upon agreement with Minsk Tractor Works other preservation greases can be used 7 6 Depreservation and represervation Depreservation method is chosen depending on p...

Страница 209: ...With prolonged exposure to skin of preservation oils greases and liquids skin may be in jured White spirit vapors in small concentrations act as a weak drug large concentration may result in poisoning Anticorrosion paper contains corrosion inhibitors causing irritation and inflammation of skin mucous of nose and eyes Before starting work it is required to put on cotton overalls robe or an apron pr...

Страница 210: ...1523 5 0000010 OM 210 Service bulletins ...

Отзывы: