Belanger Signature Series Скачать руководство пользователя страница 48

INTEGRA® / E-1063                                       


5-2


Belanger, Inc. * 1001 Doheny Ct. * Northville, MI 48167 * Ph (248) 349-7010 * Fax (248) 380-9681                    1MANUL102


Chapter 5 Operator Interface/Wash Setup Screens 

Setup 

Setup / Packages 

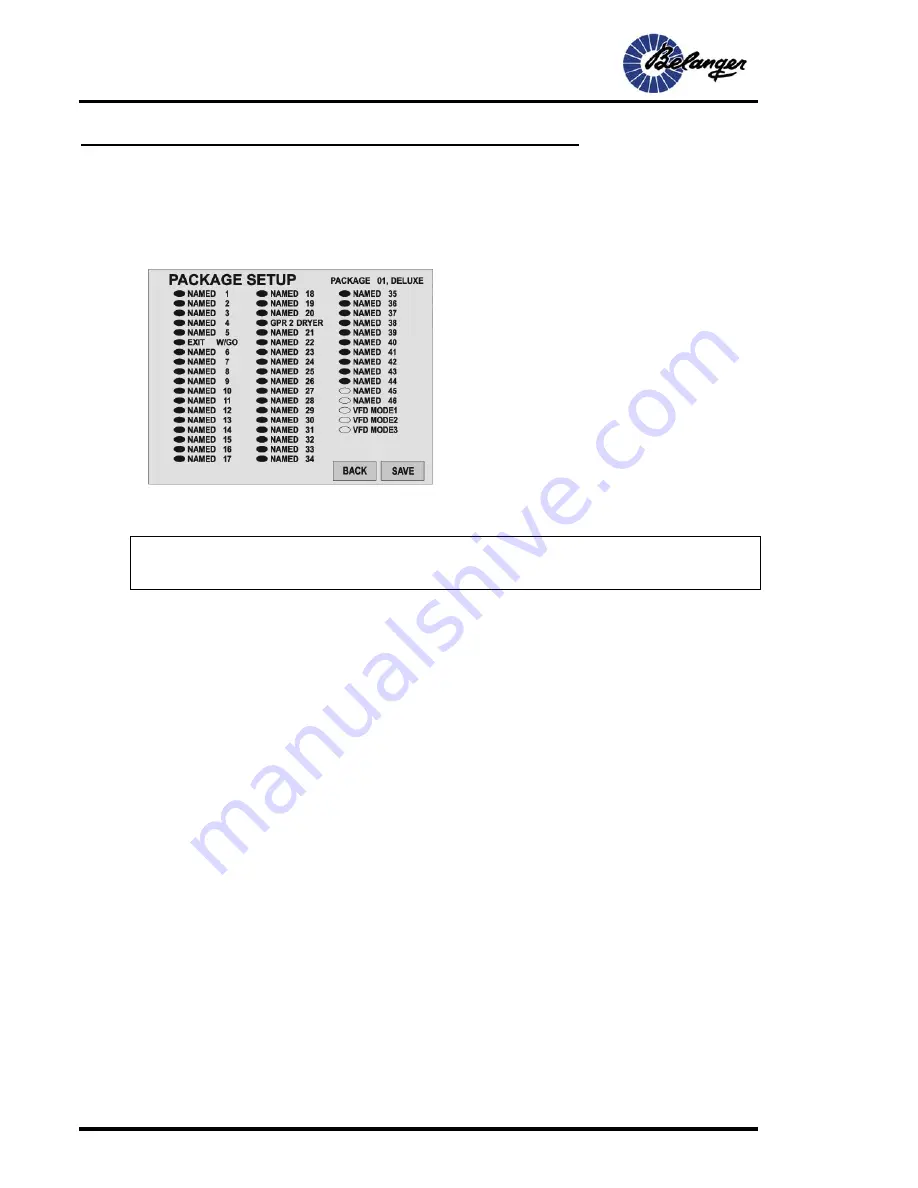
Setup / Packages / Package 1 (or any of the Package buttons) 


CHANGES WILL NOT TAKE EFFECT AND WILL BE LOST IF “SAVE” IS NOT SELECTED ONCE SELECTIONS 

ARE MADE.  

Note:


The names of the Functions may be changed from the names 

shown in the above screen. 

Screen Key:


When an Oval is filled, that item becomes part of the 
Package. 


Touch the desired oval to toggle between filled and 
unfilled. 


See SETUP / FUNCTIONS for configurations of 
Functions. 


VFD Mode 1 – Network VFD Dryer switch to set distance 
for Package. 


VFD Mode 2– Network VFD Dryer switched OFF for 
Package. 


VFD Mode 3– Network Pump 1 selected for Package. 


Содержание Signature Series

Страница 1: ...1MANUL102 REV 03 Belanger Inc P O Box 5470 Northville MI 48167 5470 Customer Service Phone 248 374 4700 Fax 248 380 9681 www belangerinc com INTEGRA E 1063 OPERATOR STATION Owners Manual ...

Страница 2: ......

Страница 3: ...mpanying equipment are protected by United States and International copyright and patent laws You may make one copy of this manual Do not make additional copies of this manual or electronically transmit it in any form whatsoever in whole or in part without the prior written permission of Belanger Inc ...

Страница 4: ......

Страница 5: ...ter 3 General Methods of Using Operator Interfaces 3 1 E 1063 3 1 Chapter 4 Operator Interface Standard Wash Operation Screens 4 1 E 1063 Main Screen 4 1 Queue 4 2 Queue Receipt 4 2 Queue More Queue 4 3 Data 4 4 Data Daily 4 5 Data Daily Weekly 4 5 User 4 6 User Clear Wash 4 6 User Wet Down 4 6 User VFD Conveyor 4 7 User Force 4 8 User Force More 4 8 User Input Bypass 4 9 User Input Bypass Enter P...

Страница 6: ...p Function Exit W Go or any of the functions 5 6 Setup Functions 5 7 Setup Loading 5 9 Setup Loading Factory 5 12 Wash In Use Wash 5 14 Setup Pager 5 16 SETUP MISC 5 17 Setup VFD Operations Conveyor 5 20 Setup VFD Operations Station 2 5 20 Setup VFD Operations Dryer VFD 5 21 Setup VFD Operations Pump 1 VFD 5 21 Setup VFD Operations Enable 5 22 Chapter 6 Techniques in Wash Setup 6 1 Additional Info...

Страница 7: ...Chapter 1 Introduction Chapter 1 Introduction Chapter REV 01 ...

Страница 8: ......

Страница 9: ...e wash solutions in conjunction with your Belanger automatic car wash equipment Limitation 4 of Paragraph 8 Limited Warranty of the Belanger Terms and Conditions of Sales describes the potential limitation of warranty due to your chemical selection 4 This warranty shall be void for all equipment failures and premature component wear caused by the use of corrosive chemicals in the wash process The ...

Страница 10: ...ds used in this manual and on warning labels tell you the seriousness of particular safety hazards The precautions that follow must be followed to prevent death injury or damage to the equipment DANGER This signal word is used to alert you to a hazard or unsafe practice which WILL RESULT IN DEATH OR SERIOUS INJURY This alerts you to a hazard or unsafe practice which COULD RESULT IN DEATH OR SERIOU...

Страница 11: ...equipment Doing so will prevent unexpected energization startup or release of hazardous energy while maintenance and servicing activities are being performed BE SURE TO OBSERVE OPERATING ENVELOPE EQUIPMENT MAY START UNEXPECTICALLY OVERHEAD ROTATING AND OR MOVING COMPONENTS COULD RESULT IN SERIOUS INJURY OR DEATH BE AWARE OF FOREIGN OBJECTS IN THE AREA SURROUNDING A ROTATING PIECE OF EQUIPMENT OBJE...

Страница 12: ... warranty Hydrofluoric Acid Ammonium Bi fluoride Bromic Acid Muriatic Acid Sulfonic Acid Phosphoric Acid Hydrogen Cyanide Hydrochloric Acid and Chlorinated Solvents The Purchaser also agrees to accept the responsibility and liability for the selection and use of any chemicals listed above 5 This warranty shall be void for all equipment failures and premature component wear caused by the use of rec...

Страница 13: ...Chapter 2 General Machine Operations Chapter 2 System Overview Chapter REV 01 ...

Страница 14: ......

Страница 15: ...etract equipment from vehicles even if the VFD is spinning the wheels These VFD Panels require CAT 5e cable to be installed from the controller to the System VFD Panel Then another is to be installed from the System VFD Panel to the next VFD Panel and continue the loop through all VFD panels This system consists of multiple motors supplied via Variable Frequency Drive Each motor should have its ow...

Страница 16: ...s are available to the field for the POS installation Following that the responsibility is on the installers to be able to integrate our product with a third party POS Review the SETUP screen for alternative methods Note 1 See your supplied 3rd Party POS manual for Wash In Use coil voltage Connection to PIN 11 of the WASH IN USE Relay may need to be changed 3rd Party POS Belanger INTEGRA 728 Wash ...

Страница 17: ...1 2 3 Chapter 2 System Overview E 1063 Overview The following will explain the interface and functions of the Controller keypad The image below shows the keys on the keypad with a brief description of their function s Each function will be covered in greater detail later in this document Back Plate E 1063 ...

Страница 18: ...s the ability to clear the entire wash Bay Wet Down initiates a Bay Wet Down Monitor I O displays current status of all inputs and outputs Power Up E Stop Choice Lets the Operator change or accept wash status after E Stop Power Up Force Manually turns on a individual function Print Printer various Setup Reports Modem Setup About displays software version currently running Input Bypass allows user ...

Страница 19: ...s Package Option and Accept input configuration Packages Functions for package offering Misc Loading Configuration of vehicle loading and Dollie tasking Bay Wet Down Set up for functions to be enabled during wet down Wash Value Dollar value of the package and options Disable Disables the un used packages Functions Configuration of wash equipment Pager Configuration of pager setup VFD operations Se...

Страница 20: ...ipswitch 2 make sure all are OFF Cable to printer must be a modem cable 9 pin to 25 pin this is where pin 2 is inverted with pin 3 and pin 3 is inverted with pin 2 as shown below 9 Pin Connector End 2 2 25 Pin Connector End 2 2 If your cable does not work try a null modem 9 pin adapter 1 Dipswitch 1 2 3 4 5 6 7 8 ON X OFF X X X X X X X 2 Dipswitch 1 2 3 4 5 6 7 8 ON OFF X X X X X X X X Printer Set...

Страница 21: ...INTEGRA E 1063 1MANUL102 Belanger Inc 1001 Doheny Ct Northville MI 48167 Ph 248 349 7010 Fax 248 380 9681 2 7 ...

Страница 22: ......

Страница 23: ...Chapter 3 General Methods of Using Operator Interfaces Chapter 3 General Methods of Using Operator Interfaces Chapter REV 01 ...

Страница 24: ......

Страница 25: ...avigation The Screen Navigation fields are typically located at the bottom of the screen These fields typically have frames boxes around words Pressing these fields will change current screen to the corresponding screen Some screen require pressing to return to the previous screen Toggles These fields toggle between two values when pressed Typical data in these fields is YES NO ENABLED DISABLED an...

Страница 26: ...selected that is Alpha Numeric one of the following Data Entry Screens will appear To navigate between screens press on of the following or When done entering the data press to return to the original screen To leave the Data Entry screens without changing data press Selections If the available selections are more that what will fit in a single screen scroll controls will appear to the right of the...

Страница 27: ...Chapter 4 Operator interface Standard User Screens Chapter 4 Operator Interface Standard Wash Operation Screens Chapter REV 01 ...

Страница 28: ......

Страница 29: ...tions on the screen Due to the ease in which a stylus can be misplaced we recommend that you use the back end of an ink pen or a stylus Note It is not recommended that the screen be operated with metal objects such as keys or screw drivers Screen Key The ESTOP is only displayed when the system is in the ESTOP condition The display box shows the currently selected stand by Package If any Options ar...

Страница 30: ...is key will clear all items in the QUEUE except the one that is already being processed This key is to be used in the case where a vehicle has crossed the treadle picked up a dollie and is being pulled to the entrance photo eye This allows that particular vehicle to continue being washed HOT DOLLIE This will send up a Dollie immediately regardless if there is a vehicle in the QUEUE or not The Conv...

Страница 31: ...e Standard Wash Operation Screens Queue Queue More Queue To enter a wash enter a Package number in the Package box It will show in the Stand By Box Then enter any Option numbers for desired options enter the Options one at a time until all corresponding ovals are filled This method of entering washes is considered for temporary use only ...

Страница 32: ...manually From the Daily Report screen press WEEKLY to get to this screen The RESET day can be changed from the MISC screen Report Printing Shift Daily and Weekly reports can be printed from the Report screens or from Operators Station The RS 232 must be set to printer before printing can occur From the Operator Station Shift Report This report can be printed by pressing and holding for 2 seconds t...

Страница 33: ...48 349 7010 Fax 248 380 9681 4 5 Chapter 4 Operator Interface Standard Wash Operation Screens Data Data Daily Data Daily Weekly Screen Key Information about this screen is presented with the Shift screen Screen Key Information about this screen is presented with the Shift screen ...

Страница 34: ...lear Wash User Wet Down This will turn on and run all of the User Defined functions of the BAY WET DOWN for the set amount of time CAUTION Pressing this button will cause motion and dispensing from equipment Screen Key This screen has the Function keys to navigate to the typical screens required by Personnel Operating Wash Screen Key Pressing YES will clear all DATA VEHICLE IN WASH If any vehicles...

Страница 35: ...erface Standard Wash Operation Screens User User VFD Conveyor Press the VFD CONVEYOR key This will take you to the VFD CONVEYOR screen This screen displays the speed of all Integra VFD functions Changing the conveyor speed variance will change the speed of all Integra network functions a percent difference between min and max speeds ...

Страница 36: ...7010 Fax 248 380 9681 1MANUL102 Chapter 4 Operator Interface Standard Wash Operation Screens User User Force From the USER screen pressing the FORCE key will navigate to the following screen User Force More Pressing the MORE key from the FORCE screen will take you to this screen ...

Страница 37: ... for temporarily bypassing the corresponding Input that may be causing issues Pressing the ENABLE button will change behavior to bypass the corresponding Input This means it will run in the BYPASS manor as setup by pressing the EDIT key Screen Key NORMAL This is the data entered into the Loading Setup screen and will be utilized for normal operation BYPASS This is the data entered into this screen...

Страница 38: ...yped at the lower right of the screen This is the simulated speed in BYPASS Mode The SAMPLES give a good indication of what your current speed may be 15 Vehicles per Hour 15 150 Screen Key NORMAL This is the data entered into the Loading Setup screen and will be utilized for normal operation BYPASS This is the data entered into this screen and will be utilized when EDIT ROLLER BYPASS is active Scr...

Страница 39: ...nue See SETUP MISC to disable this option Option can NOT be disabled for E Stop User Monitor Inputs User Monitor Outputs Screen Key This screen is to monitor wash status after a Power Up or E Stop The user can accept the current status or make changes from this screen Screen Key This screen allows monitoring of Input status The ovals are filled when the Input is ON Check prints for description of ...

Страница 40: ...reen allows monitoring of Output status The ovals are filled when the Output is ON Screen Key Pressing LOADING MISC FUNCTIONS or POS will print the corresponding setup Pressing SETUP MODEM will send setup instructions to the modem if one is installed User will not see changes on the screen when the button is pressed Pressing the MAIN BACK PACKAGES or OPTINS will navigate you to the corresponding s...

Страница 41: ...en Key Pressing these buttons will print the corresponding setup Screen Key This screen displays the software version for both the HMI screen and the Logic in the controller This screen also displays the accumulated total of vehicles washed by the controller Screen Key The ovals to the left will fill in solid when the Fault is active The Fault Code is the number that will be sent to a pager to rep...

Страница 42: ...set to Modem before paging can occur No Description of Problem 135 Roller up fault and Conveyor Jam 159 Photo Eye fault 183 Conveyor jam 190 VFD Fault 207 Roller up fault 208 Pump Water low 217 Hydraulic Tank 2 low 223 Input fault 238 Overload tripped 239 GFCI fault 243 Slow Net 244 Hydraulic Tank 1 low 245 Low air 251 E Stop Fault 255 Normal operation Note Fault numbers not listed are for multipl...

Страница 43: ... Belanger Inc 1001 Doheny Ct Northville MI 48167 Ph 248 349 7010 Fax 248 380 9681 4 15 Chapter 4 Operator Interface Standard Wash Operation Screens Faults Alarm List E 1063 All Faults and Alarms will show up on the Alarm List ...

Страница 44: ...INTEGRA E 1063 4 16 Belanger Inc 1001 Doheny Ct Northville MI 48167 Ph 248 349 7010 Fax 248 380 9681 1MANUL102 ...

Страница 45: ...Chapter 5 Operator Interface Programming Chapter 5 Operator Interface Wash Setup Screens Chapter REV 01 ...

Страница 46: ......

Страница 47: ...efined Packages Screen Key This screen has the Function keys to navigate to all of the Wash Setup screens Screen Key These buttons navigate to the corresponding Package Setup screens Pressing GOOFUP will navigate to the GOOFUP Setup screen Pressing PACKAGE VALUE will navigate to the screen for assigning Package Values Pressing the PACKAGE BLOCK will navigate to the screen that allows enabling and ...

Страница 48: ... SAVE IS NOT SELECTED ONCE SELECTIONS ARE MADE Note The names of the Functions may be changed from the names shown in the above screen Screen Key When an Oval is filled that item becomes part of the Package Touch the desired oval to toggle between filled and unfilled See SETUP FUNCTIONS for configurations of Functions VFD Mode 1 Network VFD Dryer switch to set distance for Package VFD Mode 2 Netwo...

Страница 49: ...ouch the desired oval to toggle between filled and unfilled VFD Mode 1 Network VFD Dryer switch to set distance for Package VFD Mode 2 Network VFD Dryer switched OFF for Package VFD Mode 3 Network Pump 1 selected for Package Screen Key On this screen you will enter the value costs of each Package To make a change touch the desired Value and enter new Value in the Pop Up Number Pad Screen Key Packa...

Страница 50: ...key to move to the next screen if some Functions are to be removed Screen Key The Options buttons navigate to the corresponding Option Setup screen Screen Key When an oval is filled it becomes ADDED to the Option Wash Touching the desired oval will toggle it between filled and unfilled See SETUP FUNCTIONS for configuration of Functions VFD Mode 1 Network VFD Dryer switch to set distance for Packag...

Страница 51: ...reen Key When an oval is filled it becomes REMOVED from the Option Wash Touching the desired oval will toggle it between filled and unfilled VFD Mode 1 Network VFD Dryer switch to set distance for Package VFD Mode 2 Network VFD Dryer switched OFF for Package VFD Mode 3 Network Pump 1 selected for Package Screen Key On this screen you will enter the Value Costs of each Option To make a change touch...

Страница 52: ...unction More Setup Function Exit W Go or any of the functions Note Some Functions will have different features available than others Screen Key Pressing the corresponding button will navigate to the Setup Screen for that Function Pressing the MORE button will navigate to additional Functions Screen Key Pressing the corresponding button will navigate to the Setup Screen for that Function ...

Страница 53: ...ro for off line Functions that come on before the vehicle enters the Photo Eye On For Pressing the selection toggles between the following two options Set Distance When in this mode the function will be ON for a specified distance for each vehicle Car Length When in this mode the Function will be ON for the car length plus the length Adjust setting The Adjust setting can have a value of or Typical...

Страница 54: ...ision Toggle between ON OFF during Anti Collision condition Top ON OFF for Retract This determines the state of the output when the Top Wheel retract function is retracting the Top Wheel Note If there are two Top Wheels installed that require automatic retracting the NAMED 7 must be utilized for the second Top Wheel The second Top Wheel on NAMED 7 must be positioned further down the bay than the T...

Страница 55: ...Dollie This function toggles back and forth between ON and OFF When ON Dollie will automatically be called up when the rear tire is over the Treadle This function is on in most systems REAR AUTO DOLLIE must be ON before any Rear Auto Dollie functions will activate Auto Front Dollies Inches This function determines the two following items If Dollie Up is set to COUNT this displays the number of Dol...

Страница 56: ...e Entrance Photo eye This should be set to the distance between the Entrance Photo Eye and the Dollie Up location If set to Front Tire Pull with two front tire dollies add dollie spacing distance to the recommended settings stated FAILURE TO SET AS RECOMMENDED OR LARGER WILL SEVERELY INHIBIT LOADING PERFORMANCE Neutral Distance This is the distance in inches that the NEUTRAL Light of the In Bay si...

Страница 57: ...ish to operate front pull from Dollie Call only Disable Enable Front Pull No Treadle When selected the front tire dollie comes up when the Dollie Call is pressed The rear tire Dollie will come up after the user selected amount of inches after the front Dollie The rear tire distance is FP NO TREADLE BACK TIRE DISTANCE This function can be used if you are experiencing trouble with the treadle on an ...

Страница 58: ...oheny Ct Northville MI 48167 Ph 248 349 7010 Fax 248 380 9681 1MANUL102 Chapter 5 Operator Interface Wash Setup Screens Setup Setup Loading Factory Loading Setup 2 second screen Pressing the FACTORY key will take you to the following screen ...

Страница 59: ...If an oval is filled it is selected SEE USER SECTION FOR INSTRUCTIONS ON ACTIVATING THE BAY WET DOWN FUNCTION Auto Adjust Note Feature is enabled from USER 1 VFD Conveyor screen Screen Key The fields shown in this screen toggle the ovals between Filled and unfilled Filled ovals are selected active function ON during Bay Wet Down Screen Key Pressing the button for that day will navigate to screen t...

Страница 60: ...es the entry to the POS and then the POS can turn them OFF Binary The input pattern represents the binary equivalent value of the Package Option selected When selected up to 15 packages and options can be selected Inputs can be either Pulsed or Maintained typically used with Operator Station Wash In Use Wash Wash In Use Typical setting for Unitec products The Wash in Use output is ON when a vehicl...

Страница 61: ...the QUEUE The alternative load method will be either by Input or Timed These two methods are covered below 2 Alt Accept This function toggles between Input and Timed Input Typically an E Z Load Photo Eye The stand by package will be accepted into the QUEUE when the E Z Load Photo Eye is broken Timed The stand by package will be accepted into the QUEUE according to the user defined time selected me...

Страница 62: ...ds the time it takes for a called system to pick up and broadcast its message DELAY PAGE Here you can set a delay period before the system will page This allows time for someone at the site to correct a problem before you are notified SEPARATOR This function will allow you to choose between an Asterisk or the number 9 to separate the first three digits of the Site Number and the Fault Code Most pa...

Страница 63: ...n to sound Conveyor Length Displays the Conveyor length in inches This function should be set at a minimum of 1 inch past the last functions ON point This is NOT the actual Conveyor length it is a value greater than the distance from the Photo Eye to the final component in the system Example Set it to 1 inch past the ON position of the exit Dryers Conveyor Off Delay This shows the amount of second...

Страница 64: ...ow many seconds the Prep Jet will remain ON after the Prep Jet input has turned OFF Set the time low when using a sensor activation unit Set the time high when using a Push Button activation unit If this input is left ON for longer than 720 seconds the system will automatically shut the Prep Jet down Truck Van Photo Delay The time period that Input will be OFF brake of a Photo Eye before the vehic...

Страница 65: ... disables the Slow Net to keep the wash running Network and 3 phase wiring and installation should be reviewed if Slow Net Fault occurs Setting the Time and Date Place cursor over the field to be altered Enter the desired number Move to the next field and follow the same process until the Time and Date are set RS 232 Printer Here you select which device is hooked up to the 9 pin port Selections ar...

Страница 66: ...cal side wheel is 20 the typical Top Wheel is 15 typical Quad Wave Mitter is 40 and a typical Wave Across is 33 Screen Key Pressing the corresponding button navigates to the Setup screen for that Function Screen Key Gear The accumulated gear ratio of all gear reduction boxes combined that drive the Conveyor Pitch Diameter The diameter of center line of chain as it rides around the Drive Gear Min C...

Страница 67: ...et distance when VFD MODE 1 is active from Package or Option This feature is used to reduce air flow for pickup trucks with debris in their bed Due to slow deceleration rate of the dryers this distance may be smaller than anticipated VFD Mode 2 From Package and Options will force the dryer off The air flow may not be completely off due to Conveyor Hz or slow dryer deceleration rates Screen Key Min...

Страница 68: ...81 1MANUL102 Chapter 5 Operator Interface Wash Setup Screens Setup SETUP VFD OPERATIONS Setup VFD Operations Enable CAUTION Enabling a device that is not installed will slow the network communication and or Fault the system Screen Key Toggle equipment to ENABLE if it is installed on the VFD Network ...

Страница 69: ...Chapter 6 Techniques in Programming Chapter 6 Techniques in Wash Setup Chapter REV 01 ...

Страница 70: ......

Страница 71: ...e are functions that turn on before the vehicle enters the Photo Eye To program a function to operate offline change value On Position to Zero See SETUP FUNCTIONS for more information If on AirBlade Express 180 is ordered A 60HP and a 40HP VFD Panel will be shipped The 40HP Dryer will need Station Numbers changed to range between 15 and 20 because the 60HP utilizes 9 to 15 See supplied prints for ...

Страница 72: ...es 100 Neutral Distance EZ Load Photo Input Is Not Used In Tire Eval Repeat Size Dollie Enabled Disable Front Pull No Treadle Enable Rear Push No Treadle Selection that MUST be set to match for this type of vehicle loading Auto Size Dollie Enabled 288 Max Car Length Unattended Front Tire Pull with Treadle E 1063 Loading Screen E 1063 P O S Screen Dollie Up Count Direct Select Inputs Front Auto Dol...

Страница 73: ...nputs Front Auto Dollie Off 03F Wash In Use Rear Auto Dollie On Screen Alt Accept 01 Auto Front Dollie Alt Accept Is Input 02 Auto Back Dollie 02 Dollie Call Dollies EZ Load Photo Input Is Used In Tire Eval 5 Minimum Time Between Tires Use Minimum Time Between Tires 288 Max Car Length Selection that MUST be set to match for this type of vehicle loading Repeat Size Dollie Enabled Disable Front Pull...

Страница 74: ...h for this type of vehicle loading Use Minimum Distance Between Tires 288 Max Car Length Repeat Size Dollie Enabled Disable Front Pull No Treadle Disable Rear Push No Treadle Auto Size Dollie Disabled Attended Rear Tire Push with Treadle E 1063 Loading Screen E 1063 P O S Screen Dollie Up Count Binary Select Inputs Front Auto Dollie Off Screen Accept ONLY Rear Auto Dollie On 01 Auto Front Dollie E...

Страница 75: ...INTEGRA E 1063 1MANUL102 Belanger Inc 1001 Doheny Ct Northville MI 48167 Ph 248 349 7010 Fax 248 380 9681 6 5 Chapter 6 Techniques in Wash Setup Recommended Initial Settings ...

Страница 76: ......

Страница 77: ...Chapter 7 Faults and Alarms Chapter 7 Faults and Alarms Chapter REV 01 ...

Страница 78: ......

Страница 79: ...eset If a modem is connected the system will page out the Fault Codes This fault is caused when the conveyor Pulse is lost during conveyor operation See SETUP MISC to disable Input Fault This fault will alert you by pager but will NOT shut the system down When input is OFF this Fault will self RESET Roller Up Fault This fault will alert you by pager but will NOT shut the system down Will RESET whe...

Страница 80: ... 223 Input fault 238 Overload tripped 239 GFCI fault 243 Slow Net 244 Hydraulic Tank 1 low 245 Low air 251 E Stop 255 Normal operation Alarm List All Faults and Alarms will show up on the Alarm List but only Check Enter Photo Eye will signal an alarm on the screen and require an acknowledgement ACCEPT may need to be pressed from the POWERUP CHOICE screen if system is not operating After and E STOP...

Страница 81: ...INTEGRA E 1063 1MANUL102 Belanger Inc 1001 Doheny Ct Northville MI 48167 Ph 248 349 7010 Fax 248 380 9681 7 3 Chapter 7 Faults and Alarms Alarm on S500 Drives From display on drive ...

Страница 82: ...INTEGRA E 1063 7 4 Belanger Inc 1001 Doheny Ct Northville MI 48167 Ph 248 349 7010 Fax 248 380 9681 1MANUL102 Chapter 7 Faults and Alarms Alarm on S500 Drives From display on drive ...

Страница 83: ...INTEGRA E 1063 1MANUL102 Belanger Inc 1001 Doheny Ct Northville MI 48167 Ph 248 349 7010 Fax 248 380 9681 7 5 Chapter 7 Faults and Alarms Alarm on E700 Drives From display on drive ...

Страница 84: ...INTEGRA E 1063 7 6 Belanger Inc 1001 Doheny Ct Northville MI 48167 Ph 248 349 7010 Fax 248 380 9681 1MANUL102 ...

Страница 85: ...Chapter 8 Network and E Mail Application Chapter 8 Network and E Mail Application Chapter REV 01 ...

Страница 86: ......

Страница 87: ...ch Settings Change the setting of dip switch 1 to the ON position as shown below Then cycle the power Network Startup Screens Once the power has been cycled the screen on the lower left will appear Touch the screen anywhere before it times out If it times out you will have to perform the calibration before configuring the network settings Calibration screen shown on the lower right ...

Страница 88: ... Net Mask Check with your Internet Service Provider ISP or your IT Professional to determine the number 255 255 255 0 and 255 255 255 254 248 and 255 255 255 252 are common DNS 1 This is the IP address of your domain name server DNS 2 This is the IP address for an alternative domain name server Gateway Contact your ISP or an IT Professional for this IP number This is typically the IP Address of th...

Страница 89: ...DNS server must be given in TCP IP settings My Email Addr This address will be shown as who the e mail came from Note E mail address does not need to be real example bay1 site2 com Authentication YES or NO This is typically set to YES Setting to YES specifies that the e mail server requires a User Name and Password to be utilized User Name This is the User Name utilized to access the e mail server...

Страница 90: ... a remote location and all settings may be changed Remote operation can be performed utilizing a web browser or a VNC viewer Using a VNC viewer has a better screen display Many VNC viewers can be downloaded at no charge from various web sites Enter VNC viewer or tight VNC into your favorite search engine to find these web sites Note Static ID Address recommended to utilize remote access E mail wil...

Страница 91: ...Chapter 9 E 1063 Screen Map Chapter 9 E 1063 Programming Screen Map Chapter REV 01 ...

Страница 92: ......

Страница 93: ......

Страница 94: ...Belanger Integra 1063 Programming Station 1MANUL102 Belanger Inc P O Box 5470 Northville MI 48167 5470 Customer Service Phone 248 374 4700 Fax 248 380 9681 ...

Отзывы: