background image

Mobile type air conditioners (local air conditioners) / User Manual

7 / 28 EN

3.1 Safety rules

To prevent injury to the user or other people and property damage, the following 

instructions must be followed. Incorrect operation due to ignoring of instructions 

may cause harm or damage.

C

Always do this

• 

Your air conditioner should be used in such a way that it is protected 

from moisture. e.g. condensation, splashed water, etc. Do not place or 

store your air conditioner where it can fall or be pulled into water or 

any other liquid. Unplug immediately.

• 

Always transport your air conditioner in a vertical position and stand on 

a stable, level surface during use.

• 

Turn off the product when not in use.

• 

Always contact a qualified person to carry out repairs. If the supply 

cord is damaged it must be repaired by a qualified repairer.

• 

Keep an air path of at least 30cm all around the unit from walls, 

furniture and curtains.

• 

If the air conditioner is knocked over during use, turn off the unit and 

unplug from the mains supply immediately.

Safety precautions

Содержание BEP 09C

Страница 1: ...Mobile type air conditioners local air conditioners User Manual BEP 09C BEP 09H BEP 12C BEP 12H EN ...

Страница 2: ...keep it as a reference for future use Ifyouhandovertheproducttosomeoneelse givetheusermanualaswell Follow all warnings and information in the user manual Meanings of the symbols Following symbols are used in the various section of this manual C Important information or useful hints about usage A Warning for hazardous situations with regard to life and property Warning to actions that must never pe...

Страница 3: ...nditioner features 12 5 1 Operation panel of the air conditioner 12 6 Operating instructions 14 7 Installation instructions optional 17 7 1 Location 17 7 2 Window slider kit installation 17 7 2 1 Installation in a double hung sash window 18 7 2 2 Installation in a sliding sash window 19 8 Installation instructions 20 8 1 Exhaust hose installation 20 8 2 Water drainage 21 9 Care and maintenance 23 ...

Страница 4: ... lack of experience and knowledge if they have been given supervision or instruction concerning use of the appliance in a safe way and understand the hazards involved Children shall not play the appliance Cleaning and user maintenance shall not be made by children without supervision be applicable for the European Countries This appliance is not intended for use by persons including children with ...

Страница 5: ...in accordance with national wiring regulations Do not operate your air conditioner in a wet room such as a bathroom or laundry room The appliance with electric heater shall have at l east 1 meters pace to the combustible materials Contact the authorised service technician for repair or maintenance of this unit Contact the authorised installer for installation of this unit 1 Safety instructions ...

Страница 6: ...er will take back the old product at least free of charge C The manufacture will take back the old appliance for disposal at least free of charge to the user D As old products contain valuable resources they can be sold to scrap metal dealers Wild disposal of waste in forests and landscapes endangers your health when hazardous substances leak into the ground water and find their way into the food ...

Страница 7: ... not place or store your air conditioner where it can fall or be pulled into water or any other liquid Unplug immediately Always transport your air conditioner in a vertical position and stand on a stable level surface during use Turn off the product when not in use Always contact a qualified person to carry out repairs If the supply cord is damaged it must be repaired by a qualified repairer Keep...

Страница 8: ...r come into contact with the unit Do not use the unit in the presence of inflammable substances or vapour such as alcohol insecticides petrol etc Do not allow children to operate the unit unsupervised Do not use this product for functions other than those described in this instruction manual A Energy save Use the unit in the recommended room size Locate the unit where furniture cannot obstruct the...

Страница 9: ...ong from the power cord 3 3 Electrical information Warning Be sure the electrical service is adequate for the model you have chosen This information can be found on the serial plate which is located on the side of the cabinet and behind the grille Be sure the air conditioner is properly grounded To minimize shock and fire hazards proper grounding is important The power cord is equipped with a thre...

Страница 10: ... N A G N I W S N O R E M I T Y M O N O C E F F O N O F F O R E M I T K C O L T E S E R A R E P M E T T E S C E R U T FOLLOW ME LED A L P S I D Y ION TURBO Remote Controller and Battery For remote control models only 1 pc Drain hose and drain hose adaptor 1 pc C Note Optional parts some models without Check all the accessories are included in the package and please refer to the installation instruc...

Страница 11: ...sides Fig 1 Rear 1 1 1 5 6 7 8 9 10 11 12 13 14 15 5 Upper air filter Behind the grille 6 Upper air intake 7 Air outlet 8 Drain outlet only for Pump heating model 9 Power cord outlet 10 Power cord buckle Used only when storing the unit 11 Bottom tray drain outlet 12 Power plug socket Use only when storing the unit 13 Lower air filter Behind the grille 14 Lower air intake Fig 2 4 Identification of ...

Страница 12: ...ion panel of the air conditioner Swing Timer Mode Fan Sleep 1 2 3 4 4 8 9 5 6 7 Fig 3 C Note On some models SLEEP button is instead of ECO button 1 POWER button Power switch on off 2 SLEEP ECO button Used to initiate the SLEEP ECO operation 3 FAN button Control the fan speed Press to select the fan speed in four steps LOW MED HI and AUTO The fan speed indicator light illuminates under different fa...

Страница 13: ...n DRY and FAN modes it shows the room temperature Error codes and protection code E1 Room temperature sensor error Unplug the unit and plug it back in If error repeats call for service E2 Evaporator temperature sensor error Unplug the unit and plug it back in If error repeats call for service E3 Condenser temperature sensor error Unplug the unit and plug it back in If error repeats call for servic...

Страница 14: ...until the DRY indicator light comes on Under this mode you cannot select a fan speed or adjust the temperature The fan motor operates at LOW speed Keep windows and doors closed for the best dehumidifying effect Do not put the duct to window AUTO operation When you set the air conditioner in AUTO mode it will automatically select cooling heating cooling only models without or fan only operation dep...

Страница 15: ...riod Turning the unit ON or OFF at any time or adjusting the timer setting to 0 0 will cancel the Auto Start Stop timer program When the malfunction E1 E2 E3 or E4 occurs the Auto Start Stop timed program will also be cancelled SLEEP ECO operation Press this button the selected temperature will increase cooling or decrease heating by 1 C 2 F or 1 F 30 minutess The temperature will then increase co...

Страница 16: ...the louver can be adjusted manually only Adjust the air flow direction automatically Fig 4 When the Power is ON the louver opens fully Press the SWING button on the panel or remote controller to initiate the Auto swing feature The louver willl swing up and down automatically Please do not adjust the louver manually Swing automatically Fig 4 6 Operating instructions ...

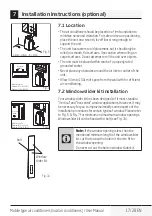
Страница 17: ...nit over objects The unit must be placed within reach of a properly rated grounded socket Never place any obstacles around the air inlet or outlet of the unit Allow 30cm to 100cm of space from the wall with for efficient air conditioning 7 2 Window slider kit installation Your window slider kit has been designed to fit most standard Vertical and horizontal window applications However it may be nec...

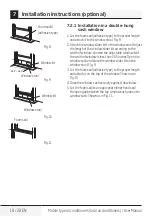
Страница 18: ... stool Adjust the length of the window slider kit according to the width of window shorten the adjustable window kit if the width of window is less than 26 5 inches Open the window sash and place the window slider kit on the window stool Fig 9 3 Cut the foam seal adhesive type to the proper length and attach it on the top of the window Shown as in Fig 10 4 Close the window sash securely against th...

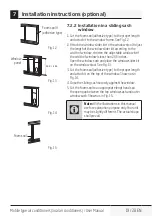
Страница 19: ... the adjustable window kit if the width of window is less than 26 5 inches Open the window sash and place the window slider kit on the window stool See Fig 13 3 Cut the foam seal adhesive type to the proper length and attach it on the top of the window Shown as in Fig 14 4 Close the sliding sash securely against the window 5 Cut the foam seal to an appropriate length and sea the open gap between t...

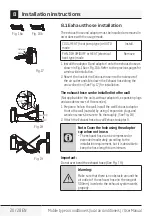
Страница 20: ...aptor A Adaptor cap min 30CM Expansion plug position The exhaust hose can be installed into the wall Not applicable to the units without adaptor A expansion plugs and wooden screws of Accessories 1 Prepare a hole in the wall Install the wall Exhaust adaptor A onto the wall outside by using 4 expansion plugs and wooden screws be sure to fix thoroughly See Fig 18 2 Attach the Exhaust hose to wall Ex...

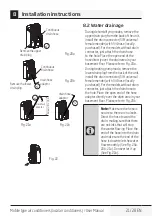
Страница 21: ...irectly over the drain area in your basement floor Please refer to Fig 20a During heating pump mode remove the lower drain plug from the back of the unit install the drain connector 5 8 universal female mender with 3 4 hose locally purchased For the models without drain connector just attach the drain hose to the hole Place the open end of the hose adaptor directly over the drain area in your base...

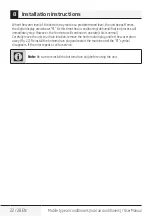
Страница 22: ...umidification process will immediately stop However the fan motor will continue to operate this is normal Carefully move the unit to a drain location remove the bottom drain plug and let the water drain away Fig 22 Reinstall the bottom drain plug and restart the machine until the P1 symbol disappears If the error repeats call for service C Note Be sure to reinstall the bottom drain plug before usi...

Страница 23: ... damaged it should be repaired by manufacture or its agency 1 Air filter Clean the air filter at least once every two weeks to prevent inferior fan operation because of dust Removal This unit has two filters Take the upper filter out along the the arrow direction Fig 23 then take the filter down Remove the lower filter by loosening the screw taking out the filter as shown in Fig 23 Cleaning Wash t...

Страница 24: ... a hose to drain outlet Place the open end of the hose directly over the drain area in your basement floor See Fig 20 21 Remove the plug from the bottom drain outlet all the water in the bottom tray would drain out See Fig 22 Keep the appliance running on FAN mode for half a day in a warm room to dry the appliance inside and prevent mold forming Stop the appliance and unplug it wrapped the cord an...

Страница 25: ...heat sources if possible Exhaust air duct is not connected or blocked Connect the duct and make sure it can function properly Temperature setting is too high Decrease the set temperature Air filter is blocked by dust Clean the air filter 3 Noisy or vibration The ground is not level or not flat enough Place the unit on a flat level ground if possible 4 Gurgling sound The sound comes from the flowin...

Страница 26: ...ct recycling should be carried out by natural persons that hold relevant certificates If the system has a leakage detection system installed leakage checks should be performed at least every 12 months make sure system operate properly If product must be performed leakage checks it should specify Inspection cycle establish and save records of leakage checks C Note For hermetically sealed equipment ...

Страница 27: ......

Страница 28: ...www beko com ...

Страница 29: ...Aparate de aer condiționat de tip mobil aparate de aer condiționat locale Manual de utilizare RO BEP 09C BEP 09H BEP 12C BEP 12H ...

Страница 30: ...strați ca referință pentru o utilizare ulterioară Dacă dați produsul unei alte persoane dați și manualul de utilizare Respectați toate atenționările și informațiile din manualul de utilizare Semnificația simbolurilor Următoarele simboluri sunt utilizate în capitolele acestui manual C Informații importante sau indicații utile cu privire la utilizare A Avertizare privind situații care pun în pericol...

Страница 31: ...de aer condiţionat 12 5 1 Panoul de comandă al aparatului de aer condiţionat 12 6 Instrucţiuni de utilizare 14 7 Instrucțiuni de instalare opțional 17 7 1 Amplasare 17 7 2 Instalarea kitului pentru ferestre culisante 17 7 2 1 Instalarea în cazul ferestrelor glisante cu două canate 18 7 2 2 Instalarea în cazul ferestrelor cu canat culisant 19 8 Instrucțiuni de instalare 20 8 1 Instalarea furtunului...

Страница 32: ... cu capacități fizice senzoriale sau mentale reduse sau cărora le lipsesc experiența și cunoștințele numai dacă li se asigură o supraveghere sau primesc instrucțiuni în ceea ce privește utilizarea aparatului în condiții de siguranță și dacă înțeleg riscurile implicate Copii nu trebuie să se joace cu aparatul Curățarea și lucrările de întreținere accesibile utilizatorului nu trebuie să fie efectuat...

Страница 33: ...entru a evita orice pericol Aparatul trebuie instalat în conformitate cu reglementările naţionale în materie de cablaje Nu utilizați aparatul de aer condiționat într o cameră umedă cum ar fi o baie sau spălătorie Aparatele cu funcţie de încălzire electrică trebuie să fie aşezate la cel puţin 1 metru distanţă faţă de materialele inflamabile Contactaţi un tehnician de service autorizat pentru repara...

Страница 34: ...us nou vânzătorul preia produsul vechi cel puţin fără costuri pentru utilizator C Producătorul preia aparatul vechi pentru a l elimina cel puţin fără costuri pentru utilizator D Întrucât produsele vechi conţin resurse valoroase ele pot fi vândute comercianţilor de deşeuri metalice Eliminarea deşeurilor în păduri sau în natură pune în pericol sănătatea deoarece substanţele periculoase ajung în pânz...

Страница 35: ...au depozitați aparatul de aer condiţionat într un loc de unde poate să cadă sau să fie tras în apă sau în alt lichid Scoateţi l imediat din priză Transportaţi întotdeauna aparatul de aer condiţionat în poziţie verticală şi aşezaţi l pe o suprafaţă stabilă şi uniformă în timpul utilizării Opriţi produsul când nu este folosit Contactaţi întotdeauna o persoană calificată pentru efectuarea reparaţiilo...

Страница 36: ...ţasaupentrua intraîncontactcuunitatea Nufolosiţiunitateaînprezenţasubstanţelor sauavaporilorinflamabiliprecumalcool insecticide benzinăetc Nu lăsaţi copiii să folosească unitatea nesupravegheaţi Nu folosiţi acest produs în alte scopuri decât cele descrise în acest manual de instrucţiuni A Reducerea consumului de energie Folosiţi unitatea într o încăpere de dimensiuni recomandate Aşezaţi unitatea î...

Страница 37: ...e Avertizare Asiguraţi vă că serviciul electric este adecvat pentru modelul pe care l aţi ales Aceste informaţii pot fi găsite pe placa de serie care este amplasată pe partea laterală a unităţii şi în spatele grilajului Asiguraţi vă că aparatul de aer condiţionat dispune de o împământare corespunzătoare Pentru a reduce riscurile de electrocutare şi de incendiu este important ca aparatul să dispună...

Страница 38: ...LOW MODE F D E E P S N A G N I W S N O R E M I T Y M O N O C E F F O N O F F O R E M I T K C O L T E S E R A R E P M E T T E S C E R U T FOLLOW ME LED A L P S I D Y ION TURBO Telecomandă şi baterii Doar pentru modelele cu telecomandă 1 buc Furtun de evacuare şi adaptor pentru furtunul de evacuare 1 buc C Notă Piese opționale unele modele nu le includ Verificaţi dacă toate accesoriile sunt incluse ...

Страница 39: ...14 15 5 Filtru de aer superior în spatele grilajului 6 Admisie superioară de aer 7 Evacuare de aer 8 Fantă de evacuare doar pentru modelul cu pompă de încălzire 9 Ieșire cablu de alimentare 10 Clemă pentru cablul de alimentare utilizată doar la depozitarea unităţii 11 Orificiu de evacuare al tăviţei inferioare 12 Fişă pentru cablul de alimentare utilizat doar la depozitarea unităţii 13 Filtru de a...

Страница 40: ... La unele modele butonul SLEEP somn este înlocuit de butonul ECO 1 Butonul POWER Pornire Porneşte Opreşte alimentarea 2 Butonul SLEEP ECO somn Eco Utilizat pentru a porni funcţionarea în modul SLEEP ECO somn Eco 3 Butonul FAN Ventilator Controlează viteza ventilatorului Apăsaţi pentru a selecta una din cele patru trepte ale vitezei ventilatorului MICĂ MEDIE MARE şi AUTO Lumina indicatoare a viteze...

Страница 41: ...i de protecţie E1 Eroare la senzorul de temperatură a camerei Scoateţi unitatea din priză apoi branşaţi o din nou Dacă eroarea apare din nou sunaţi la serviciul de asistenţă E2 Eroare la senzorul de temperatură al evaporatorului Scoateţi unitatea din priză apoi branşaţi o din nou Dacă eroarea apare din nou sunaţi la serviciul de asistenţă E3 Eroare la senzorul de temperatură al condensatorului Sco...

Страница 42: ...păsaţi butonul MODE Mod până când se aprinde lumina indicatoare DRY Dezumidificare În acest mod nu puteţi selecta viteza ventilatorului sau regla temperatura Motorul ventilatorului funcţionează la viteză joasă Păstraţi geamurile şi uşile închise pentru a beneficia de un efect de dezumidificare optim Nu puneţi furtunul pe fereastră Funcţionarea în modul AUTO Când aparatul de aer condiţionat funcţio...

Страница 43: ...secunde Pornirea sau oprirea în orice moment a unităţii ori aducerea temporizatorului la valoarea 0 0 va anula programul de pornire oprire automată a temporizatorului Când apare o defecţiune E1 E2 E3 sau E4 programul de pornire oprire temporizată va fi de asemenea anulat Modul de funcționare SLEEP ECO somn eco Dacă apăsaţi acest buton temperatura selectată va creşte răcire sau se va micşora încălz...

Страница 44: ...dele fanta poate fi reglată numai manual Reglarea automată a direcţiei fluxului de aer Fig 4 Când este pornită unitatea fanta se deschide în întregime Apăsaţi butonul SWING Pendulare de pe panou sau de pe telecomandă pentru a activa funcţia de pendulare automată Fanta va pendula automat în sus şi în jos Vă rugăm să nu reglaţi manual fanta Pendulare automată Fig 4 6 Instrucţiuni de utilizare ...

Страница 45: ...itatea trebuie amplasată astfel încât să poată fi alimentată de la o priză cu împământare corespunzătoare Nu amplasaţi niciodată obstacole în apropierea orificiului de intrare sau ieşire a aerului din unitate Lăsaţi un spaţiu de 30 cm 100 cm faţă de perete pentru o funcţionare eficientă a aparatului de aer condiţionat 7 2 Instalarea kitului pentru ferestre culisante Kitul pentru ferestre culisante...

Страница 46: ...ntru ferestre culisante pe pervazul ferestrei Ajustaţi lungimea kitului în funcţie de lăţimea ferestrei scurtaţi kitul reglabil pentru ferestre dacă lăţimea ferestrei este mai mică de 67 3 cm 26 5 inci Deschideţi canatul ferestrei şi amplasaţi kitul pentru erestre culisante pe pervaz Fig 9 3 Tăiaţi garnitura de spumă de tip adeziv la lungimea corespunzătoare şi lipiţi o pe partea de sus ferestrei ...

Страница 47: ...labil pentru ferestre dacă lăţimea ferestrei este mai mică de 67 3 cm 26 5 inci Deschideţi canatul ferestrei şi amplasaţi kitul pentru ferestre culisante pe pervaz Vedeți Fig 13 3 Tăiaţi garnitura de spumă de tip adeziv la lungimea corespunzătoare şi lipiţi o pe partea de sus ferestrei După cum este indicat în Fig 14 4 Închideţi bine canatul culisant al ferestrei 5 Tăiaţi garnitura de spumă la o l...

Страница 48: ... 19 maxim 120 cm Adaptor A Adaptor capac minim 30 cm Poziție bușon expandabil Furtunul de evacuare poate fi instalat în perete Neaplicabil în cazul unităţilor fără adaptor A buşoane expandabile sau şuruburi pentru lemn de accesorii 1 Pregătiţi un orificiu în perete Instalaţi adaptorul de evacuare A în perete exterior folosind 4 buşoane expandabile şi şuruburi pentru lemn asiguraţi vă că le strânge...

Страница 49: ...adaptorului furtunului direct deasupra zonei de scurgere din podea Consultaţi Fig 20a În modurile de încălzire cu pompă scoateţi buşonul inferior de evacuare din spatele unităţii instalaţi conectorul de evacuare mufă mamă universală de 5 8 şi furtunul de 3 4 achiziționat local Pentru modelele fără conector de evacuare este suficient să introduceţi furtunul de evacuare în orificiu Amplasaţi capătul...

Страница 50: ...sul de dezumidificare se oprește imediat Totuși motorul ventilatorului continuă să funcţioneze acest lucru este normal Mutaţi cu atenţie unitatea în locul de golire scoateţi buşonul inferior de evacuare şi lăsaţi apa să curgă Fig 22 Reinstalaţi buşonul inferior de evacuare şi reporniţi aparatul până când simbolul P1 dispare Dacă eroarea apare din nou apelaţi la un tehnician de service C Notă Asigu...

Страница 51: ...are cablul de alimentare este deteriorat acesta va fi reparat de producător sau de un agent al acestuia 1 Filtru de aer Curăţaţi filtrul de aer cel puţin o dată la fiecare două săptămâni pentru a împiedica funcţionarea filtrului inferior din cauza prafului Îndepărtare Această unitate are două filtre Trageţi filtrul superior în direcţia săgeţii Fig 23 apoi trageţi filtrul Scoateţi filtrul inferior ...

Страница 52: ...furtunul în orificiul de evacuare Amplasaţi capătul deschis al furtunului direct deasupra zonei de scurgere din podea Consultaţi Fig 20 şi Fig 21 Scoateţi buşonul din orificiul inferior de evacuare şi lăsaţi să se scurgă toată apa din tăviţa inferioară Consultaţi Fig 22 Lăsaţi aparatul să funcţioneze în modul FAN Ventilator timp de o jumătate de zi într o încăpere călduroasă pentru a usca interior...

Страница 53: ...vacuare a aerului nu este conectată sau este blocată Conectaţi conducta şi asiguraţi vă că funcţionează corect Temperatura setată este prea mare Scădeţi temperatura setată Filtrul de aer este înfundat cu praf Curăţaţi filtrul de aer 3 Zgomote sau vibraţii Suprafaţa nu este suficient de plată sau uniformă Amplasaţi unitatea pe o suprafaţă plată şi uniformă dacă este posibil 4 Se aude un clipocit Su...

Страница 54: ... de persoanele fizice care dețin autorizații corespunzătoare În cazul în care sistemul are instalat un sistem de detectare a scurgerilor verificările pentru scurgeri trebuie efectuate cel puțin la fiecare 12 luni pentru a vă asigura că sistemul funcționează corect În cazul în care produsul trebuie verificat pentru scurgeri acesta trebuie să specifice periodicitatea verificărilor țineți evidența ve...

Страница 55: ......

Страница 56: ...www beko com ...

Отзывы: