background image

23 / EN

Dryer / User Manual

Operating the product

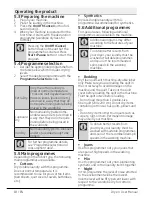
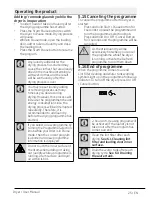
•  Open the loading door and put the 

laundry in.

•  Select the drying program.

Press End Time button to set the desired 

time delay. 

•  Press Start/Pause button. Time Delaying 

starts countdown and the time delaying 

symbol lights up on the display. The “:” in 

the middle of the displayed delay time 

will flash.

•  Additional laundry may be loaded / taken 

out during the End Time  period. At the 

end of the End Time countdown process, 

End Time symbol disappears, drying 

process starts and the programme 

duration is displayed.

C

If loading door is opened and 

closed during the End Time 

duration, the programme will 

switch to pause mode. End Time 

function should be resumed with 

pressing Start/Pause button.

Changing the End time

If you want to change the time during 

countdown:

•  End Time is deactivated when the dryer 

is switched off and on with On/Off/

Cancel button. Restart the dryer and 

repeat the End Time procedure for the 

desired time.

•  When your dryer is operated for the 

first time, it starts with the declaration 

programme (wardrobe dryness for 

cottons).

Canceling End time function

If you want to cancel the End Time 

countdown and start the programme 

immediately:

•  End Time is deactivated when the dryer 

is switched off and on with On/Off/

Cancel button. 

•  Press Start/Pause button to start 

the programme you have previously 

selected.

5.10 Warning symbols

C

Warning symbols may differ 

according to the model of your 

machine.

Lint filter cleaning

When the programme is completed, a 

warning symbol will appear continously 

indicating that the filter needs to be cleaned.

C

For detailed information, 

see 6 

Maintenance and cleaning.

C

If the filter cleaning symbol 

flashes continuously, 

see 7 

Troubleshooting.

Draining the water tank

When the programme is completed, a 

warning symbol will appear continously 

to remind that the water tank needs to be 

drained.

C

For detailed information, 

see 6 

Maintenance and cleaning.

If the water tank becomes full while the 

programme is running, the warning symbol 

will start to flash and the dryer will pause. 

Drain the water in the water tank and 

press 

Start / Pause

 button to resume the 

programme. The warning symbol turns off 

and the programme resumes operating.

Содержание BDP83HW

Страница 1: ...Dryer User Manual BDP83HW BDP83HW 271017 1521 EN ...

Страница 2: ...he model indicated on the cover page Read the instructions Explanation of symbols Throughout this user manual the following symbols are used C Important information or useful hints about usage AWarning for hazardous situations with regard to life and property BWarning against electric shock Warning against hot surfaces Warning against fire hazard Warning against scalding hazard Packaging materials...

Страница 3: ... be kept away unless continously supervised Adjustable feet should not be removed The gap between the dryer and the floor should not be reduced with materials such as carpet wood and tape This will cause problems with the dryer Always have the installation and repairing procedures carried out by the Authorized Service Manufacturer shall not be held liable for damages that may arise from procedures...

Страница 4: ...el Have the grounding installation performed by a qualified electrician Our company shall not be liable for any damages that will arise when the dryer is used without grounding in accordance with the local regulations The voltage and allowed fuse protection is stated on the type label plate The voltage specified on the type label must be equal to your mains voltage Unplug the dryer when it is not ...

Страница 5: ...he ventilation programme to cool down or quickly remove all laundry from the dryer in order to hang them up and dissipate the heat Points to be taken into consideration for fire hazard Below specified laundry or items must not be dried in the dryer considering fire hazard Unwashed laundry items Items soiled with oil acetone alcohol fuel oil kerosene stain removers turpentine paraffin or paraffin r...

Страница 6: ...inadequately may ignite on their own and even may ignite after drying ends Oil affected items can ignite spontaneously especially when exposed to heat sources such as in a tumble dryer The items become warm causing an oxidation reaction in the oil Oxidation creates heat If the heat cannot escape the items can become hot enough to catch fire Piling stacking or storing oil affected items can prevent...

Страница 7: ...s or the published service manual Otherwise you will be putting your life and others lives in danger There must not be a lockable sliding or hinged door that may block the opening of the loading door in the place where your dryer is to be installed Install your dryer at places suitable for home use Bathroom closed balcony garage etc Make sure that pets do not enter the dryer Check the inside of th...

Страница 8: ... by the authorized service agent Total weight of the washing machine and the dryer with full load when they are placed on top of each other reaches to approx 180 kilograms Place the products on a solid floor that has sufficient load carrying capacity A Washing machine cannot be placed on the dryer Pay attention to the above warnings during the installation on your washing machine Installation Tabl...

Страница 9: ... of the dryer that you purchased is 10 years During this period original spare parts will be available to operate the dryer properly 1 4 Child safety Packaging materials are dangerous for the children Keep packaging materials away from children Electrical products are dangerous for the children Keep children away from the product when it is operating Do not let them tamper with the dryer Use the c...

Страница 10: ...of its service life Take it to the collection center for the recycling of electrical and electronic equipment Please consult your local authorities to learn about these collection centers 1 6 Compliance with RoHS Directive The product you have purchased complies with EU RoHS Directive 2011 65 EU It does not contain harmful and prohibited materials specified in the Directive 1 7 Package information...

Страница 11: ...stic front door usage 48 5 kg Net weight glass front door usage 51 kg Voltage See type label Rated power input Model code C Technical specifications of the dryer are subject to specification without notice to improve the quality of the product C Figures in this manual are schematic and may not match the product exactly C Values stated on markers on the dryer or in the other published documentation...

Страница 12: ...ds 6 Adjustable legs 7 Kick plate 8 Type label 9 Lint filter 10 Water tank drawer 11 Power cord 2 2 Package Contents 1 2 3 5 6 4 7 8 1 Water drain hose 2 Filter drawer spare sponge 3 User Manual 4 Drying basket 5 Drying basket user manual 6 Water Filling Container 7 Pure Water 8 Fragrance Capsules Group It can be supplied with your machine depending on its model ...

Страница 13: ...here your dryer is to be installed Once the dryer is installed it should stay at the same place where its connections have been made When installing the dryer make sure that its rear wall does not touch anywhere tap socket etc Place the dryer at least 1 cm away from the edges of other furniture Your dryer can be operated at temperatures between 5 C and 35 C If the operating conditions fall outside...

Страница 14: ... machine in the upright position we recommend carrying it by tilting towards the right side when looked from the front 3 6 Warnings about sounds C It is normal to hear a metallic noise from the compressor sometimes during operation C Water collected during operation is pumped to water tank It is normal to hear pumping noise during this process 3 7 Changing the illumination lamp In case an illumina...

Страница 15: ...g them Thus the drying time is shortened and energy consumption is reduced Sort out the laundry depending on their type and thickness Dry the same type of laundry together For example thin kitchen towels and tableclothes dries earlier than thick bathroom towels Follow the instructions in the user manual for programme selection Do not open the loading door of the machine during drying unless necess...

Страница 16: ...le 1500 Cotton quilt covers single 1000 Bed sheets double 500 Bed sheets single 350 Large tablecloths 700 Small tablecloths 250 Tea napkins 100 Bath towels 700 Hand towels 350 Blouses 150 Cotton shirts 300 Shirts 250 Cotton dresses 500 Dresses 350 Jeans 700 Handkerchiefs 10 pieces 100 T Shirts 125 Dry laundry weight before washing ...

Страница 17: ...sing button Remaining time indicator Filter drawer cleaning warning symbol Filter cleaning warning symbol Smart grid symbol Child lock warning symbol Water tank warning symbol End time symbol Start Pause symbol Steam tank warning symbol Dryness level Time that appears on display indicates the remaining time until the end of the programme and changes according to the dampness level of the laundry a...

Страница 18: ...se for your cotton items bed sheets quilt covers towels bathrobes etc Synthetics Dry less durable laundry with this programme Recommended for synthetics 5 6 Additional programmes For special cases following additional programmes are available in the machine C Additional programs may differ according to the features of your machine C To obtain better results from your dryer your laundry must be was...

Страница 19: ...tic cotton or mixed fabrics Delicates You can dry your highly delicate laundry silk blouses fine underwear etc that are suitable for drying or laundry which is advised to be hand washed at a lower temperature C It is recommended to use a cloth bag to avoid certain delicate garments and laundry from getting creased or damaged Take your laundry immediately out of the dryer and hang them after the pr...

Страница 20: ...60 124 95 Jeans 4 1200 50 117 85 Sport 4 1000 60 105 70 Shirts 30 0 5 1200 60 30 23 Babyprotect 3 1000 60 95 71 Mix 4 1000 60 110 75 Bedding 2 5 1000 40 120 Night silent 8 1000 60 240 Delicates 2 600 40 50 WoolProtect 1 5 600 50 146 Synthetics B Cupboard dry 4 800 40 75 50 B Iron dry 4 800 40 59 34 Energy consumption values Programs Capacity kg Energy consumption value kWh per year Energy rating s...

Страница 21: ...n change the sound level either before the programme starts or while the programme is in progress Volume level low Volume level high Dryness level adjustment selection Dryness level adjustment button is used to adjust the required dryness level Programme duration can change depending on the selection C You can activate this function only before the programme has started Drying level damp Drying le...

Страница 22: ...ite selection button for about 3 seconds Features of set programme will be saved End time With the End Time function the end time of the programme may be delayed up to 24 hours The time on the display is the total of normal drying time and end time Anti creasing Anti creasing programme duration may be changed with the Anti creasing selection button You can use Anti creasing function to prevent lau...

Страница 23: ...ime it starts with the declaration programme wardrobe dryness for cottons Canceling End time function If you want to cancel the End Time countdown and start the programme immediately End Time is deactivated when the dryer is switched off and on with On Off Cancel button Press Start Pause button to start the programme you have previously selected 5 10 Warning symbols C Warning symbols may differ ac...

Страница 24: ... appear on the display when the Child Lock is activated All buttons except the On Off Cancel and Child Lock button on the control panel are deactivated when the Child Lock is active Display symbols will not change even if the position of Programme Selection knob is changed while the child lock button is active When the programme selection knob is turned and function buttons are pressed Child Lock ...

Страница 25: ...ion knob while your drier is in Pause mode then the current program is aborted and new programme information is displayed Do not touch the inner surface of the drum when adding or taking out laundry while a programme is running Drum surface and dryer air within is hot 5 15 Canceling the programme To cancel the programme after the dryer is started Press and hold Start Pause button for 1 seconds to ...

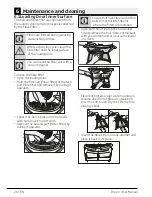
Страница 26: ...art inner filter of the two part fibre filter and remove it by pulling it upwards Collect the hair fibres and cotton balls with hand or with a soft cloth Remove the second part outer filter by pulling it upwards C Ensure that hair fibre and cotton balls do not fall into the slot where the filters are installed Open both fibre filters inner and outer filters remove the hair fibre cotton balls with ...

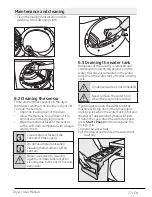
Страница 27: ... of the sensors A Never use solvents cleaning agents or similar substances for cleaning due to the risk of fire and explosion 6 3 Draining the water tank Dampness of the laundry is removed and condensed during drying process and the water that arise accumulates in the water tank Drain the water tank after each drying cycle A Condensed water is not drinkable A Never remove the water tank when the p...

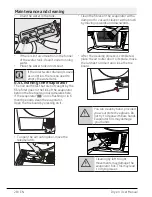
Страница 28: ...tes here If the evaporator icon is flashing or in 6 month periods clean the evaporator Open the toe board by pressing on it To open the air routing door move the release latch Clean the fibres on the evaporator with a damp cloth vacuum cleaner with a brush by moving upwards and downwards After the cleaning process is completed place the air router door to its place move the latches to close it and...

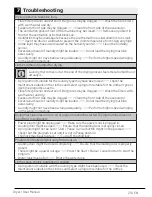
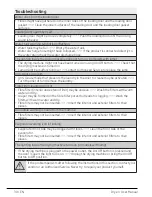
Страница 29: ... type or use time programs as extra Fibre filter interior and exterior filter pores may be clogged Wash the filters with warm water and dry Evaporator front side may be clogged Clean the front side of the evaporator Excessive amount of laundry might be loaded Do not load the drying machine excessively Laundry might not have been wrung adequately Perform a higher speed wringing on the washing machi...

Страница 30: ...vated Turn the drier off and remove the laundry Fibre filter cleaning icon is lit Fibre filter interior and exterior filter may be unclean Wash the filters with warm water and dry A layer may be formed on the fibre filter pores that leads to clogging Wash the filters with warm water and dry Fibre filters may not be inserted Insert the interior and exterior filters to their places An audible warnin...

Страница 31: ......

Страница 32: ......

Отзывы: