background image

45 / EN

Washing Machine / User’s Manual

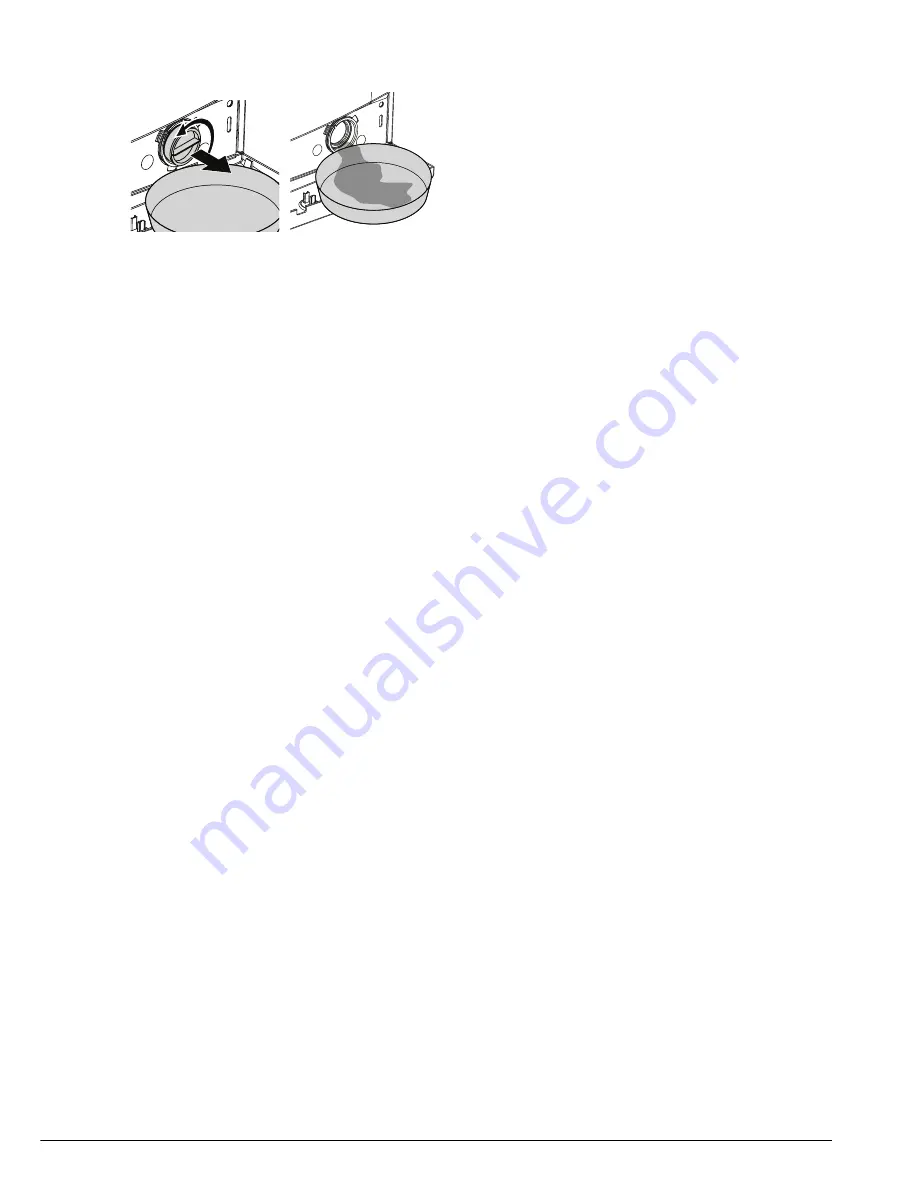
If the product does not have an emergency water drain hose, in order to drain the 
water:

a.  In order to collect the water to flow out 

of the filter, place a large vessel in front 

of the filter.

b.  Turn and loosen the pump filter until 

water starts to flow (counterclockwise). 

Fill the flowing water into the container 

you have placed in front of the filter. 

Always keep a piece of cloth handy to 

absorb any spilled water.

c  When the water inside the product is 

finished, take out the filter completely 

by turning it.

4 Clean any residues inside the filter as well as fibers, if any, around the pump impeller 

region.

5. Replace the filter.

6. If the filter cap is composed of two pieces, close the filter cap by pressing on the tab. If 

it is one piece, seat the tabs in the lower part into their places first, and then press the 

upper part to close.

Содержание 8143 CMK

Страница 1: ...8143 CMK 2820523995_EN 17 04 14 15 40 Washing Machine User s Manual Document Number ...

Страница 2: ...rmation in the user manual Remember that this user manual is also applicable for several other models Differences between models will be identified in the manual Explanation of symbols Throughout this user manual the following symbols are used C Important information or useful hints about usage A Warning for hazardous situations with regard to life and property B Warning for electric shock Recycla...

Страница 3: ...13 4 4 4 Connecting water supply 13 4 4 5 Connecting the drain hose to the drain 14 4 4 6 Adjusting the feet 14 4 4 7 Electrical connection 15 4 4 8 Initial use 15 4 5 Preparation 16 4 5 1 Sorting the laundry 16 4 5 2 Preparing laundry for washing 17 4 5 3 Things to be done for energy saving 17 4 5 4 Loading the laundry 17 4 5 5 Correct load capacity 18 4 5 6 Using detergent and softener 18 4 5 7 ...

Страница 4: ...selections after programme has started 36 4 6 17 Child Lock 37 4 6 18 Cancelling the programme 37 4 6 19 End of programme 38 4 6 20 Favourite program setting 38 4 6 21 Entering the settings menu 38 4 7 Maintenance and cleaning 42 4 7 1 Cleaning the detergent drawer 42 4 7 2 Cleaning the loading door and the drum 42 4 7 3 Cleaning the body and control panel 43 4 7 4 Cleaning the water intake filter...

Страница 5: ...uthorized Service Agent Manufacturer shall not be held liable for damages that may arise from procedures carried out by unauthorized persons u The water supply and draining hoses must be securely fastened and remain undamaged Otherwise water leak may occur u While there is still water inside the product never open the loading door or remove the filter Otherwise risk of flooding and injury from hot...

Страница 6: ... with the product Use child lock to prevent children from intervening with the product u Do not forget to close the loading door when leaving the room where the product is located u store all detergents and additives in a safe place away from the reach of the children by closing the cover of the detergent container or sealing the detergent package 1 3 Electrical safety u If the product has a failu...

Страница 7: ... unplugged during installation maintenance cleaning and repair procedures u If the power cable is damaged it must be replaced by the manufacturer after sales service or a similarly qualified person preferably an electrician or someone designated by the importer in order to avoid possible risks 1 4 Hot surface safety While washing the laundry at high temperatures the loading door glass will get hot...

Страница 8: ... complies with EU RoHS Directive 2011 65 EU It does not contain harmful and prohibited materials specified in the Directive 2 2 Package information Packaging materials of the product are manufactured from recyclable materials in accordance with our National Environment Regulations Do not dispose of the packaging materials together with the domestic or other wastes Take them to the packaging materi...

Страница 9: ...9 EN Washing Machine User s Manual 4 Your product 4 1 Overview 1 2 3 4 5 6 7 8 1 Power cable 2 Top panel 3 Control panel 4 Drain hose 5 Loading door 6 Filter cap 7 Adjustable feet 8 Detergent drawer ...

Страница 10: ... Electronic water shut off b Mechanical water shut off c Standard 13 Liquid detergent container 14 User Manual 15 Blind plug 16 Plastic plug group Number of transportation safety bolts may change depending on the model of your product This may be supplied with the machine depending on the model of your product It will be supplied if your product has double water inlet CFigures in this manual are s...

Страница 11: ...tandard 40 C cotton programme at partial load min 207 Duration of the left on mode min N A Airborne acoustical noise emissions washing spinning dB 57 72 Built in No Rated capacity kg 8 Height cm 84 Width cm 60 Depth cm 61 Net weight 4 kg 71 Single Water inlet Double Water inlet Available Electrical input V Hz 220 240 V 50Hz Total current A 10 Total power W 2000 2350 Main model code 958 1 Energy Co...

Страница 12: ...it If so do not have it installed Damaged products cause risks for your safety 4 4 1 Appropriate installation location Place the product on a hard and level floor Do not put it onto a carpet with high pile or other similar surfaces When the washing machine and drier are placed on top of each other their total weight when loaded amounts to 180 kilograms Place the product on a solid and flat floor t...

Страница 13: ... cold water inlet unit you must install the supplied stopper to the hot water valve before operating the product Applies for the products supplied together with a blind stopper group A CAUTION Models with a single water inlet should not be connected to the hot water tap In such a case the laundry will get damaged or the product will switch to protection mode and will not operate CAUTION Do not use...

Страница 14: ...to ensure easy drainage do not immerse the end of the hose into the waste water or do not insert it into the drain for more than 15 cm If it is too long cut it short The end of the hose should not be bent it should not be stepped on and the hose must not be pinched between the drain and the machine If the length of the hose is too short use it by adding an original extension hose Length of the hos...

Страница 15: ... mains voltage Do not make connections via extension cables or multi plugs B CAUTION Damaged power cables must be replaced by the Authorized Service Agents 4 4 8 Initial use Before starting to use the product make sure that the preparations are made which are in line with the 2 Important Safety and Environment Instructions and the instructions in the 4 Installation section To prepare the product f...

Страница 16: ...Drying Symbols Suitable for dryer No Iron Sensitive Delicate dry Do not dry with dryer Do not dry Do not dry clean DRYING Drying Settings At any temperature At high temperature At medium temperature At low temperature Without heating Hang to dry Lay to dry Hang wet to dry Lay in shadow to dry Dry cleanable Iron IRON Dry or Steam Iron at high temperature Iron at medium temperature Iron at low tempe...

Страница 17: ... hours before washing This will reduce pilling Laundry that are subjected to materials such as flour lime dust milk powder etc intensely must be shaken off before placing into the machine Such dusts and powders on the laundry may build up on the inner parts of the machine in time and can cause damage 4 5 3 Things to be done for energy saving Following information will help you use the product in a...

Страница 18: ...e washing programme While the washing cycle is in progress do not leave the detergent dispenser open When using a programme without prewash do not put any detergent into the prewash compartment compartment nr 1 In a programme with prewash do not put liquid detergent into the prewash compartment compartment nr 1 Do not select a programme with prewash if you are using a detergent bag or dispensing b...

Страница 19: ...uid detergent cup Do not use liquid detergent for the prewash in a programme with prewash Liquid detergent stains your clothes when used with Delayed Start function If you are going to use the Delayed Start function do not use liquid detergent Using gel and tablet detergent If the gel detergent thickness is fluidal and your machine does not contain a special liquid detergent cup put the gel deterg...

Страница 20: ...at dosages recommended for heavily soiled clothes It is recommended to use powder detergents to clean clay and soil stains and the stains that are sensitive to bleaches Powder and liquid detergents recommended for colors can be used at dosages recommended for heavily soiled clothes It is recommended to use powder detergents to clean clay and soil stains and the stains that are sensitive to bleache...

Страница 21: ...n 17 18 26 19 20 21 22 23 24 25 27 4 6 2 Display symbols a b c d e f g h i k j m I n a Child Proof Lock Indicator b Main Wash Detergent Compartment indicator c Prewash Detergent Compartment indicator d Display Information Line e load indicator displays the recommended amount of load f Time indicator g Start Pause indicator h End Time indicator i Auxiliary Function indicator j Door Lock indicator k...

Страница 22: ...Auxiliary functions Programme Max Load kg Water Consumption l Energy Consumption kWh Max Speed Lavage Express Prélavage Rinse Hold Anti Creasing Rinçage Plus Soaking Pet hair removal Mode Nuit Selectable temperature range C Coton 90 8 95 2 70 1600 90 Cold 60 8 95 1 75 1600 90 Cold 40 8 95 1 00 1600 90 Cold Coton Eco 60 8 62 1 30 1600 60 Cold 60 5 5 58 0 90 1600 60 Cold 40 5 5 58 0 82 1600 60 Cold ...

Страница 23: ... order to provide guidance for people seeking advice in this issue It is aimed to assure poeple that products had been scientifically tested or reviewed with measurable results C The auxiliary functions in the table may vary according to the model of your product Water and power consumption may vary subject to the changes in water pressure water hardness and temperature ambient temperature type an...

Страница 24: ...ore providing a more economic wash This programme is available in the models with the remaining time indicator Cottons Use for your cotton laundry such as bed sheets duvet and pillowcase sets towels bathrobes underwear etc Your laundry will be washed with vigorous washing action for a longer washing cycle Synthetics Use to wash your synthetic clothes shirts blouses synthetic cotton blends etc It w...

Страница 25: ... and synthetic blended fabrics together Fast 14 Use to wash your lightly soiled and unstained cotton laundry in a short time Fast Daily Use to wash your lightly soiled and unstained cotton laundry in a short time Automatic Programme Use to wash your frequently washable cotton synthetic or blended cotton synthetic clothes Programme detects the type and quantity of the laundry to automatically adjus...

Страница 26: ...erature indicator It is possible that the recommended temperature value is not the maximum temperature that can be selected for the current programme Press the Temperature Adjustment button to change the temperature Temperature will decrease by increments of 10 C C Temperature Adjustment button only serves for decreasing the temperature Cold Wash Finally symbol indicating the cold wash option appe...

Страница 27: ...o Spin option is indicated with _ _ symbol If you are not going to unload your laundry immediately after the programme completes you can use Rinse Hold function in order to prevent them from getting wrinkled when there is no water in the machine Rinse Hold No Spin This function holds the laundry in the final rinsing water If you want to spin your laundry after the Rinse Hold function Adjust the Sp...

Страница 28: ...ve way Use this programme only for durable colorfast cotton laundry do not wash delicate and pigmenting clothes and laundry in this programme Before washing garment tags should be checked recommended for cotton shirts trousers shorts t shirts baby clothes pyjamas aprons table clothes beddings duvet cover bed sheet pillowcase bath beach towel towel socks cotton underwears that are suitable for wash...

Страница 29: ...o the stain type while the stain is still fresh Apply pretreatment to the stain using liquid or powder special stain remover liquid detergent or a little amount of paste of water and powder detergent It is recommended to use cold water for applying pretreatment to stains with unknown type Before applying pretreatment to the stain read the garment s tag to ensure that no condition that may harm the...

Страница 30: ...id of the relevant compartment to fill the liquid detergent softener Make sure not to pass the line Close the lid Slowly close the detergent drawer After closing the detergent drawer the flashing detergent symbol will start to lit steadily Indicates that the components are filled and the drawer is closed For coloured and white laundry it is recommended to fill commonly used liquid detergent in the...

Страница 31: ...ry function and soiling level of the laundry press the powder detergent button Powder Detergent Selected text will be displayed Program is started by pressing Start Pause button When the machine starts to take in water detergent will also be taken in Softener will be taken in through the detergent dosing system Run Out of Detergent and or Softener When the detergent in the detergent drawer runs ou...

Страница 32: ...perties of the softener that is used Enter the settings menu select Softener amount ml and increase or decrease the amount The amount can be changed between 20 ml and 80 ml The amount of softener that will be used during washing will be determined automatically based on this value and the selected programme and amount of laundry If you don t want to use softener during washing select Cancel from t...

Страница 33: ...al Water Additional Water will be canceled and Quick Wash will remain active An auxiliary function that is not compatible with the programme cannot be selected See 4 6 3 Programme and consumption table Some programmes have auxiliary functions that must be operated simultaneously Those functions cannot be cancelled The frame of the auxiliary function will not be illuminated only inner area will be ...

Страница 34: ... the values in the Programme and consumption table depending on the water pressure water hardness and temperature ambient temperature amount and the type of laundry auxiliary functions selected and the changes at the mains voltage 4 6 13 End Time End time setting With the End Time function the startup of the programme may be delayed up to 24 hours After pressing End Time button the programme s est...

Страница 35: ... display When the End Time selection is completed the time appears on the screen consists of end time plus the duration of the selected programme 4 6 14 Starting the programme 1 Press Start Pause button to start the programme Program starts Locking door 2 Start indicator is lit to indicate that the programme is started Programme starts appears on the display for 3 seconds 3 Loading door is locked ...

Страница 36: ...ill be displayed Changing the programme selection after programme has started The programme change is not allowed when the current programme is running If you turn the Programme Selection knob while the programme is running Switch to Standby appears on the display You can select the new programme after switching the current programme to pause mode C The selected program starts anew Changing the au...

Страница 37: ...d Lock Enabled appears on the display if you press any button when Child Lock is enabled To deactivate the child lock Child lock Off Press and hold Auxiliary Function button 1 for 3 seconds After the countdown as Child Lock 3ıı 2ıı 1ıı on the display is over Child Lock Disabled appears on the display and Child lock indicator is lit 4 6 18 Cancelling the programme Cancel 1 The programme is cancelle...

Страница 38: ...ourite programme Favourite 1 Favourite Saving 1 Select the desired programme temperature spin speed soiling degree and auxiliary function 2 Keep the Favourite button pressed for 3 seconds 3 A countdown as Favourite 3ıı 2ıı 1ıı Favourite Saving is displayed C If storing is not successful Favorite not saved appears on the display To select a favourite programme Favourite Selected 1 Press Favourite b...

Страница 39: ... and 3rd Auxiliary Function buttons Save setting will be prompted Language English 4 Pressing the second auxiliary function button will save the settings Changing the screen brightness setting 1 Press and hold Soiling Level Setting button for 3 seconds to enter the Settings menu Using the 1st and 3rd Auxiliary Function buttons open the Brightness menu Brightness 3 2 Press the 2nd auxiliary functio...

Страница 40: ...o enter the Settings menu Using the 1st and 3rd Auxiliary Function buttons open the Volume Level menu Volume Low SETTINGS BRIGHTNESS 2 The Volume setting can be High or Low The menu will be opened with the last selected level Press the 2nd auxiliary function button until the desired level appears The desired volume level will be saved ...

Страница 41: ...urned to factory settings 1 Press and hold Soiling Level Setting button for 3 seconds to enter the Settings menu Use the 1st and 3rd Auxiliary Function buttons to open the Factory Settings menu SETTINGS BRIGHTNESS 2 Press the 2nd auxiliary function button to restore the factory settings Store Settings 3 To restore the factory settings press one of the 1st and 3rd Auxiliary Function buttons Save se...

Страница 42: ... and the drum Residues of softener detergent and dirt may accumulate in the product in time and may cause unpleasant odours and washing complaints To avoid this use the Drum Cleaning programme If your product is not featured with Drum Cleaning programme use Cottons 90 programme and select Additional Water or Extra Rinse auxiliary functions as well Apply this procedure without any laundry in the pr...

Страница 43: ...ng remaining water and cleaning the pump filter The filter system in your product prevents solid items such as buttons coins and fabric fibers clogging the pump impeller during discharge of washing water Thus the water will be discharged without any problem and the service life of the pump will extend If the product fails to drain water inside it the pump filter is clogged Filter must be cleaned w...

Страница 44: ...the cover 3 Follow the below procedures in order to drain water If the product has an emergency water draining hose in order to drain the water a Pull the emergency draining hose out from its seat b Place a large container at the end of the hose Drain the water into the container by pulling out the plug at the end of the hose When the container is full block the inlet of the hose by replacing the ...

Страница 45: ...o the container you have placed in front of the filter Always keep a piece of cloth handy to absorb any spilled water c When the water inside the product is finished take out the filter completely by turning it 4 Clean any residues inside the filter as well as fibers if any around the pump impeller region 5 Replace the filter 6 If the filter cap is composed of two pieces close the filter cap by pr...

Страница 46: ...e too little Add more laundry to the machine Machine might be overloaded with laundry Take out some of the laundry from the machine or distribute the load by hand to balance it homogenously in the machine Machine might be leaning on a rigid item Make sure that the machine is not leaning on anything There is water leaking from the bottom of the washing machine Water drain hose might be clogged or t...

Страница 47: ...47 EN Washing Machine User s Manual ...

Страница 48: ... have occurred and automatic foam absorption system might have been activated due to too much detergent usage Use recommended amount of detergent Programme time does not countdown On models with display Timer may stop during water intake Timer indicator will not countdown until the machine takes in adequate amount of water The machine will wait until there is sufficient amount of water to avoid po...

Страница 49: ... is poor Stains persist or the laundry is not whitened Insufficient amount of detergent is used Use the recommended amount of detergent appropriate for water hardness and the laundry Excessive laundry was loaded in Do not load the machine in excess Load with amounts recommended in the Programme and consumption table Wrong programme and temperature were selected Select the proper programme and temp...

Страница 50: ... of detergent for the water hardness can cause the laundry to become stiff in time Use appropriate amount of detergent according to the water hardness Detergent is put in the wrong compartment If detergent is put in the prewash compartment although prewash cycle is not selected machine can take this detergent during rinsing or softener step Put the detergent in the correct compartment Detergent mi...

Страница 51: ...h as tulle may foam too much because of their texture Use smaller amounts of detergent for this type of item Detergent is put in the wrong compartment Put the detergent in the correct compartment Softener is being taken early There may be problem in the valves or in the detergent dispenser Call the Authorized Service Agent Foam is overflowing from the detergent drawer Too much detergent is used Mi...

Страница 52: ...www beko com ...

Отзывы: