background image

Cleaning

/disinfection  


Operating manual SENTA PUR L    

V2.5 E 

Page 44 of 64   

9  Cleaning/disinfection 

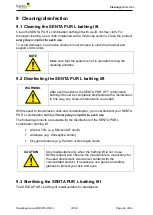
9.1  Cleaning the SENTA PUR L bathing lift 

Clean the SENTA PUR L combination bathing lift with a soft, lint-free cloth. For 
thorough cleaning, use a cloth moistened with a mild soap solution. Clean the product 

every day

 and 

prior to each use

To avoid damages, no abrasive cleaners must be used to clean the handset and 
keypad control units. 

NOTE 


Make sure that the system is not in operation during the 
cleaning activities. 

9.2  Disinfecting the SENTA PUR L bathing lift 


WARNING 


After each treatment, the SENTA PUR LIFT combination 
bathing lift must be completely disinfected with a disinfectant. 
In this way, any cross-contamination is avoided. 


With respect to transmission risks and contamination, you must disinfect your SENTA 
PUR L combination bathing lift 

every day

 and 

prior to each use

The following products are suitable for the disinfection of the SENTA PUR L 
combination bathing lift: 

  Alcohol 70% (e.g. Mikrozid AF liquid) 

  Aldehyde (e.g. Antiseptica kombi) 

  Oxygen releasers (e.g. Perform or Descogen liquid) 


CAUTION 


Only disinfectants only when the bathing lift is not in use. 
Strictly respect and observe the manufacturer’s instructions for 
the used disinfectant. Avoid direct contact with the 
concentrated product. If necessary, use gloves and safety 
glasses to protect your skin and eyes. 


9.3  Sterilising the SENTA PUR L bathing lift 

The SENTA PUR L bathing lift is 

not

 suitable for sterilisation. 


Содержание SENTA PUR L

Страница 1: ...SENTA PUR L Combination bathing lift Version 2 5 English Subject to technical modifications 2019 04 08 Operating manual Original operating manual...

Страница 2: ...d safety instructions 9 4 5 Warnings 10 5 Transport 12 5 1 Unpacking the product 12 5 1 1 Removing the cardboard 12 5 1 2 Loosening the product from the pallet 13 6 Installation 14 6 1 Electrical conn...

Страница 3: ...8 7 1 Assembly disassembly of the armrests 29 8 8 Operating the SENTA PUR L 30 8 9 Lifting the patient from a bed 31 8 9 1 Getting autonomously onto the seat lift 32 8 10 Transferring a patient into a...

Страница 4: ...R L bathing lift 44 10 Checks tests 45 10 1 Maintenance of the 24 Volt battery 45 11 Waste disposal 46 11 1 Disposal of the packaging material 46 11 2 Disposal of the product 46 12 Troubleshooting Aft...

Страница 5: ...nd tested according to stringent quality criteria 1 2 Manufacturer s address BEKA Hospitec GmbH Am R benmorgen 3 35582 Wetzlar Phone 49 0 641 9 22 22 0 Fax 49 0 641 9 22 22 20 info beka hospitec de 1...

Страница 6: ...s well as the national regulations laws and prescriptions related to work safety and accident prevention The manufacturer of the product is only responsible for the safety and the reliability of the p...

Страница 7: ...the operating manual and the safety instructions before starting to use the product Keep the operating manual near the device for future reference 3 2 Type plate This image shows the type plate The t...

Страница 8: ...in the operating manual In case of doubt please consult with the treating doctor 4 2 Other prescriptions The product meets the current VDE prescriptions 0100 and 0100 710 However have a specialist com...

Страница 9: ...g Hazardous Area Applied part Type B to DIN EN 60601 1 Special waste no household waste The device and the packaging materials never must be disposed of in the domestic waste stream CE label in accord...

Страница 10: ...safety belt must be attached and the safety armrests must be folded into position so as to surround and enclose the patient Please make sure that your feet are not located in the area of the castors n...

Страница 11: ...assistant is required Each lifting and transport operation must be adequately planned in order to ensure an optimal protection for the patient resident Do not position yourself between the combinatio...

Страница 12: ...t authorized by the manufacturer any further liability of the manufacturer shall be excluded 5 Transport 5 1 Unpacking the product To remove the packaging materials you will need a cutter knife NOTE T...

Страница 13: ...roduct from the pallet Unscrew the fixing screws of the straps Remove the straps Release the brakes of the wheels Brakes After all fixations have been removed you can remove the combination bathing li...

Страница 14: ...equipped with a 24V battery system This motor is self locking and therefore protected against unintentional lowering of the seat in case of malfunction or failure The battery of the combination bathi...

Страница 15: ...ith cover 8 Belt holder 3 Belt 9 Removable backrest 4 Belt holder 10 Battery with control unit 5 Foldable safety armrests 11 Opening for adjustable stretcher lift wings 6 Seat 12 Rear castors lockable...

Страница 16: ...PUR L V2 5 E Page 16 of 64 N Description 1 Handset 2 Allen wrench for the manual emergency lowering 3 Control box and battery moveable 7 1 Handset N Description N Description 1 Seat stretcher up 4 Ser...

Страница 17: ...e battery must be charged less than 25 When you push a button an audible signal will be emitted Service indication n 4 If the orange LED of the service display flashes you must request a check of your...

Страница 18: ...emergency lowering system buttons for use in case of handset malfunction 5 Not used sealed with caps 3 Handset connection 6 Charger cable connection 7 2 3 Explanation of the LED indications Green LED...

Страница 19: ...a switch mode charger and is supplied ready assembled on a mounting rail It can be installed on any suitable wall The required power cable is included in the delivery The charging time for the battery...

Страница 20: ...using the 6 mm Allen wrench which is included in delivery The emergency lowering system must only be used in case of emergency The battery must be removed prior to use CAUTION In order to avoid injur...

Страница 21: ...ctrical emergency lowering system Control unit button Should your handset be defective or present a malfunction and provided that the battery still has sufficient voltage you can raise or lower the se...

Страница 22: ...pressing the emergency stop switch you can lock the SENTA PUR L combination bathing lift thus making any unauthorized use of the device more difficult Turn the button in the direction of the arrow to...

Страница 23: ...and trouble free operation Visual check of the lift system external damages and wear and tear Check that no screws of the safety armrests are missing or loose Check the functioning of the safety armre...

Страница 24: ...r down so that the patient s back and legs can be smoothly positioned onto the stretcher The sides of the bed surface are formed so that the patient can be smoothly be lifted from and into the bed CAU...

Страница 25: ...ach other see image Now you can remove the safety armrest by pulling The safety armrest is re assembled in reversed order Markings NOTE The safety armrests must not be used to support the patient when...

Страница 26: ...ssembly of the wings 1 Engage the parking brakes 2 Turn the interlock 1 4 of a turn to the left or to the right so that the locking bolt latches in the rear position 3 Slide the wing to be assembled i...

Страница 27: ...al SENTA PUR L V2 5 E Page 27 of 64 Side rails NOTE The side rail must be ordered directly ex works Integrating a side rail after delivery is not possible 8 6 1 Disassembly of the side rails 1 Open th...

Страница 28: ...ation Operating manual SENTA PUR L V2 5 E Page 28 of 64 2 Pull the closing flap forward Closing flap unlocked flap 3 Remove the side rail by pulling upwards Removed side rail Re assemble in reversed o...

Страница 29: ...ither side 8 7 1 Assembly disassembly of the armrests To remove a safety armrest turn it until both red markings on the safety armrest and its opening are opposite of each other Markings Now you can r...

Страница 30: ...he lift and remove the obstacle After that you can use the lift as usual The rear castors are equipped with parking brakes Engage the castors when lifting a patient in order to avoid any unintentional...

Страница 31: ...urface or the seat of the SENTA PUR L over the mattress 6 Engage the brakes of the SENTA PUR L to lock the castors 7 Now turn the patient onto the reclining surface seat of the SENTA 8 Fold the front...

Страница 32: ...to the seat of the SENTA 4 Install the patient resident backwards on the seat 5 Lower the backrest 6 Fold the safety armrest forward 7 Secure the patient resident with the belt 8 Raise the SENTA and t...

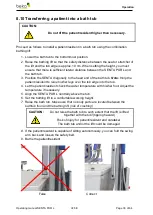
Страница 33: ...nd of the bath tub Note Help the patient resident to raise his her legs over the tub edge into the tub 4 Let the patient resident check the water temperature with his her foot Adjust the temperature i...

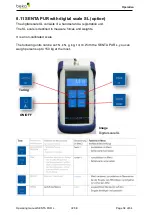
Страница 34: ...The digital scale SL consists of a handset and a registration unit The SL scale is destined to measure forces and weights It is a non calibrated scale The following units can be set N kN g kg t or lb...

Страница 35: ...Position the patient resident onto the SENTA PUR L combination bathing lift Make sure that the patient resident is sitting or lying completely on the combination bathing lift and that the weighing pro...

Страница 36: ...ted applications It is the operator s responsibility to ensure this It is possible to configure device settings beyond the calibration regulations You must always check whether the settings of the par...

Страница 37: ...10 to 40 C Humidity 90 NiMh battery operation 9 6 V DC Permanent power supply 12 24 V DC 2 5 W max 8 12 6 Electrical safety Please make sure that you respect and observe the ambient conditions for you...

Страница 38: ...display changes to 0 and the status bar displays NET The TARE button is active for the entire possible weighing range This concerns a subtractive taring i e the weighing range is reduced by the tare...

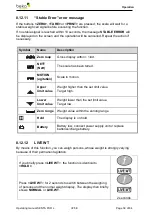
Страница 39: ...red MOTION agitation Scale in motion Upper limit value Weight higher than the set limit value Target high Lower limit value Weight lower than the set limit value Target low Zero range Weight value wit...

Страница 40: ...Press the LIVE WT button once more to trigger a new average calculation As soon as the gross weight is within the zero range i e the scale is emptied the process can be repeated 8 12 13 Error message...

Страница 41: ...on underneath the zero point PT TOO CLOSE Adjustment points are too close to one another 2 Adjustment impossible Use other usually higher weights RES LO Too little calibration values 100 set RES HIGH...

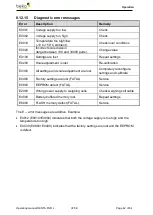
Страница 42: ...djustment is lost Re calibration E0300 All settings and scale adjustment are lost Completely reconfigure settings and calibrate E0400 Factory settings are lost FATAL Service E0800 EEPROM defect FATAL...

Страница 43: ...C connector of the charger in the charging socket on the right hand side underneath the scale cover of the SENTA lift 3 The charging indicator will become red the battery is being charged The charging...

Страница 44: ...completely disinfected with a disinfectant In this way any cross contamination is avoided With respect to transmission risks and contamination you must disinfect your SENTA PUR L combination bathing...

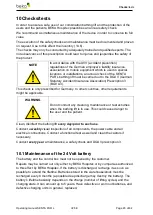
Страница 45: ...k is only prescribed for Germany In other countries other requirements might be applicable WARNING Do not conduct any cleaning maintenance or test activities when the bathing lift is in use This could...

Страница 46: ...sal of the product The estimated lifetime of the device is 8 year At the end of the product s lifetime contact your BEKA dealer who will recycle the SENTA PUR L combination bathing lift in accordance...

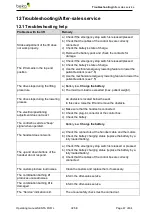
Страница 47: ...ps during the lowering process An obstacle is located below the seat In this case raise the lift and remove the obstacle The electrical positioning adjustment does not react a Make sure that the hands...

Страница 48: ...lights are not lit Inform the after sales service The indicator light does not go out after multiple hours of charging The battery must be replaced Inform the after sales service The battery installed...

Страница 49: ...mage 2 Additional parts tools 1 rear castor 1 thread locking fluid medium tight Image 3 Unscrew the screw by means of the 22 mm open ended spanner Image 4 Remove the castor from the carrier frame Imag...

Страница 50: ...he screw with retaining nut and spacer Image 5 Insert the screw through the opening from top to assemble the new castor Then install the spacer at the screw Install the retaining nut from the bottom I...

Страница 51: ...r cable from the control box Image 4 Unplug the cable of the handset control from the control box Image 5 Remove the retaining screw of the control box Image 6 Remove the top retaining screw of the mo...

Страница 52: ...ry Image 1 The image shows the inserted battery Image 2 Unlock the battery by means of the release lever in the battery handle Image 3 Pull the battery up to remove it Image 4 The image shows the remo...

Страница 53: ...ied part Type B Operating mode Short term operation Input voltage 100 V 240 V AC 50 60 Hz Output voltage 24 V DC Power consumption I in max 1 Amp I out max 10 Amp Spindle motor Operating mode Short te...

Страница 54: ...Appendix Operating manual SENTA PUR L V2 5 E Page 54 of 64 14 2 Dimensions of the SENTA PUR L...

Страница 55: ...Appendix Operating manual SENTA PUR L V2 5 E Page 55 of 64 14 3 Declaration of conformity...

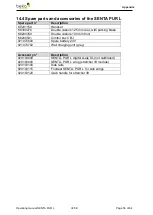
Страница 56: ...rear with parking brake K9200350 Double castors 100 mm front K9200541 Control box CBJ 921070600 Spare battery 24 V 921070702 Wall charging unit grey Accessory n Description 920104000 SENTA PUR L digit...

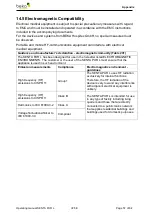
Страница 57: ...er listed ELECTROMAGNETIC ENVIRONMENTS The customer or the user of the SENTA PUR L must ensure that the appliance is used in such environment Emission measurements Compliance Electromagnetic environme...

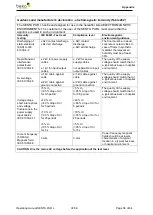
Страница 58: ...uality of the supply voltage should match that of a typical business or hospital environment Overvoltage IEC 61000 4 5 1 kV cable against cable 2 kV cable against ground connection 1 kV cable against...

Страница 59: ...of fixed HF transmitters as determined by an electromagnetic field survey a should be less than the COMPLIANCE LEVEL in each frequency range b In the vicinity of equipment marked with the following sy...

Страница 60: ...ance depending on the transmitting frequency in m 150 kHz to 800 MHz d 0 35 P 80 MHz to 800 MHz d 1 2 P 800 MHz to 2 5 GHz d 2 3 P 0 01 0 1 1 10 100 0 04 0 11 0 35 1 1 3 5 0 12 0 38 1 2 3 8 12 0 23 0...

Страница 61: ...Am R benmorgen 3 35582 Wetzlar Serial number _____________________________________________ Date of purchase _____________________________________________ Site ________________________________________...

Страница 62: ...Appendix Operating manual SENTA PUR L V2 5 E Page 62 of 64 Periodic inspection repair DGUV 3 safety check etc Type of inspection Date Result Measure Signature...

Страница 63: ...Appendix Operating manual SENTA PUR L V2 5 E Page 63 of 64 Your notes...

Страница 64: ...BEKA Hospitec GmbH Am R benmorgen 3 35582 Wetzlar Germany Phone Fax 49 0 6 41 9 22 20 0...

Отзывы: