background image

Product Specifications

10

Beijer Electronics, MA00824

3.1

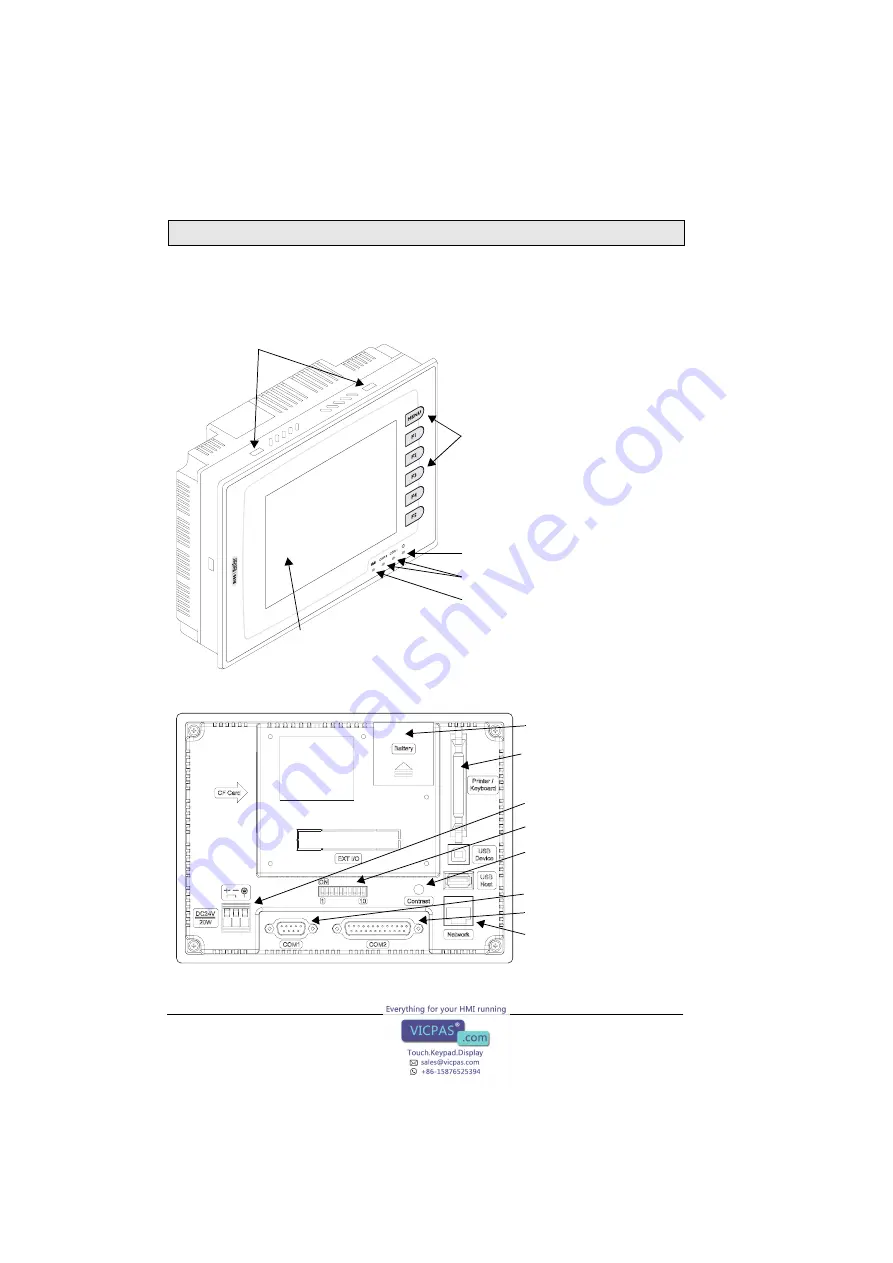
Description of Parts

Front

Back

Fixture mounting holes

Power lamp

Communication lamps

Function keys

Display

Network lamp

DIP switches (1-10)

COM2: RS232/RS422/RS485

DC power outlet

Battery cover

Printer/keyboard 

COM1: RS232/RS485

Network connection

Contrast adjustment

connection

Содержание H-T60 Series

Страница 1: ...H T60 Installation and Operation Manual MA00824 2005 10 English Om s l agM A00824 f m Page1 M onday Sept em ber26 2005 9 11 AM...

Страница 2: ...onics AB is not responsible for modified altered or renovated equipment Because the equipment has a wide range of applications users must acquire the appropriate knowledge to use the equipment properl...

Страница 3: ...y 11 3 4 Mounting Procedure 12 3 5 Grounding 13 3 6 Power Supply and Wiring 13 4 Dip Switches 14 5 Communication Ports 15 6 LCD Contrast Adjustment 16 7 Operation 17 7 1 Self Test 17 7 2 System Menu 1...

Страница 4: ...Contents Beijer Electronics MA00824...

Страница 5: ...EEC Storing the operator terminal where the temperature is lower higher than recommended in this manual can cause the LCD display liquid to congeal become isotopic The LCD display liquid contains a p...

Страница 6: ...s must be separated from power cables for operational circuits Only use shielded cables to avoid unpredictable problems During Use Emergency stop and other safety functions may not be controlled from...

Страница 7: ...ents The following parts are found in the box Operator terminal H T60 4 installation fasteners Battery CR2032 Power connector connected to the 24 V DC power outlet Printer cable only for H T60b P H T6...

Страница 8: ...2 25 pin female connector RS232 RS422 RS485 Multi functional port 26 pin connector for printer 64 external keys 26 pin connector for printer 64 external keys Ethernet Yes Yes Flash ROM 4 MB RAM 512 KB...

Страница 9: ...nsed Vibration endurance 0 5 mm displacement 10 55 Hz 2 hours per X Y and Z axis direc tions Shock endurance 10 G 11 ms 3 times in each direction of X Y and Z axes RF emissions CISPR 22 Class A Electr...

Страница 10: ...on of Parts Front Back Fixture mounting holes Power lamp Communication lamps Function keys Display Network lamp DIP switches 1 10 COM2 RS232 RS422 RS485 DC power outlet Battery cover Printer keyboard...

Страница 11: ...d Cut out Dimensions 3 3 Installing the Battery 1 Remove the battery cover 2 Insert the battery into the operator terminal by pressing the battery down and pushing it slightly To remove the battery pu...

Страница 12: ...h the dimensions mm below 2 Mount the operator terminal into the cut out Insert the fixtures to the holes on the unit and fasten the screws into the front panel Do not tighten the screws with too much...

Страница 13: ...er consumption is 20W Perform the following steps to wire the power connector 1 Unplug the power connector and unscrew the screws 2 Strip approximately 1 cm of insulation Insert the wire all the way i...

Страница 14: ...mmunication SW6 Password ON The operator terminal asks the operator to enter a password after power on self test OFF No password is required to start the operator terminal SW7 System Menu ON The opera...

Страница 15: ...dip switches for example RS485 corresponds to SW9 and SW10 ON See section 4 Dip Switches Pin Function Pin Function Pin Function 1 RS485 1 N A 14 RS422 TX RS485 2 RS232 RXD 2 RS232 TXD 15 RS422 TX RS4...

Страница 16: ...eps 1 Touch the upper left and lower right corners of the screen 2 Follow the route on the screen 3 Touch the square on the center of the screen to complete the task See also section 7 2 System Menu T...

Страница 17: ...with Failed next to the test item Additionally the message Error Press screen to continue will be displayed at the bottom of the screen If the power to the operator terminal or the PC was interrupted...

Страница 18: ...ed below System menu command Function Link The operator terminal is connected F2 Confg Sets up the internal time clock and communication parameters in the operator terminal Use and to move to desired...

Страница 19: ...unctional keys can also be defined in H Designer and used as Quick buttons for example to set an ON OFF value to change a screen etc For further information about the slide out menu please see the H D...

Страница 20: ...ters There are two ways to configure working parameters to set parameters in the operator terminal or in H Designer To set parameters in the operator terminal select F2 Confg in the system menu To set...

Страница 21: ...ication parameters are correctly configured Also remember to compile the file before downloading it The file has to be compiled every time a change has been made in the file before downloading it Then...

Страница 22: ...firmware file AF6 to save Click Save Then the operator terminal will prompt for a password enter the password set in H Designer from Application Workstation Setup Once the correct pass word is entered...

Страница 23: ...nloading a Recipe Open an application file with the recipe to be downloaded in H Designer Select File Download Recipes to display the Open dialog Enter the name of the rec ipe file RCP and click Open...

Страница 24: ...nu will be displayed on the screen Select F3 Copy in the system menu from the operator terminal with the appli cation to be copied The operator terminal will prompt for a password enter the password s...

Страница 25: ...cess the table can register passwords and user levels in the table shown below In the illustration below the button is an action button used to display the password table When the button is selected t...

Страница 26: ...rd The object Action Button in H Designer also allows the designer to create a but ton which asks the user to re enter a password For example by pressing the button the password keypad will be display...

Страница 27: ...ser for a password The user will need a password with at least the level of privilege that has been set for the button This function can restrict users to ac cess to certain parts of the application S...

Отзывы: