4A
G. If The pan belt is broken
1. Turn off the main power.
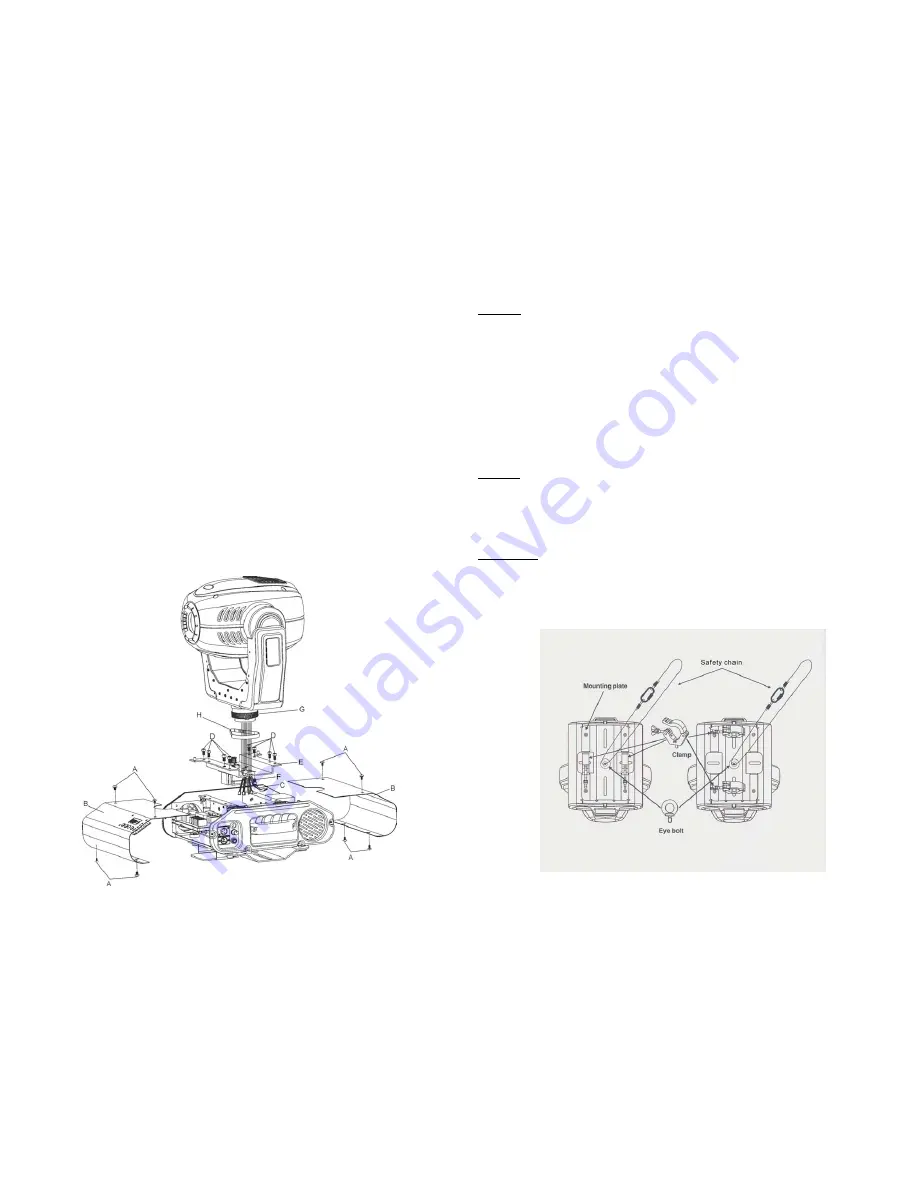
2. Unscrew all the screws (A) and open the base-housing cover (B).
3. Unplug all the connect wires (C) that from the arm to PC board and igniter.
4. Unscrew the screws (D) that fix the bridge (E).
5. Unscrew the screws (F) that fix the axis gear (G).
6. Change a new belt (H) by going through all connecting wires that from the arm to base,
and through the bridge for correct position.
7. Set up the gear axis to the bridge and screwed it. Note: do not press the belt.
8. Put the belt around the axis gear and motor gear.
9. Plug all the connect wires (C) that form the arm to PC board and igniter.
10. Adjust the pan home position.
11.Screw the base-housing cover (B).
Warning
z
To prevent or reduce the risk of electrical shock or fire, do not expose the unit to rain or
moisture.
z
Never touch bulb with bare fingers, as it is very hot after using.
z
Hot lamp explosion hazard. Do not open the unit within five minutes after switching off.
z
Do not start on the unit without bulb enclosure or housing are damaged.
z
The housing, the lenses, or the ultraviolet filter must be replaced if they are visibly
damaged.
z
Do not look directly at the light while the bulb is on.
Caution
There are no user serviceable parts inside the unit. Do not open the housing or attempt
any repairs yourself. In the unlikely event your unit may require service, please contact
your nearest dealer.
Installation
The unit should be mounted via its mounting system ( as shown below ) on the bottom of the
base. Use clamps to fix the unit to truss. Always ensure that the unit is firmly fixed to avoid
vibration and slipping while operating. Always ensure that the structure to which you are
attaching the unit is secure and is able to support a weight of 30 kgs for each unit.


