8. Checking to see if front weights need to be added to the tractor in order to maintain
balance.
9. Checking the tractor tires for the proper pressure in accordance with the tractor
operator’s manual.
10. Making sure the proper attire is worn. Avoiding loose fitting clothing which can
become entangled. Wearing sturdy, tough-soled work shoes and protective
equipment for eyes, hands, ears and head. Never operate tractor or implements in
bare feet, sandals or sneakers.
11. Checking area for stones, branches and other debris that might be thrown.
12. Ensuring proper lighting is available, sunlight or good artificial lighting.
3.07 - Working Speed
Ground speed is determined by the soil condition and tractor power. Simple
experimentation will determine the best speed for the desired results, usually 8 to 14
mph.
3.08 - Operating Techniques
When working, rake wheels should slightly touch the ground. This gives the individual
wheels and tines maximum flexibility to insure clean raking on any terrain. The correct
pressure will always depend on field conditions, quantity and type of forage being
windrowed. For heavy crops, more down pressure may be needed. Too much pressure
may cause dirt and debris to be rolled into the windrow. The ideal setting allows rake to
float smoothly across ground contour while moving crop cleanly into a row.
If the crop was mowed with a sickle bar mower, operate the rake in the same direction
the crop was mowed, while if the crop was mowed with a rotary mower, best results are
obtained by operating the rake in the opposite direction the crop was mowed.
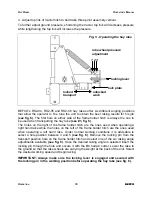
To set ground pressure do the following:
1. Slide the lock plate
(see fig. 5)
in the unlocked position and secure it with the Ø5
hairpin cotter. This will allow the rake to float evenly across the surface even when
raking over uneven terrain and prolong the life of the rake’s teeth.
2. Lower rake so that wheels are slightly touching the ground. Adjust the tractor’s lift
arms so that they are approximately 19” from the ground when raking
(see fig. 7)
and 22” from the ground when spreading or turning the hay
(see fig. 8 and 9)
.
3. Assemble the spring clip in the desired position. The pressure that the rake wheel
applies on the ground can be adjusted by bolting the lower spring clip to one of the
other two holes available on the pivot housing tube
(see fig. 5)
. Moving the lower
spring clip to one of the holes further away from the springs will cause the spring
tension to increase and therefore decrease the amount of pressure that the rake
wheels will apply on the ground. As a general rule, in standard working conditions
use the first hole for RS2-04 rakes
(see #1, fig. 5)
and the second hole for RS2-05
and RS2-06 rakes
(see #2, fig. 5)
. Setting the rake with the least amount of
pressure will help to keep the finger wheels cleaner and therefore keep dirt off the
forage.
O
PERATION
15
BEFCO
H
AY
R
AKES
O
PERATOR
’
S
M
ANUAL
Содержание RS2-04L
Страница 34: ...HAY RAKES THREE POINT HITCH OPERATOR S MANUAL RS2 04 RS2 05 RS2 06 PARTS MANUAL 34 BEFCO 08 2013...
Страница 36: ...HAY RAKES FRAME OPERATOR S MANUAL RS2 04 PARTS MANUAL 36 BEFCO 08 2013...
Страница 38: ...HAY RAKES FRAME OPERATOR S MANUAL RS2 05 PARTS MANUAL 38 BEFCO 08 2013...
Страница 40: ...HAY RAKES FRAME OPERATOR S MANUAL RS2 06 PARTS MANUAL 40 BEFCO 12 2013...
Страница 42: ...HAY RAKES RAKE WHEEL HUB OPERATOR S MANUAL RS2 02 RS2 03 RS2 04 RS2 05 RS2 06 PARTS MANUAL 42 BEFCO 08 2013...
Страница 44: ...HAY RAKES DECALS OPERATOR S MANUAL RS2 04 RS2 05 RS2 06 PARTS MANUAL 44 BEFCO 08 2013...
Страница 46: ......


