background image


         - 3 - 


STEP 1:

 Carefully select the site for your pond in a level 

area away from trees and not in a low area of your lawn. 
The area should receive 4 to 6 hours of sunlight each day.


STEP 2:

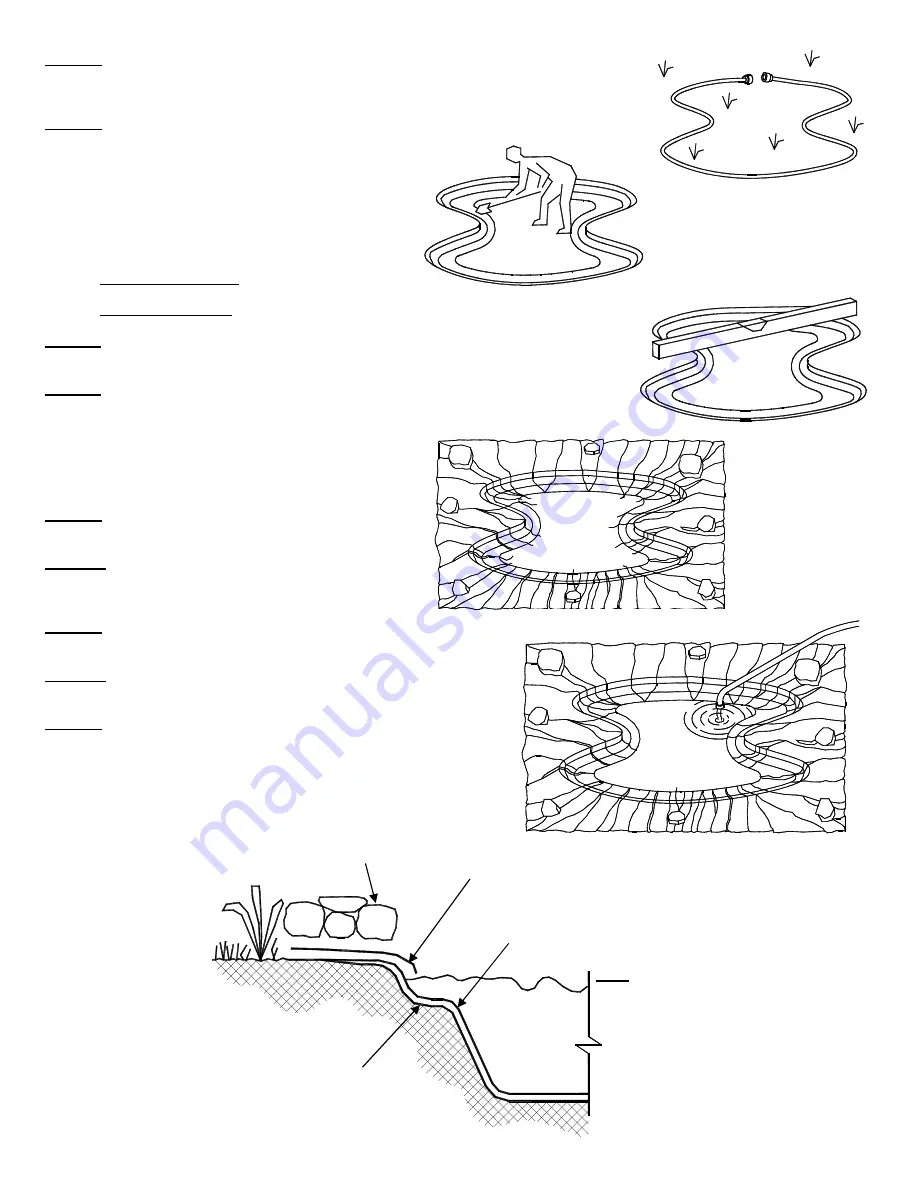
 Outline the shape and size of your pond with a 

rope or garden hose. To determine the size of your pond 
you must consider the dimensions of your liner minus the 
depth of the pond plus a 6-inch border. Fish and plants 
require a depth of 16 to 30 inches depending on your winter 
climate and the type of water lilies being used. Once you 
have decided on the depth for your pond, use the following 
equations to determine the maximum length and width: 
 
Liner length minus 2 times pond depth minus 2 times 6” 
border = Maximum Pond Length 
Liner width minus 2 times pond depth minus 2 times 6” 
border = Maximum Pond Width 
 

Example:

 120” – (2 x 20”) – (2 x 6”) =120” – 40” – 12” = 68” 

= 5’8” Length 
 

STEP 3

:

 Begin digging and always remember to stay 

inside your outline. Allow for plant ledges if desired. Level 
the edge of your pond by using a carpenter’s level on 
straight 2 x 4 placed across your pond. This will show if one 
side needs to be adjusted. Repeat this process for the width 
and length of your pond until the perimeter is completely 
level. 
 

STEP 4:


Remove all roots and sharp objects that may 

puncture the liner.  
 

STEP 5:


Line the bottom and sides of the excavation with 

Beckett’s Pond Underlayment

 to provide a cushioned 

surface for the liner.  
 

STEP 6:

 Drape your liner loosely into the excavation with 

an even overlap on all sides. 
 

STEP 7:


Secure the liner with bricks or stones on the 

corner.  
 

STEP 8:

 Fill the pond with water. As the pond fills, 

continually smooth and fold the liner to minimize wrinkles, 
but do not stretch the liner for it may tear. 


Water Level  


Design your Rock 
Ledge as low in the 
water as possible to 
minimize UV damage. 


Use Flat Stones, Round Rocks 
or Bricks to hide liner.  

Use Beckett’s Underlayment, Sand 
or Carpet Padding to provide a 
protective surface for the pond liner. 
 

Pond Liner 
 

Use an excess liner strip to protect the 
PVC Liner from sun (UV) damage. 
 

Содержание LCK535

Страница 1: ...nstructions and warnings in this manual may result in pump damage and or serious injury BE SURE TO READ AND SAVE THIS MANUAL FOR FUTURE REFERENCE A B C H G F Items Included A 1 Pump G325AG20 MCK325 1...

Страница 2: ...essentially maintenance free This Pump is designed to operate completely submerged Cleaning of the inlet screen can be reduced by placing the pump on a brick or patio stone in the water to raise it a...

Страница 3: ...Allow for plant ledges if desired Level the edge of your pond by using a carpenter s level on straight 2 x 4 placed across your pond This will show if one side needs to be adjusted Repeat this process...

Страница 4: ...order as shown Experiment with the different assortment of Nozzles STEP 1 STEP 2 STEP 3 To connect to a Spitter slide one Hose Clamp on each end of the Tubing Slide the Tubing over the Diverter and S...

Страница 5: ...long with proof of purchase to Beckett Corporation Customer Service Dept 3321 E Princess Ann Rd Norfolk Va 23502 telephone 866 466 4319 Telephone authorization from Beckett is required prior to return...

Страница 6: ...6 This page is intentionally left blank...

Страница 7: ...ual puede dar como resultado que la bomba sufra da os y o que se produzcan lesiones graves ASEG RESE DE LEER Y CONSERVAR ESTE MANUAL PARA CONSULTAS FUTURAS C90215 A B C D E G H F J K L M N P R PIEZAS...

Страница 8: ...ca utilice una extensi n para conectar la unidad a una fuente el ctrica prov ase de una toma con GFCI B Nunca entierre el enchufe de 3 dientes del cord n el ctrico no est hecho a prueba de agua y ocur...

Страница 9: ...plantas Nivele el borde del estanque con el nivel de carpintero apoyado sobre la viga de 2 pulg x 4 pulg la cual debe estar colocada a trav s del estanque De esta forma usted sabr si debe corregir lo...

Страница 10: ...ras del agua le dan diferentes formas al agua Experimente un poco con todas las Boquillas hasta que encuentre su favorita PASO 3 La V lvula desviadora controla la cantidad de agua que sale por la Boqu...

Страница 11: ...ctuoso con gastos de env o prepagados con comprobante de compra a Beckett Corporation Customer Service Dept 3321 E Princess Ann Rd Norfolk Va 23502 tel fono 866 466 4319 Autorizaci n telef nica por pa...

Страница 12: ...12 Esta p gina es espacio en blanco izquierdo intencional...

Страница 13: ...en Cloche G 1 Bec jet en Trompette H 1 Corps De Bec J 1 Bec De Fleur K 1 Bec 3 Tier L 1 Abaissez Le Bec M 1 Tube de Rallonge N 1 D viateur P 1 1 2 NPT Adaptateur LCK535 R 1 1 4 NPT Adaptateur MCK325 D...

Страница 14: ...pour brancher l appareil au courant lectrique fournissez une prise disjoncteur de fuite la terre bien plac e B N enfouissez jamais la fiche 3 broches du cordon car elle n est pas tanche et vous pourr...

Страница 15: ...Pr voyez des bordures de plantes si d sir galisez le niveau du pourtour de l tang l aide d un niveau bulle Placez celui ci sur une planche de 5 cm x 10 cm 2 x 4 en travers de l tang Cette tape permet...

Страница 16: ...e l eau vous donnera des formes Faites plusieurs essais pour d couvrir ce que vous pr f rez La Fl che pointe toujours vers le haut L D viateur commande la quantit d coulement de l eau au bec l art d t...

Страница 17: ...conforme fret pay d avance l adresse suivante Beckett Corporation Customer Service Dept 3321 E Princess Ann Rd Norfolk Va 23502 t l phone 866 466 4319 Il faut obtenir de Beckett une autorisation par...

Отзывы: