background image

3

DE

GB

FR

NL

Sommaire

Inhoudsopgave

Introductions ............................................................................................................................................................ 16
Garantie ................................................................................................................................................................... 16
Instructions de sécurité ............................................................................................................................................. 16
Utilisation conforme aux prescriptions ........................................................................................................................ 16
Montage .................................................................................................................................................................. 17
Réglage des commutateurs DIP 1 (8 contacts) et 2 (2 contacts) ....................................................................................... 18
Autres fonctions et raccordements ............................................................................................................................. 20
Description des DEL / Tableau des codes d’erreurs ..................................................................................................... 21
Que faire si...? .......................................................................................................................................................... 21

Inleiding ................................................................................................................................................................... 22
Garantie ................................................................................................................................................................... 22
Veiligheidsinstructie .................................................................................................................................................. 22
Doelmatig gebruik ..................................................................................................................................................... 22
Montage .................................................................................................................................................................. 23
Instelling van de DIPschakelaars 1 (8pol.) en 2 (2pol.) .............................................................................................. 24
Andere functies en aansluitingen ................................................................................................................................ 26
Beschrijving van de LED’s / foutcodetabel .................................................................................................................. 27
Wat te doen, als...? .................................................................................................................................................... 27

Содержание 4023 200 040 0

Страница 1: ...lectricians Users Please forward accordingly These instructions must be kept for future reference Notice de montage et d utilisation Carte enfichable Informations importantes pour l installateur l lec...

Страница 2: ...P Schalter 1 8 pol und 2 2 pol 6 Weitere Funktionen und Anschl sse 8 Beschreibung der LEDs Fehlercode Tabelle 9 Was tun wenn 9 Introduction 10 Warranty 10 Safety Information 10 Intended Use 10 Install...

Страница 3: ...P 1 8 contacts et 2 2 contacts 18 Autres fonctions et raccordements 20 Description des DEL Tableau des codes d erreurs 21 Que faire si 21 Inleiding 22 Garantie 22 Veiligheidsinstructie 22 Doelmatig ge...

Страница 4: ...r Firma Becker freigegeben sind F r nicht freigegebene Fremdprodukte oder Ver nderungen haftet der Hersteller oder Anbieter nicht f r entstandene Personen oder Sachsch den sowie Folgesch den Beim Betr...

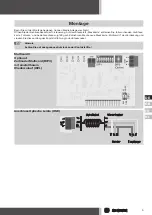
Страница 5: ...Sie den Geh usedeckel der Torsteuerung Auf dem Steckplatz Steckkarte entfernen Sie falls vorhanden die Steck karte Totmann und bewahren diese sorgf ltig auf Entnehmen Sie die neue Steckkarte Multicard...

Страница 6: ...d 1 2 k 1 2 3 4 5 6 7 8 ON OFF DIP 1 1 2 ON OFF DIP 2 Abschlusswiderstand 8 2 k 1 2 3 4 5 6 7 8 ON OFF DIP 1 1 2 ON OFF DIP 2 Schaltleisten mit Testung DW Leiste Beim Einsatz einer pneumatischen Leist...

Страница 7: ...Tores und bleibt f r 2 Minuten aktiv Dauerimpuls mit Vorwarnung bei Automatischem Wiederzulauf 1 2 3 4 5 6 7 8 ON OFF DIP 1 1 2 ON OFF DIP 2 Bei Automatischem Wiederzulauf wird 3 Sekunden bevor sich...

Страница 8: ...det sich die Steuerung in St rung wird der automatische Wiederzulauf nicht ausgef hrt Die Abfahrt erfolgt nur im Totmann Betrieb Bei Verwendung der Lichtschranke als Einzugsicherung muss diese in den...

Страница 9: ...n e d l t v e e i S n e r e i t s u J S E V D E L r e d g n u f r p r e b r u z t n e i D f u a 7 S r e t l a h c s d n e r o V m e n e r h a f e g n a i e b t e t h c u e l S E V D E L e i D s r e t...

Страница 10: ...may be used which has been approved by the BECKER company If non approved products from other companies are used or if non approved modifications are made the manufacturer or supplier will not accept...

Страница 11: ...door control unit Remove the dead man plug in card provided one exists from the plug in card insertion area and store it in the foil bag on the inside of the cover Remove the new Multicard II from th...

Страница 12: ...8 2 k terminating resistor 1 2 3 4 5 6 7 8 ON OFF DIP 1 1 2 ON OFF DIP 2 Safety Edges with Testing DW Edge If a pneumatic safety edge is used i e pressure wave safety edge DW edge a pressure wave tes...

Страница 13: ...tes Continuous Pulse with pre warning for Automatic Closing 1 2 3 4 5 6 7 8 ON OFF DIP 1 1 2 ON OFF DIP 2 For Automatic Closing a warning lamp is switched on 3 seconds before the door automatically st...

Страница 14: ...malfunctioning the automatic re start is not executed Descent occurs only in dead man mode If the light barrier is used as a trapping safety device it must be switched into the emergency stop circuit...

Страница 15: ...l u M e h t n o h c t i w s g n i d i l s e h t D E L S E V e h t f o n o i t i s o p t e s e h t k c e h c o t s e v r e S d e t c a t n o c s i 7 S h c t i w s t i m i l e r p e h t f i p u s t h g...

Страница 16: ...llations et appareils lectriques ou lectroniques certains composants sont soumis une tension lectrique dangereuse En cas d intervention par des personnes non qualifi es ou de non respect des avertisse...

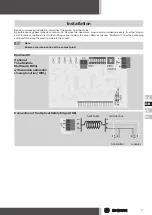
Страница 17: ...a porte Retirez s il y en a une la carte enfichable homme mort de son emplacement et conservez la soigneusement D ballez la nouvelle carte enfichable Multicard II et ins rez la le long de la glissi re...

Страница 18: ...DIP 1 1 2 ON OFF DIP 2 Barres de commutation avec proc dure de test barre pneumatique En cas d utilisation d une barre palpeuse pneumatique une proc dure de test de la barre p ex en position finale i...

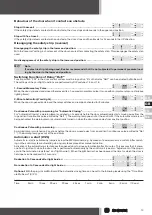
Страница 19: ...2 minutes Impulsion continue avec pr avertissement lors de la fermeture automatique 1 2 3 4 5 6 7 8 ON OFF DIP 1 1 2 ON OFF DIP 2 Lors de la fermeture automatique une lampe d avertissement s allume 3...

Страница 20: ...en fonctionnement homme mort En cas d utilisation de la barri re photo lectrique comme s curit elle doit tre en s rie dans le circuit d arr t d urgence Veuillez tenir compte du fait que lorsque la ba...

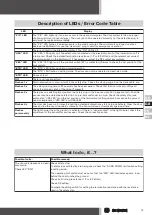
Страница 21: ...e l l e u t n e v S E V L E D t r e S e h c r a m n e s i m t s e 7 S e l b a l a r p e s r u o c e d n i f r u e t a t u m m o c e l d n a u q e m u l l a s S E V L E D a L e s r u o c e d n i f r u...

Страница 22: ...of bij veranderingen kan de fabrikant of de aanbieder niet aansprakelijk worden gesteld voor ontstane lichamelijke letsels en materi le schade of voor gevolgschade Bij het gebruik van elektrische of...

Страница 23: ...n de deurbesturing Op de insteekplaats steekkaart verwijdert u indien beschikbaar de aan wezige steekkaart dodeman Deze bewaart u zorgvuldig Neem de nieuwe steekkaart Multicard II uit de verpakking en...

Страница 24: ...itweerstand 8 2 k 1 2 3 4 5 6 7 8 ON OFF DIP 1 1 2 ON OFF DIP 2 Sluitkantbeveiliging met test DW contact Bij gebruik van een pneumatische sluitkantbeveiliging d w z pneumatische DW contact is volgens...

Страница 25: ...nde 2 minuten actief Continu impuls met signalering bij Automatische sluiten 1 2 3 4 5 6 7 8 ON OFF DIP 1 1 2 ON OFF DIP 2 Bij Automatische sluiten wordt 3 seconden voordat de deur zich uit de bovenst...

Страница 26: ...storing opgetreden aan de besturing dan wordt het automatisch sluiten niet uitgevoerd De OMLAAG beweging gebeurt alleen in dodemansbedrijf Bij gebruik van de fotocel als intrekbeveiliging moet deze in...

Страница 27: ...e e r e v o t c a t n o c W D t e h l e e u t n e v e l e g e R S E V D E L e d l e t s e g n i e d n a v e l o r t n o c e d r o o v t n e i D 7 S r a a l e k a h c s d n i e r o o v n e p o l e g n...

Страница 28: ...4023 630 033 0c 01 08 Becker Antriebe GmbH 35764 Sinn Germany www becker antriebe com...

Отзывы: