background image

                                                                                          BEC MX-200A ODU Outdoor Router 


Mounting Instructions 

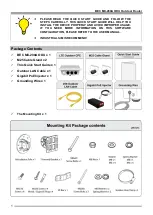
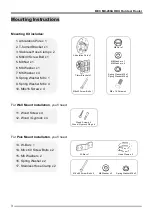
Mounting Kit includes: 
 

1. Articulation Pole x 1 

2. T-formed Bracket x 1 

3. Stainless Hose Clamp x 2 

4. M8x40 Screw Bolt x 1 

5. M8 Nut x 1 

6. M8 Washer x 1 

7. M6 Washer x 4 

8. Spring Washer M8 x 1 

9. Spring Washer M6 x 4 

10. M6x16 Screw x 4 


For 

Wall Mount Installation

, you’ll need: 


11. Wood Screw x 4   

      12. Wood / Gyprock x 4 


For 

Pole Mount Installation

, you’ll need: 


13. W-Bar x 1 

      14. M6 x 60 Screw Bolts x 2 

      15. M6 Washer x 2 

      16. Spring Washer x 2 

      17. Stainless Hose Clamp x 2   


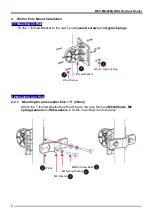
T-form Bracket x 1


Articulation Pole x 1


M8x40 Screw Bolt x 1


  M6 x 16 Screw x 4


M8 Nut x 1


Spring Washer M8 x 1 
Spring Washer M6 x 4 

M8 Washer x 1 
M6 Washer x 4


Wood Screw x 4 

Wood / Gyprock Plug x 4


      Hose Clamp x 2


Spring Washer M6 x 2 

M6 Washer x 2


M6 x 60 Screw Bolt x 2


W-Bar x 1


Содержание MX-200A ODU

Страница 1: ...Quick Start Guide BEC MX 200A ODU 4G LTE Outdoor Router...

Страница 2: ......

Страница 3: ...gabit PoE Injector x 1 Grounding Wire x 1 The Mounting Kit x 1 v PLEASE READ THE QUICK START GUIDE AND FOLLOW THE STEPS CAREFULLY THIS QUICK START GUIDE WILL HELP YOU INSTALL THE DEVICE PROPERLY AND A...

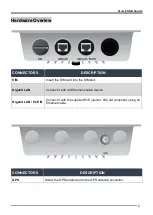
Страница 4: ...t the SIM card into the SIM slot Gigabit LAN Connect it with an Ethernet enable device Gigabit LAN PoE IN Connect it with the supplied PoE injector 802 3at compliant using an Ethernet cable CONNECTORS...

Страница 5: ...ount Installation you ll need 11 Wood Screw x 4 12 Wood Gyprock x 4 For Pole Mount Installation you ll need 13 W Bar x 1 14 M6 x 60 Screw Bolts x 2 15 M6 Washer x 2 16 Spring Washer x 2 17 Stainless H...

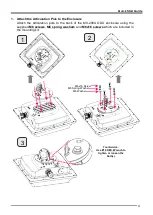
Страница 6: ...the articulation pole to the back of the MX 200A ODU enclosure using the supplied M6 screws M6 spring washers and M6x16 screws which are included in the mounting kit Tool Advice Use 10 HEX Wrench to...

Страница 7: ...plugs 2 2 Mounting on a Pole 2 2 1 Mounting for pole smaller than 1 5 38mm Attach the T formed Bracket and the W bar to the pole then use M6x60 bolts M6 spring washers and M6 washers to fix the mounti...

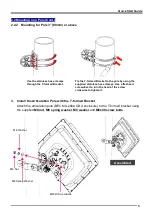
Страница 8: ...enclosure to the T formed bracket using the supplied M8 nut M8 spring washer M8 washer and M8x40 screw bolts Fix the T formed Bracket to the pole by using the supplied stainless hose clamps Use a flat...

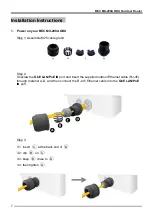
Страница 9: ...ble M25 cable gland Step 2 Unscrew the GbE LAN PoE IN port and insert the supplied outdoor Ethernet cable RJ 45 through material A D and then connect the RJ 45 Ethernet cable into the GbE LAN PoE IN p...

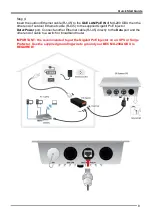
Страница 10: ...e RJ 45 to the supplied Gigabit PoE injector Data Power port Connect another Ethernet cable RJ 45 directly to the Data port and the other end of cable to a switch or broadband router IMPORTANT It is r...

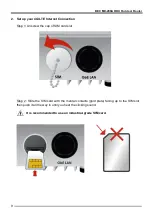
Страница 11: ...net Connection Step 1 Unscrew the cap of SIM card slot Step 2 Slide the SIM card with the mental contacts gold plate facing up to the SIM slot then push it all the way in until you hear the clicking s...

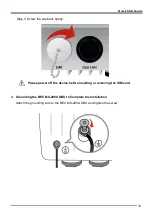
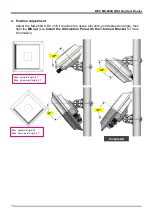
Страница 12: ...Screw the cap back tightly Please power off the device before inserting or removing the SIM card 3 Grounding the BEC MX 200A ODU to Complete the Installation Attach the grounding wire to the BEC MX 20...

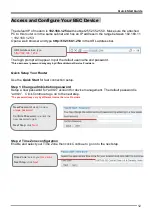
Страница 13: ...MX 200A ODU until it reaches the desire elevation and depression angle then tight the M8 nut see Install the Articulation Pole with the T formed Bracket for more information Max upward angle 47 Max do...

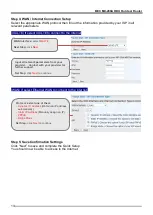
Страница 14: ...nternet Service Providers Quick Setup Your Router Use the Quick Start for fast connection setup Step 1 Change administration password Setup a new password for admin account for device management The d...

Страница 15: ...rnet Step 5 Save Confirmation Settings Click Next to save and complete the Quick Setup You should now be able to access to the Internet WAN Interface select 4G LTE Next Step click Next Input all relev...

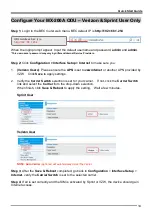
Страница 16: ...rovided by VZW Click Save to apply settings 2 Verify the Carrier Switch selection is set for your carrier If not click the Carrier Switch link and select the Carrier from the drop down selection When...

Страница 17: ...ternet Service Provider If this fails you can restore your router to its factory settings by holding the Reset button on the back of your router for 6 seconds or more This username password may vary b...

Страница 18: ...is encouraged to try to correct the interference by one or more of the following measures s Reorient or relocate the receiving antenna s Increase the separation between the equipment and receiver s Co...

Отзывы: