BEBE CONFORT Tinca base Скачать руководство пользователя страница 34

34


I

 Tinca 

I

 Bébé Confort

A  -  Carrying handle

B  -  Sun canopy

C  -  Push button for carrying handle  


  adjustment (L+R)

D  -  Belt hooks for lap part of belt (L+R)

E  -  Harness adjuster button

F  -   Instruction manual storage

G  -  Harness belt tensioner strap

H  -  Belt buckle with belt pad

I  - Cover

J  -  Newborn inlay

K  -  Stroller release buttons (L+R)

L  - Headrest

M1 -  Belt hook for shoulder part of belt

M2 -  Mounting bars for base

EN

SAFETY

The car seat is developed for an intensive use 

of approximately 6 years.

Tinca car use 

• Only use a forward-facing seat that is fitted 

with a 3-point safety belt that complies with 

the ECE R16 standard.

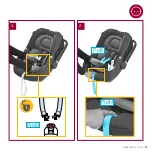
• Make sure the car safety belt buckle runs in a 

straight line and stays below the belt hook of 

the car seat.

• The car safety belt must be threaded 

tight along all blue markings. For a proper 

installation, check the instruction in this 

manual and the sticker on the side of the  

car seat.


WARNING:

Install the car seat only rearward facing in the 

car on a forward facing vehicle seat.

Tinca and your baby

•  Make sure you can fit no more than one 

finger between the harness and your baby 

(1cm). If there is more space than 1 cm, tighten 

the harness belt further.

• Only use the baby-hugg inlay of the Tinca 

until your baby exceeds the 60 cm length limit. 

Afterwards remove the baby-hugg inlay from 

the Tinca.

WARNING:

• Never place the car seat on an elevated 

surface (such as a table or chair).

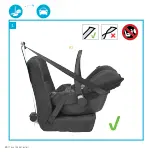
• In order to prevent the car seat from tipping 

over during carrying, check if the carrying 

handle is locked in place in carrying position 

(A1).

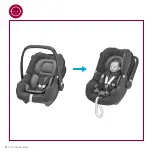
• When Tinca is installed on a stroller, always 

make sure to use approved car seat adapters 

and to secure Tinca correctly.

Care 

The cover, inlay, belt pads and sun canopy of 

the car seat can be removed for washing. The 

front baleen of the sun canopy needs to be 

removed before washing.

Содержание Tinca base

Страница 1: ...Tinca 45cm 75cm max 12 kg i Size compliant with base...

Страница 2: ...emploi et de respecter toutes les instructions ES Enhorabuena por su compra Para ofrecer la m xima protecci n y un ptimo confort para su beb es muy importante que lea atentamente todo el manual y siga...

Страница 3: ...3 I Tinca I B b Confort M2 M1 A B C F G D E H I K L J M...

Страница 4: ...Index EN FR ES IT PT AR 34 35 36 37 38 40 03 10 15 21 27 30...

Страница 5: ...dulo portabeb s mejorado para utilizar en combinaci n con un producto i Size homologado de acuerdo con el Reglamento n 129 para el uso en plazas de asiento del autom vil compatibles con i Size tal com...

Страница 6: ...manual do utilizador do ve culo Este m dulo tamb m pode ser usado como portador de crian as independente de acordo com as instru es do fabricante do Sistema Refor ado de Reten o para Crian as Em caso...

Страница 7: ...instalarse en una base ISOFIX de B b Confort Lea atentamente el manual de usuario de la base Alternativamente Tinca puede instalarse utilizando el cintur n de seguridad de 3 puntos de su autom vil IT...

Страница 8: ...sificado como Universal y se puede fijar en el asiento de los siguientes autom viles IMPORTANTE Para ver un listado completo de autom viles visite www bebeconfort com car fitting list IT Questo dispos...

Страница 9: ...B b Confort I Tinca 9 EN INSTRUCTIONS FOR USE FR MODE D EMPLOI ES INSTRUCCIONES DE USO IT ISTRUZIONI D USO PT INSTRU ES DE UTILIZA O AR...

Страница 10: ...10 I Tinca I B b Confort www bebeconfort com EN Carrying handle FR Poign e de portage ES Asa de transporte IT Maniglione per il trasporto PT Pega de transporte AR...

Страница 11: ...B b Confort I Tinca 11 A1 A2 A3...

Страница 12: ...ation pour l enfant A3 Position berceau inclin e ES A1 Posici n de transporte y de conducci n A2 Desbloqueo y posici n de instalaci n para ni o A3 Posici n reclinada de cuna IT A1 Posizione per il tra...

Страница 13: ...B b Confort I Tinca 13 Push A1 A1 2 1 Click Pull...

Страница 14: ...14 I Tinca I B b Confort Click Push...

Страница 15: ...B b Confort I Tinca 15 www bebeconfort com EN Ready to go FR Pr t partir ES Listo para ir IT Si parte PT Pronto para viajar AR...

Страница 16: ...16 I Tinca I B b Confort 1 2 Click...

Страница 17: ...B b Confort I Tinca 17 1 2 Push...

Страница 18: ...18 I Tinca I B b Confort B A A B 1 Click...

Страница 19: ...B b Confort I Tinca 19 2...

Страница 20: ...20 I Tinca I B b Confort 3 A1 1 DO NOT REMOVE DO NOT REMOVE 1 DO NOT REMOVE DO NOT REMOVE...

Страница 21: ...B b Confort I Tinca 21 EN Child installation FR Installation de l enfant ES Instalaci n del ni o IT Accomodare il bambino PT Instala o da crian a AR www bebeconfort com...

Страница 22: ...22 I Tinca I B b Confort...

Страница 23: ...B b Confort I Tinca 23 1 2 Push Push Pull...

Страница 24: ...24 I Tinca I B b Confort 3 5 4 Click Max 1 cm Pull...

Страница 25: ...B b Confort I Tinca 25 1 2 60 cm 60 cm...

Страница 26: ...26 I Tinca I B b Confort 1 2 Pull...

Страница 27: ...B b Confort I Tinca 27 www bebeconfort com EN Stroller car seat FR Poussette et si ge auto ES Cochecito y silla de auto IT Passeggino seggiolino auto PT Carrinho e cadeira auto AR...

Страница 28: ...28 I Tinca I B b Confort Click 1 2...

Страница 29: ...B b Confort I Tinca 29 Click Click 3 4...

Страница 30: ...30 I Tinca I B b Confort eodmU EN Washing FR Lavage ES Lavado IT Lavaggio PT Lavagem AR www bebeconfort com...

Страница 31: ...B b Confort I Tinca 31 1 Pull 2x...

Страница 32: ...32 I Tinca I B b Confort 2 4 3 5 Pull Pull Pull Pull 2x...

Страница 33: ...B b Confort I Tinca 33 8 Pull 6 7 Pull...

Страница 34: ...ation check the instruction in this manual and the sticker on the side of the car seat WARNING Install the car seat only rearward facing in the car on a forward facing vehicle seat Tinca and your baby...

Страница 35: ...peut tre utilis jusqu ce que votre b b mesure plus de 60 cm Retirez ensuite le coussin r ducteur du Tinca AVERTISSEMENT Ne posez jamais le si ge auto sur une surface sur lev e table ou chaise par exe...

Страница 36: ...or todas las marcas verdes Para una instalaci n adecuada consulte las instrucciones de este manual y la pegatina en el lateral de la silla de auto ADVERTENCIA Solo se debe instalar la silla de auto or...

Страница 37: ...are le istruzioni in questo manuale e l adesivo presente sul lato del seggiolino AVVERTENZA Installare il seggiolino auto solo in senso contrario alla direzione di marcia del veicolo su un sedile orie...

Страница 38: ...justo ao longo de todas as marca es verdes Para uma instala o adequada consulte as instru es no presente manual e o autocolante na lateral da cadeira auto AVISO Instalar a cadeira auto apenas virada...

Страница 39: ...B b Confort I Tinca 39 AR...

Страница 40: ...40 I Tinca I B b Confort AR A B L R C L R D E F G H I J L R K L M1 M2 Tinca 1 1 Tinca 60 Tinca A1 Tinca Tinca 6 Tinca ECE R16...

Страница 41: ...B b Confort I Tinca I 41 EN Non contractual photos FR Photos non contractuelles ES Fotograf as no contractuales IT Foto non contrattuali PT Fotografias n o contratuais AR...

Страница 42: ...ustinusstra e 9 c D 50226 Frechen K nigsdorf DEUTSCHLAND DOREL ITALIA S P A Via Verdi 14 24060 Telgate BG ITALIA DOREL HISPANIA S A U Edificio Barcelona Moda Centre Ronda Maiols 1 Planta 4 Locales 401...

Отзывы: