background image

36

Español

11. Instrucciones de seguridad y exención de responsabilidad

No intente nunca abrir el dispositivo para repararlo o modificarlo. Evite entrar en 

contacto con las tensiones de la red. No cortocircuite el producto. El dispositivo 

no está homologado para el uso al aire libre, manténgalo siempre seco. Protéjalo 

de una elevada humedad ambiental, agua y nieve. No exponga el dispositivo a 

altas temperaturas.

Compruebe el dispositivo antes de utilizarlo por si presentara algún deterioro. 

No utilice el dispositivo si ha recibido un golpe o se ha dañado de cualquier otro 

modo.Respete las disposiciones y restricciones nacionales. No utilice el dispositi

-

vo para otros fines a los detallados en el manual. 

Este producto no es un juguete. Manténgalo alejado de los niños o las personas 

con discapacidad mental. Toda reparación o modificación en el dispositivo que 

no haya sido efectuada por el proveedor original ocasiona la pérdida de todos los 

derechos de garantía. El dispositivo solo puede ser utilizado por personas que ha

-

yan leído y comprendido este manual. Las especificaciones del producto pueden 

cambiar sin un aviso previo.

12. Indicaciones para la eliminación

Según la directiva europea WEEE, está prohibido eliminar los equipos eléctricos 

y electrónicos con la basura doméstica. Sus componentes se deben llevar por 

separado a los puntos de reciclaje o eliminación correspondientes, ya que compo

-

nentes venenosos y peligrosos pueden dañar el medio ambiente a largo plazo si 

no se eliminan correctamente.

Como consumidor, la ley sobre residuos eléctricos y electrónicos alemana (Elek

-

troG) le obliga a devolver gratuitamente los dispositivos eléctricos y electrónicos 

al final de su vida útil al fabricante, el punto de venta o al punto público de reco

-

gida establecido para ello. El derecho regional regula particularidades al respecto. 

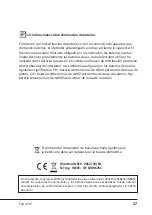
El símbolo en el producto, el manual de uso y/o el embalaje advierte de estas 

disposiciones. Esta forma de separación de materiales, reutilización y eliminación 

le permite contribuir en gran medida a proteger nuestro entorno.

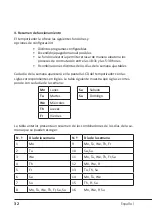
Содержание 303215/20180315NB067

Страница 1: ...DIGITAL TIMER Mod Nr 303215 20180315NB067 ...

Страница 2: ...2 Deutsch Table of contents 1 Deutsch 3 2 English 10 3 Français 17 4 Italiano 24 5 Español 31 ...

Страница 3: ...erä teanschluss der Zeitschaltuhr eingesteckt ist Sollte eine Reinigung des Produktes notwendig sein so trennen Sie die Zeitschaltuhr vollständig vom Stromnetz und wischen Sie das Gerät mit einem trockenen Tuch ab Tauchen Sie die Zeitschaltuhr niemals in Wasser oder andere Flüssigkeiten Heizgeräte und ähnliche Verbraucher sollten während des Betriebes nie unbeaufsichtigt gelassen werden Der Herste...

Страница 4: ...sschalten möglich Die Zufallsfunktion ermöglicht eine zufällige Verzögerung der Schaltvorgänge zwischen 18 31 Uhr und 5 30 Uhr 9 verschiedene Kombinationen der Wochentage einstellbar Die einzelnen Wochentage werden im LCD Display der Zeitschaltuhr in Form der englischen Abkürzungen angezeigt Welche Abkürzung welchem Wochentag entpricht ist in folgender Tabelle ersichtlich Die obige Tabelle stellt ...

Страница 5: ...ichzeitig die WEEK Tas te bis der aktuelle Wochentag im Display der Zeitschaltuhr angezeigt wird Halten Sie die CLOCK Taste weiterhin gedrückt und stellen Sie mithilfe der Tasten HOUR Stunde und MINUTE Minute die aktuelle Tageszeit ein Lassen Sie die Tasten anschließend wieder los Die aktuelle Uhrzeit sowie der Wo chentag sind nun eingestellt 7 Schaltprogramme einstellen Drücken Sie kurz die TIMER...

Страница 6: ...mme nicht überschneiden um ein ungewolltes Ein oder Ausschalten zu vermeiden Um ein Schaltprogramm wieder zu deaktivieren oder ein deaktiviertes Programm zu reaktivieren drücken Sie die TIMER Taste so oft bis das gewünschte Programm im Display erscheint Mithilfe der RES RCL Taste können Sie das Schaltprogramm nun aktivieren oder deaktivieren 8 Manuelles Ein und Ausschalten Mithilfe der ON AUTO OFF...

Страница 7: ...nd AUTO ON OFF gleichzeitig um zwischen Sommer und Winterzeit umzuschalten Ist die Sommerzeit eingestellt so er scheint im Display der Zeitschaltuhr das Symbol Die Uhr wird in diesem Fall eine Stunde vorgestellt Um zwischen der 12 und 24 Stundenanzeige umzuschalten drücken Sie die CLOCK und die TIMER Taste gleichzeitig Im Display erscheint das AM oder PM Symbol sobald die 12 Stundenanzeige aktiv i...

Страница 8: ...ondert darauf hingewiesen wurde 12 Entsorgungshinweise Elektrische und elektronische Geräte dürfen nach der europäischen WEEE Richt linie nicht mit dem Hausmüll entsorgt werden Deren Bestandteile müssen ge trennt der Wiederverwertung oder Entsorgung zugeführt werden weil giftige und gefährliche Bestandteile bei unsachgemäßer Entsorgung die Umwelt nachhal tig schädigen können Sie sind als Verbrauch...

Страница 9: ...tterien enthalten ist der Anbieter verpflichtet den Kunden auf folgendes hinzuweisen Der Kunde ist zur Rückgabe gebrauchter Batterien als Endnutzer gesetzlich verpflichtet Er kann Altbatterien die der Anbieter als Neubatterien im Sortiment führt oder geführt hat unentgeltlich am Versandlager Versandadresse des Anbieters zurückgeben Die auf den Batterien abgebildeten Symbole haben folgende Bedeutun...

Страница 10: ...lug is fully inserted into the timer port If you need to clean the product first disconnect the timer from the mains completely and wipe the device using a dry cloth Never immerse the timer in water or other liquids Heaters and similar devices should never be left unattended during operation The manufactur er recommends not to connect any such devices to the timer Only for use in dry rooms Do not ...

Страница 11: ...itched on off manually The random function allows a random switching delay between 6 31 pm and 5 30 am 9 different combinations of the weekdays can be set The individual days of the week are shown in the timer display in the form of English abbreviations The following table shows the abbreviations and the corre sponding day of the week The above table shows an overview of the combinations that can...

Страница 12: ...utton pressed and set the current time using the HOUR and MINUTE buttons Then release the buttons The current time and day of the week are now set 7 Setting the timer programmes Press the TIMER button briefly You can first set the time at which the connected device has to be switched on ON Press the WEEK button until the desired days of the week on which the timer programme has to be executed are ...

Страница 13: ...the desired program is shown in the display You can now enable or disable the timer programme using the RES RCL button 8 Switching on and off manually You can manually switch on and switch off the device connected to the timer using the ON AUTO OFF button or enable the automatic control according to the configured timer programmes again Press the button to change between the different modes The di...

Страница 14: ... Never try to open the device to carry out repairs or conversions Avoid contact with mains voltages Do not short circuit the product The device is not certified for use in the open air only use it in dry conditions Protect it from high humidity water and snow Keep it away from high temperatures Do not subject the de vice to sudden changes in temperature or heavy vibration as this might damage elec...

Страница 15: ...and or the packaging refers to these regula tions By separating materials in this way recycling and disposing of old devices you are making an important contribution towards protecting our environment 13 Instructions on the disposal of batteries With regard to the sale of batteries or the supply of devices containing batteries the supplier is obliged to draw the customer s attention to the followi...

Страница 16: ...hold waste WEEE guideline 2012 19 EU WEEE register number DE 67896761 WD Plus GmbH herewith declares that this product 303215 20180315NB067 conforms to the principle requirements and other relevant stipulations The complete Declaration of Conform ity can be obtained from WD Plus GmbH Wohlenbergstraße 16 30179 Hanover ...

Страница 17: ... de l horloge programmable Si un nettoyage du produit s avère né cessaire débranchez complètement l horloge programmable et essuyez le dispo sitif avec un chiffon sec N immergez jamais l horloge programmable dans de l eau ou d autres liquides Des dispositifs de chauffage et consommateurs similaires ne doivent pas être laissés sans surveillance durant le fonctionnement Le fabricant recommande de ne...

Страница 18: ...e possible La fonction aléatoire permet un délai aléatoire des opérations de commutation entre 18 h 31 et 5 h 30 9 différentes combinaisons des jours de la semaine réglables Les différents jours de la semaine sont indiqués sur l écran LCD de l horloge programmable sous la forme de leurs abréviations anglaises Quelle abréviation correspond à quel jour de la semaine est indiqué dans le tableau suiva...

Страница 19: ...ouche WEEK jusqu à ce que le jour de semaine actuel soit affiché dans l écran de l hor loge programmable Continuez à maintenir la touche CLOCK enfoncée et réglez l heure actuelle à l aide des touches HOUR heure et MINUTE minute Relâchez ensuite les touches L heure actuelle ainsi que le jour de la semaine sont maintenant affichés 7 Réglage des programmes de commutation Appuyez brièvement sur la tou...

Страница 20: ...e se chevauchent pas afin d éviter une mise en marche ou un arrêt involontaire Pour désactiver un programme de commutation ou réactiver un programme désactivé appuyez sur la touche TIMER répétitivement jusqu à ce que le programme souhaité apparaisse sur l écran Vous pouvez maintenant activer ou désactiver le programme à l aide de la touche RES RCL 8 Mise en marche et arrêt manuels À l aide de la t...

Страница 21: ...é est configurée le symbole apparait sur l écran de l horloge programmable L heure est avancée d une heure dans ce cas Pour commuter entre l affichage de 12 et 24 heures appuyez également simultanément sur les touches CLOCK et TIMER Le symbole AM ou PM apparait sur l écran dès que l affichage 12 heures devient actif 11 Consignes de sécurité et clause de non responsabilité N essayez jamais d ouvrir...

Страница 22: ...bligé de ramener gratuitement les appareils électriques et électroniques arrivés en fin de vie au fabricant au point de vente ou dans un point de collecte prévu à cet effet La loi de chaque pays règle les détails connexes Le symbole sur le produit le manuel d utilisation et ou l emballage indique lesdites dispositions Avec ce type de séparation des matières de recyclage et d élimination des appa r...

Страница 23: ...E 2012 19 EU N d enregistrement DE 67896761 Par la présente la société WD Plus GmbH déclare que l appareil 303215 20180315NB067 est conforme aux exigences essentielles et aux autres dispositions pertinentes Pour obte nir une déclaration de conformité dans son intégralité contactez WD Plus GmbH Wohlen bergstraße 16 30179 Hanovre ...

Страница 24: ...ompletamente inserita nella presa del timer Se dovesse risultare necessaria la pulizia del prodotto scollegare il timer dalla rete elettrica e pulire l unità con un panno asciutto Non immergere il timer in acqua o altri liquidi Riscaldatori e dispositivi simili non devono mai essere lasciati in custoditi durante il funzionamento Il produttore raccomanda di non collegare al temporizzatore simili di...

Страница 25: ...le la commutazione manuale On Off La funzione random consente un ritardo casuale dei processi di commutazione tra le ore 18 31 e le ore 5 30 9 diverse combinazioni di giorni della settimana regolabili I giorni della settimana sono visualizzati sul display LCD del timer nella forma di abbreviazioni inglesi L abbreviazione dei giorni si può consultare nella tabella seguente La tabella sopra riportat...

Страница 26: ...mente il tasto WEEK fino a quando viene visualizzato il giorno stesso sul display del timer Tenere ancora premuto il tasto CLOCK e impostare l ora attuale utilizzando i tasti HOUR ora e MINUTE minuto Successivamente rilasciare i tasti Adesso l ora e il giorno della settimana sono impostati 7 Impostazione dei programmi di commutazione Premere brevemente il tasto TIMER È possibile impostare la prima...

Страница 27: ...rammi di commutazione non si sovrappongano in modo da evitare la commutazione involontaria tra acceso o spento Per disattivare nuovamente un programma di commutazione o riattivare un programma disattivato premere il tasto TIMER ripetutamente fino a quando il programma desiderato appare sul display Grazie al tasto RES RCL è possibile attivare o disattivare il programma di commutazione 8 Spegnimento...

Страница 28: ...zare la funzione random Se si desidera impostare più programmi accertarsi che l orario OFF del programma precedente si trovi almeno 31 minuti prima dell orario ON del programma successivo 10 Ora estiva e display 12 24 ore Premere i tasti CLOCK e AUTO ON OFF simultaneamente per commutare tra ora estiva e ora invernale Quando è impostata l ora estiva il display del timer mostra l icona del timer In ...

Страница 29: ... apportata all apparecchio non eseguita dal fornitore originario comporta la decadenza dei diritti di garanzia L apparecchio essere usato solo da persone che hanno letto e compreso questa guida di riferimento Le specifiche dell apparecchio possono essere modificate senza preavviso 12 Indicazioni per lo smaltimento Secondo la direttiva europea RAEE gli apparecchi elettrici ed elettronici non posson...

Страница 30: ...one del fornitore I simboli riprodotti sulle batterie hanno il seguente significato Pb la batteria contiene più di 0 004 percentuale in peso di piombo Cd la batteria contiene più di 0 002 percentuale in peso di cadmio Hg la batteria contiene più di 0 0005 percentuale in peso di mercurio Il simbolo della spazzatura barrata da una croce significa che la batteria non può essere smaltita insieme ai ri...

Страница 31: ...tivos del interruptor eléctrico automático Si es necesario limpiar el aparato separe el temporizador de la red de alimentación y límpielo con un paño seco No sumerja nunca el interruptor eléctrico automático en agua ni otros líquidos Los radiadores y otros productos similares no deben dejarse sin vigilancia nunca mien tras estén en funcionamiento El fabricante recomienda no utilizar esos aparatos ...

Страница 32: ...apagado manual posibles La función aleatoria permite retrasar de manera aleatoria los procesos de conmutación entre las 18 31 y las 5 30 horas 9 combinaciones distintas de los días de la semana ajustables Cada día de la semana aparecerá en la pantalla LCD del temporizador con las siglas correspondientes en inglés La tabla siguiente muestra qué sigla se corres ponde con cada día de la semana La tab...

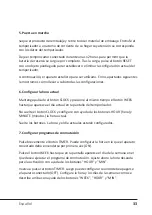
Страница 33: ... CLOCK y presione al mismo tiempo el botón WEEK hasta que aparezca el día actual en la pantalla del temporizador No suelte el botón CLOCK y configure con ayuda de los botones HOUR hora y MINUTE minutos la hora actual Suelte los botones La hora y el día actuales estarán configurados 7 Configurar programas de conmutación Pulse brevemente el botón TIMER Puede configurar la hora en la que el aparato c...

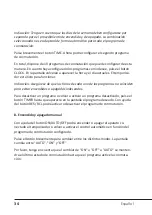
Страница 34: ...egúrese de que las horas de cada uno de los programas no coinciden para evitar encendidos o apagados indeseados Para desactivar un programa o volver a activar un programa desactivado pulse el botón TIMER hasta que aparezca en la pantalla el programa deseado Con ayuda del botón RES RCL podrá activar o desactivar el programa de conmutación 8 Encendido y apagado manual Con ayuda del botón ON AUTO OFF...

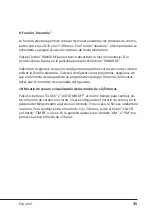
Страница 35: ...ar la función aleatoria Si desea configurar varios programas asegúrese de que el momento de apagado de un programa tenga lugar al menos 31 minutos antes que el momento de encendido del siguiente 10 Horario de verano y visualización de los modos de 12 24 horas Pulse los botones CLOCK y AUTO ON OFF al mismo tiempo para cambiar en tre el horario de verano e invierno Si está configurado el horario de ...

Страница 36: ...a de todos los derechos de garantía El dispositivo solo puede ser utilizado por personas que ha yan leído y comprendido este manual Las especificaciones del producto pueden cambiar sin un aviso previo 12 Indicaciones para la eliminación Según la directiva europea WEEE está prohibido eliminar los equipos eléctricos y electrónicos con la basura doméstica Sus componentes se deben llevar por separado ...

Страница 37: ...Los símbolos que figuran en las baterías tienen los siguientes significados Pb batería contiene más de 0 004 porcientos de masa de plomo Cd batería contiene más de 0 002 porcientos de masa de cadmio Hg batería contiene más de 0 0005 porcientos de masa de mercurio Por la presente la empresa WD Plus GmbH declara que el dispositivo 303215 20180315NB067 cumple los requisitos fundamentales y las demás ...

Страница 38: ...38 Notes ...

Страница 39: ...39 Notes ...

Страница 40: ...WD Plus GmbH Wohlenbergstraße 16 D 30179 Hannover ...

Отзывы: