background image


26 


Specifications and design are subject to change without prior notice.. 


www.tronios.com 


Copyright © 2018 by TRONIOS the Netherlands 

Содержание 150.551

Страница 1: ...LCB244 LED BAR Ref nr 150 551 INSTRUCTION MANUAL GEBRUIKSAANWIJZING BEDIENUNGSANLEITUNG MANUAL DE INSTRUCCIONES MANUEL D INSTRUCTIONS INSTRUKCJA OBSŁUGI V1 1 ...

Страница 2: ...sity LEDs Do not look into the LED light to prevent damage to your eyes Do not repeatedly switch the product on and off This shortens the life time Keep the unit out of the reach of children Do not leave the unit unattended Do not use cleaning sprays to clean switches The residues of these sprays cause deposits of dust and grease In case of malfunction always seek advice from a specialist Only ope...

Страница 3: ...fuse Make sure the device has an appropriate electrical ground to avoid the risk of electrocution or fire INSTALLATION Attention The installation of the product has to be built and constructed in a way that it can hold 10 times the weight for 1 hour without any harming deformation The installation must always be secured with a secondary safety attachment e g an appropriate catch net This secondary...

Страница 4: ...he other units that must react on the master you must set in slave mode The Slave will synchronously follow the Master Noted Any unit can be the Master or Slave REPLACING THE FUSE If the fuse is defective replace the fuse with a fuse of the same type and value Before replacing the fuse unplug mains lead Procedure Step 1 Open the fuse holder on the rear panel with a fitting screwdriver Step 2 Remov...

Страница 5: ...phanging Monteer minimaal 50 cm van brandbare objecten en laat tenminste 1meter vrij aan weerszijden voor een deugdelijke ventilatie Dit apparaat bezit een hoge intensiteit LED kijk nooit in de LED om oogbeschadigingen te voorkomen Het apparaat buiten bereik van kinderen houden Bovendien mag het apparaat nooit onbeheerd gelaten worden Gebruik geen schoonmaakspray om de schakelaars te reinigen Rest...

Страница 6: ...het apparaat direct op de netspanning worden aangesloten en mag géén dimmer of regelbare voeding worden gebruikt Sluit het apparaat altijd aan op een beschermd circuit aardlekschakelaar of zekering Zorg ervoor dat het apparaat voldoende elektrisch is geaard om het risico op elektrocutie of brand te vermijden INSTALLATIE De constructie van de ophanging dient zo te zijn dat deze 10 keer het gewicht ...

Страница 7: ...ten die moeten reageren op de master moet u in de slave modus zetten De slave zal synchroon de master volgen Opmerking Elk apparaat kan de Master of Slave zijn VERVANGEN ZEKERING Indien de zekering defect is dient u de zekering te vervangen door een zekering van hetzelfde type en waarde Voor het vervangen van de zekering schakel eerst de stroom uit en volg de onderstaande stappen Procedure Stap 1 ...

Страница 8: ...u gewährleisten Das Gerät besitzt eine hochintensive LED Niemals direkt in die LED blicken um die Augen nicht zu beschädigen Niemals das Gerät kurz hintereinander ein und ausschalten Dadurch verkürzt sich die Lebensdauer erheblich Das Gerät außerhalb der Reichweite von Kindern halten Das Gerät niemals unbeaufsichtigt lassen Die Regler nicht mit Reinigungssprays reinigen Diese hinterlassen Rückstän...

Страница 9: ...hne Spuren von Verformung tragen können Verwenden Sie immer das mitgelieferte Montagebügel um das Gerät zu hängen Das Gerät darf nur über den Montagebügel nicht enthalten an der mitgelieferten Hänge Befestigungsbügel installiert werden Das Gerät muss immer mit Hilfe von Sicherungsseil gesichert werden Die Anlage muss immer mit einer zweiten Sicherheitsvorrichtung z B einem geeigneten Fallnetz Sich...

Страница 10: ...gen Achtung Jede Gerät kann der Master oder Slave sein SICHERUNGSWECHSEL Wenn die Feinsicherung des Gerätes defekt ist darf diese nur durch eine Sicherung gleichen Typs ersetzt werden Vor dem Sicherungswechsel ist das Gerät allpolig von der Netzspannung zu trennen Netzsteckerziehen Vorgehensweise Schritt 1 Öffnen Sie den Sicherungshalter an der Geräterückseite mit einem passenden Schraubendreher S...

Страница 11: ... inflamables y deje un espacio de al menos 1 metro a cada lado para permitir que haya suficiente ventilación Este aparato contiene LEDs de alta luminosidad No mire a la luz del LED para evitar daños en su vista No lo apague y encienda repetidamente Esto acorta su tiempo de vida Mantenga el aparato fuera del alcance de los niños No deje el aparato sin vigilancia No utilice sprays limpiadores para l...

Страница 12: ...n circuito protegido disyuntor o fusible Asegúrese de que el producto tiene una toma de tierra adecuada para evitar el riesgo de electrocución o incendio INSTALACIÓN Atención La instalación del aparato debe ser de una manera que pueda soportar 10 veces su peso durante 1 hora sin sufrir deformaciones dañosas La instalación siempre debe ser efectuada con un accesorio de seguridad secundario por ejem...

Страница 13: ...as otras unidades en modo esclavo para que reaccionen al maestro El esclavo sigue sincrónicamente al Maestro Nota Qualquier unidad puede ser Maestro o Esclavo CAMBIANDO EL FUSIBLE Si el fusible está defectuoso reemplace el fusible por un fusible del mismo tipo y valor Antes de sustituir el fusible desconectar de la corriente Procedimiento Paso 1 Abra el portafusibles del panel trasero con un desto...

Страница 14: ...vision N allumez pas et n éteignez pas l appareil de manière répétée Cela réduit sa durée de vie Conservez l appareil hors de la portée des enfants Ne laissez pas l appareil sans surveillance N utilisez pas d aérosols pour nettoyer les interrupteurs Les résidus créent des dépôts et de la graisse En cas de dysfonctionnement demandez conseil à un spécialiste Ayez toujours les mains propres pour util...

Страница 15: ... de l appareil doit être pensée et réalisée de telle sorte que le support de fixation puisse supporter 10 fois le poids de l appareil pendant une heure sans aucune déformation L installation doit toujours être assurée par un second système de fixation par exemple un filet ou une élingue Ce second système doit être conçu de telle sorte que aucun élément de l installation ne puisse tomber si la fixa...

Страница 16: ...chage Les autres appareils devant réagir aux indications de l appareil Master doivent être réglés en mode Slave L appareil Slave va suivre l appareil Master de manière synchrone Note n importe quel appareil peut être Master ou Slave REMPLACEMENT DU FUSIBLE Si le fusible est défectueux il faut le remplacer par un fusible de même type et de même valeur Avant de le remplacer veillez à débrancher l ap...

Страница 17: ...m od materiałów łatwopalnych i zachowuj co najmniej 1m wolnej przestrzeni z każdej strony aby zapewnić odpowiednie chłodzenie Urządzenie posiada diody LED wysokiej mocy Nie patrz bezpośrednio na diody aby nie uszkodzić wzroku Nie włączaj i wyłączaj urządzenia co chwilę Skraca to jego żywotność Trzymaj z dala od dzieci Nie zostawiaj sprzętu bez opieki Nie używaj spray ów do czyszczenia przełącznikó...

Страница 18: ...ektrycznego za pomocą bezpiecznika lub wyłącznika instalacyjnego Upewnij się że urządzenie jest uziemione aby uniknąć pożaru lub śmiertelnego porażenia prądem INSTALACJA Uwaga Instalacja urządzenia powinna być przeprowadzona na konstrukcji która jest w stanie utrzymać 10 krotność wagi sprzętu przez godzinę bez żadnych deformacji Instalacja musi być zawsze dodatkowo zabezpieczona np linką bezpiecze...

Страница 19: ...przyjmować ustawienia urządzenia master należy ustawić w trybie slave Teraz wszystkie urządzenia będą pracować tak samo Informacja Każde urządzenie może pracować jako master lub slave WYMIANA BEZPIECZNIKA Jeśli bezpiecznik jest niesprawny wymień go na nowy egezmplarz tego samego typu i wartości Przed wymianą bezpiecznika wyciągnij kabel zasilajacy z gniazda Instrukcja Krok 1 Otwórz śrubokrętem zas...

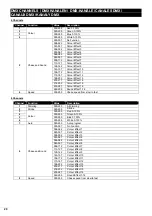
Страница 20: ...233 247 Colour Effect 16 248 255 Sound Effect 1 16 6 Speed 000 255 Chase speed from slow to fast 9 Channels Channel Function Value Description 1 Dimming 000 255 All dimming 2 Strobe 000 255 Strobe 3 Colour 000 255 Red 0 100 4 000 255 Green 0 100 5 000 255 Blue 0 100 6 000 255 White 0 100 7 Auto 000 255 Auto program 8 Chase and Sound 000 007 No Function 008 022 Colour Effect 1 023 037 Colour Effect...

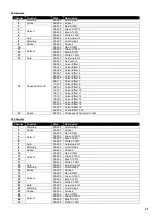
Страница 21: ...fect 12 188 202 Colour Effect 13 203 217 Colour Effect 14 218 232 Colour Effect 15 233 247 Colour Effect 16 248 255 Sound Effect 1 16 16 Speed 000 255 Chase speed from slow to fast 30 Channels Channel Function Value Description 1 Dimming 000 255 All dimming 1 2 Strobe 000 255 Strobe 1 3 Colour 1 000 255 Red 0 100 4 000 255 Green 0 100 5 000 255 Blue 0 100 6 000 255 White 0 100 7 Auto 000 255 Auto ...

Страница 22: ...7 Auto 000 255 Auto program 1 8 Dimming 000 255 All dimming 2 9 Strobe 000 255 Strobe 2 10 Colour 2 000 255 Red 0 100 11 000 255 Green 0 100 12 000 255 Blue 0 100 13 000 255 White 0 100 14 Auto 000 255 Auto program 2 15 Dimming 000 255 All dimming 3 16 Strobe 000 255 Strobe 3 17 Colour 3 000 255 Red 0 100 18 000 255 Green 0 100 19 000 255 Blue 0 100 20 000 255 White 0 100 21 Auto 000 255 Auto prog...

Страница 23: ...ffect 6 098 112 Colour Effect 7 113 127 Colour Effect 8 128 142 Colour Effect 9 143 157 Colour Effect 10 158 172 Colour Effect 11 173 187 Colour Effect 12 188 202 Colour Effect 13 203 217 Colour Effect 14 218 232 Colour Effect 15 233 247 Colour Effect 16 248 255 Sound Effect 1 16 58 Speed 000 255 Chase speed from slow to fast MENU MENÜ MENÚ Mode Program Description DMX MODE ADDR 001 512 DMX addres...

Страница 24: ... 240V AC 50 60Hz Rated power 160Watt LED 24x 3Watt RGBW 4 in1 Fuse T1A DMX Channels 6 9 16 30 or 58 Channels Function DMX Auto Sound active and Master Slave Dimensions per unit 102 x 67 x 67mm Weight per unit 1 95kg The specifications are typical The actual values can slightly change from one unit to the other Specifications can be changed without prior notice ...

Страница 25: ... Regulatory Requirement EN 55015 2013 EN 61000 3 2 2014 EN 61000 3 3 2013 EN 61547 2009 EN 61000 4 2 2009 4 3 2006 A1 2008 A2 2010 4 4 2012 4 5 2014 4 6 2014 4 8 2010 4 11 2004 EN 60598 2 17 1989 A2 1991 EN 60598 1 2015 I hereby declare that the product meets the requirements stated in Directives 2014 35 EU 2014 30 EU 2011 65 EU and conforms to the above mentioned Declarations Almelo 19 3 2018 Nam...

Страница 26: ...26 Specifications and design are subject to change without prior notice www tronios com Copyright 2018 by TRONIOS the Netherlands ...

Отзывы: