Be Cool BC45ST2002F Скачать руководство пользователя страница 14


Seite 14 von 17 

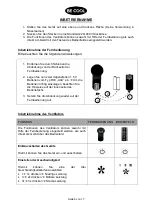
Commissioning of the fan 
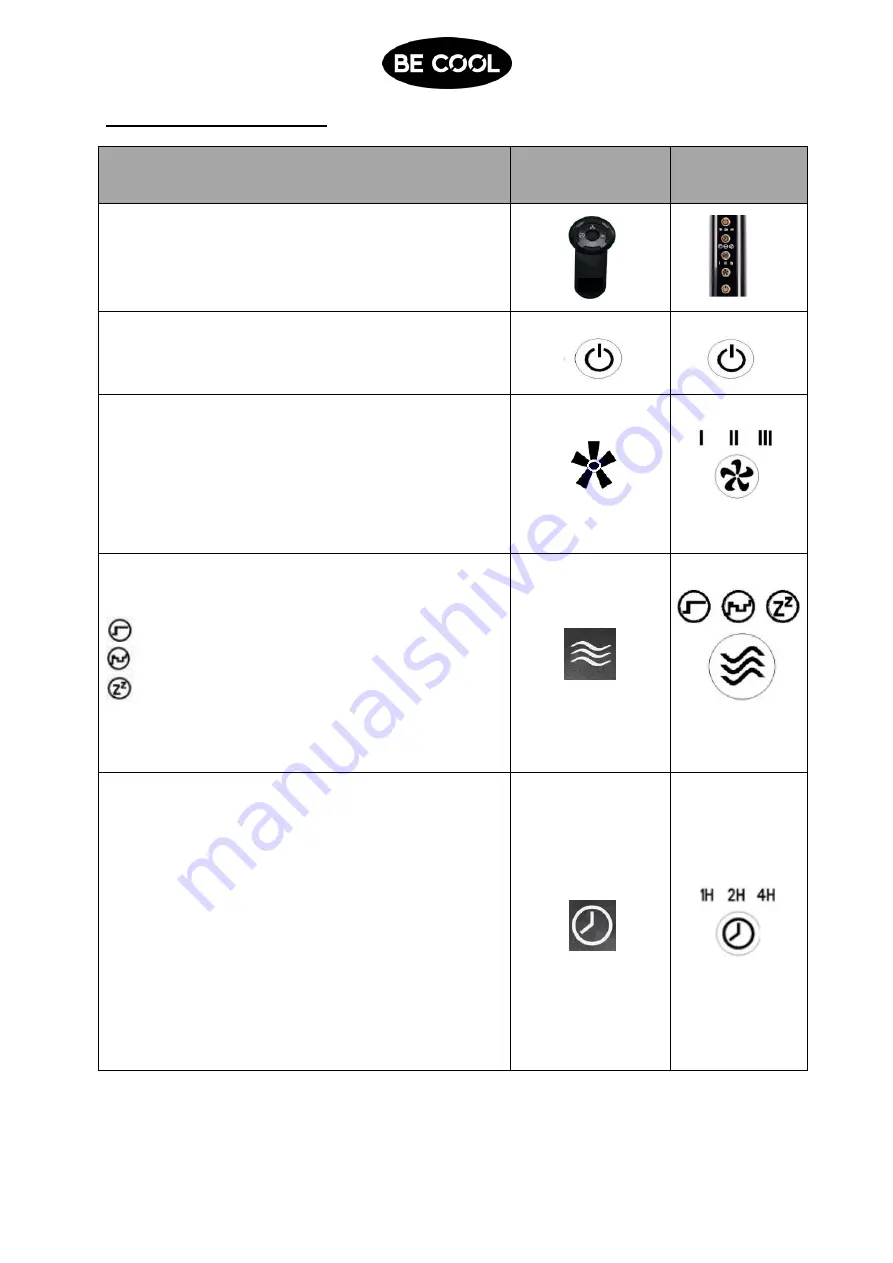
 

FUNCTION


REMOTE 

CONTROL


CONTROL 

PANEL


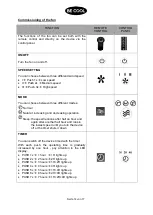
The  functions  of  the  fan  can  be  set  both  with  the 
remote  control  and  directly  on  the  device  via  the 
control panel.


ON/OFF


Turn the fan on and off. 


SPEED SETTING


You can choose between three differend wind speed:  


 Push 1x 

 Low speed


II 

 Push 2x 

 Medium speed


III 

 Push 3x 

 High speed


MODE


You can choose between three different modes:


Normal


Natural: increasing and decreasing operation


Sleep: the speed reduces after half an hour and            


     again after another half hour and runs in 


     the lowest speed until you turn the device 


     off or the timer shuts it down  


TIMER 


You can switch off the device timed with the timer. 
With  each  push,  the  operating  time  is  gradually 
increased  by  one  hour  -  pay  attention  to  the  LED 
display: 


PUSH 1x 

 1 hour   

 1H lights up 


PUSH 2x 

 2 hours 

 2H lights up


PUSH 3x 

 3 hours 

 1H+2H lights up


PUSH 4x 

 4 hours 

 4H lights up


PUSH 5x 

 5 hours 

 1H+4H lights up


PUSH 6x 

 6 hours 

 2H+4H lights up


PUSH 7x 

 7 hours 

 1H+2H+4H lights up


O
N

O
F

Содержание BC45ST2002F

Страница 1: ...5ST2002F HERZLICHEN GL CKWUNSCH VIELEN DANK DASS SIE SICH F R EIN PRODUKT VON BE COOL ENTSCHIEDEN HABEN Diese Bedienungsanleitung gibt es in folgenden Sprachen DEUTSCH Seite 2 9 ENGLISH Seite 10 17 DE...

Страница 2: ...nicht defekt oder lose sein und muss f r die erforderliche Strombelastung geeignet und vor allem zuverl ssig geerdet sein 7 Vermeiden Sie die Verwendung eines Verl ngerungskabels denn dieses k nnte be...

Страница 3: ...in einem guten Zustand indem Sie das Ger t pflegen und reinigen Falls Sie Fragen zur Instandhaltung haben k nnen Sie mit der vom Hersteller autorisierten Kundenhotline Servicestelle in Kontakt treten...

Страница 4: ...dfu es einf gt damit das Ger t stabil ist Befestigen Sie anschlie end das Standbein indem Sie die 4 mitgelieferten Schrauben und Beilagscheiben mit einem Schraubenzieher von unten festziehen Montage d...

Страница 5: ...Hand an den Fl geln drehen Hierbei d rfen sich die Fl gel und die Gewindemutter nicht ber hren ffnen Sie nun die Klammer auf dem vorderen Schutzgitter 8 und lockern die Fixierschraube 7 Setzten Sie n...

Страница 6: ...nun zwei mitgelieferten 1 5 V Batterien vom Typ R03 AAA ein Um die Batterien richtig einzulegen beachten Sie die Hinweise auf der Innenseite des Batteriefachs 3 Setzen Sie die Abdeckung wieder auf de...

Страница 7: ...uf die LED Anzeige 1x dr cken 1 Stunde 1H leuchtet 2x dr cken 2 Stunden 2H leuchtet 3x dr cken 3 Stunden 1H 2H leuchtet 4x dr cken 4 Stunden 4H leuchtet 5x dr cken 5 Stunden 1H 4H leuchtet 6x dr cken...

Страница 8: ...Ursache Eventuelle Behebung Das Ger t zeigt keine Funktion Keine Stromversorgung berpr fen Sie ob der Netzstecker richtig eingesteckt ist Die Ventilatorfl gel drehen sich nicht Falsche Montage berpr...

Страница 9: ...el scht unleserlich gemacht oder entfernt worden ist Dienstleistungen au erhalb unserer Vertragswerkst tten die Transportkosten zu einer Vertragswerkstatt oder an uns und retour sowie die damit verbun...

Страница 10: ...operly earthed 7 Avoid the use of an extension cable as this may overheat and cause a fire 8 It is strictly forbidden to modify the properties of this device in any form or manner and you must only us...

Страница 11: ...ry place out of reach for children when you are not using it RECYCLING The device s packaging materials can be recycled It is therefore recommended to dispose of them through sorted waste collection D...

Страница 12: ...sert the lower stand tube into the base hole and keep the bulge of stand tube alignment with space of base hole then use the four screws to tighten the tube to the base Assembly of the upper stand tub...

Страница 13: ...clip screw Position the top clip on the uppermost part of the rear guard Push the top clip down and press the rim of the front guard onto the rear guard Close the bottom clip and tighten the screw STA...

Страница 14: ...es Normal Natural increasing and decreasing operation Sleep the speed reduces after half an hour and again after another half hour and runs in the lowest speed until you turn the device off or the tim...

Страница 15: ...e come to a full stop before disconnect it from the outlet Use a soft cloth to clean the device If dirt and contamination should not come off easily you may use warm soapy water Do not use solvents an...

Страница 16: ...ounting Check if the blades are damaged Check if the guards are deformed and touch the blades Technical information Rated voltage Frequency Rated input power Name Symbol Value Unit Maximum volume flow...

Страница 17: ...r serial number on the device have been erased rendered illegible or removed Service work not performed by our authorised workshops transport costs to an authorised workshop or us and back as well as...

Отзывы: