Brook House,
Dunmurry Industrial Estate,
Dunmurry,
Belfast BT17 9HU
T +44 (0)28 9061 6505
F +44 (0)28 9061 6518
E [email protected]
elkay.co.uk
BROOK DESIGN HARDWARE LTD
B
D
H
B
D
H
BROOK DESIGN
HARDWARE LTD
B
D
H
BROOK DESIGN
HARDWARE LTD
BDH
BROOK DESIGN
HARDWARE LTD
B
D
H
Problem
Resolution
Lights will not
switch OFF
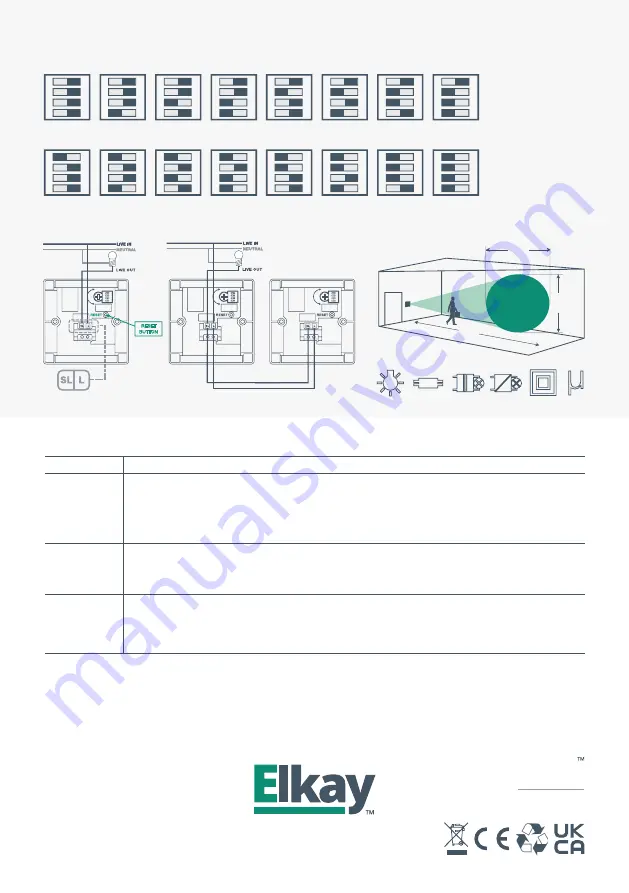
• Check time settings (Black bar denotes position of dip switches).
• Check Connections.
• PIR is too close to lights – Re-position away from lighting, forced air ventilation or heating sources.
• Ensure PIR is not looking directly at heat source or is in direct sunlight.
• PIR is re-triggered – Check area is left unoccupied for longer than time setting using an accurate time piece.
• Capacitor must be fi tted if switching low wattage loads or LED lighting.
Lights will not
switch ON
• Check Terminal connections.
• Lux set too low – Turn up lux level towards the plus and wait 30 seconds for sensor to adjust.
• In the unlikely event that the above does not work then press the reset button at the back.
(In circuits with multiple PIRs ensure that all PIRs have reset buttons pressed).
Light switches
OFF then
immediately
comes back ON
• Check terminal connections.
• PIR may be detecting normally fi nd potential source that is triggering PIR. Best method is to cover
detector with thick material to eliminate potential trigger source.
• PIR is seeing infra-red heat from lighting load.
• Capacitor must be fi tted if switching low wattage loads or LED lighting.
Diagram 1 – Time settings
Please note:
The black bar denotes the position of the dip switch.
10-15 sec 2 mins 3 mins 4 mins 5 mins 7 mins 10 mins 15 mins
TEST MODE
ON DIP
4
3
2
1
ON DIP
4
3
2
1
ON DIP
4
3
2
1
ON DIP
4
3
2
1
ON DIP
4
3
2
1
ON DIP
4
3
2
1
ON DIP
4
3
2
1
ON DIP
4
3
2
1
20 mins 25 mins 30 mins 35 mins 40 mins 45 mins 50 mins 60 mins
ON DIP
4
3
2
1
ON DIP
4
3
2
1
ON DIP
4
3
2
1
ON DIP
4
3
2
1
ON DIP
4
3
2
1
ON DIP
4
3
2
1
ON DIP
4
3
2
1
ON DIP
4
3
2
1
Diagram 2 – Wiring
Troubleshooting
Diagram 3 – Detection 360
O
4-6m
3-4m
5-7m
Multiple switching
Single switching
Note
Ensure no cables rest
on Reset Button
when switch is attached
to wall.
Important Notice
All wiring should be carried out by a competent
person or a qualifi ed electrician and should be
fi tted to current IEE wiring regulations BS 7671.
The circuit should be isolated before carrying out
any work. Failure to adhere to the instructions
will invalidate the warranty.
Technical Helpline
For further help, or information on this and the other products in the Elkay range go to
www.elkay.co.uk or call +44 (0)28 9061 6505. In the unlikely event that you have to
return your product, please ensure you switch the battery off fi rst. These instructions
are available in other languages. Please refer to our website www.elkay.co.uk
Instrukcje są również dostępne w innych językach. Prosimy o zapoznanie się z naszą
stroną internetową www.elkay.co.uk lub www.elkaypolska.pl
Elkay (Europe), 51C Milicka, Trzebnica, 55-100, Poland


