


BD FocalPoint™ GS Imaging System Instrument User’s Manual
140
To insert slides into trays:
1
Grasp the slide by its edges and gently slide the barcode label end of a slide under the metal
clips. Try not to let any fingers touch the top or bottom surfaces of the slide. Do not force
slides into trays.
2
Once the slide is positioned under the metal clip, position it up towards the clip and to the
left. This ensures all slides are positioned in the same direction and optimizes barcode label
visualization.
3
Do not tear the barcode label. If label gets torn, replace it with a new one.
4
Seat the slide firmly at both ends of the tray. Do not use a slide that is either too long or too
short to seat properly in the slot.
5
Seat the slides so that they are level in the tray.
6
When all the slides are loaded in the tray, lightly pass an index finger over the slide ends not
held by the metal clips. This detects if any of the slides are not seated properly. Reseat slides
as necessary.
15.3.2
Changing Preparation Types with Switch Slides
If processing more than one type of slide preparation on a single BD FocalPoint™ Slide Profiler,
a special slide must be inserted in the tray to separate each type of preparation. These special
slides are called switch slides. The barcodes on these slides identify the preparation type and the
coverslip type. If slides processed on the device do not match the preparation type of the current
switch slide, the slides most likely will be classified as
Process Review
.
When using switch slides, consider the following:
•
When loading trays with each type of preparation, insert the appropriate switch slide in the
first position of the first tray for that group of slides.
•
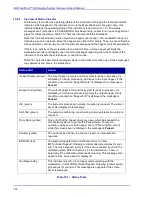
2 shows examples of switch slides.
Figure 15
-
2 – Four example switch slides
•
Whenever loading trays into an empty hopper, always place a switch slide indicating the type
of preparation in the first position of the first tray. This practice ensures that the system
engages the proper processing mode for the types of slides loaded in the succeeding trays.
•
Make sure that coverslip type on the switch slide corresponds to the operating mode of the
instrument.
Содержание FocalPoint GS
Страница 10: ...BD FocalPoint GS Imaging System Instrument User s Manual 10...
Страница 44: ...BD FocalPoint GS Imaging System Instrument User s Manual 44...
Страница 54: ...BD FocalPoint GS Imaging System Instrument User s Manual 54...
Страница 58: ...BD FocalPoint GS Imaging System Instrument User s Manual 58...
Страница 76: ...BD FocalPoint GS Imaging System Instrument User s Manual 76...
Страница 86: ...BD FocalPoint GS Imaging System Instrument User s Manual 86...
Страница 110: ...BD FocalPoint GS Imaging System Instrument User s Manual 110...
Страница 126: ...BD FocalPoint GS Imaging System Instrument User s Manual 126...
Страница 156: ...BD FocalPoint GS Imaging System Instrument User s Manual 156...
Страница 192: ...BD FocalPoint GS Imaging System Instrument User s Manual 192...
Страница 200: ...BD FocalPoint GS Imaging System Instrument User s Manual 200...
Страница 204: ...BD FocalPoint GS Imaging System Instrument User s Manual 204...
Страница 206: ...BD FocalPoint GS Imaging System Instrument User s Manual 206...
Страница 210: ...BD FocalPoint GS Imaging System Instrument User s Manual 210...
Страница 212: ...BD FocalPoint GS Imaging System Instrument User s Manual 212...
Страница 218: ...BD FocalPoint GS Imaging System Instrument User s Manual 218...
Страница 224: ...BD FocalPoint GS Imaging System Instrument User s Manual 224...