Pg. 11
11
12
TOOLS REQUIRED
PRODUCT ASSEMBLY
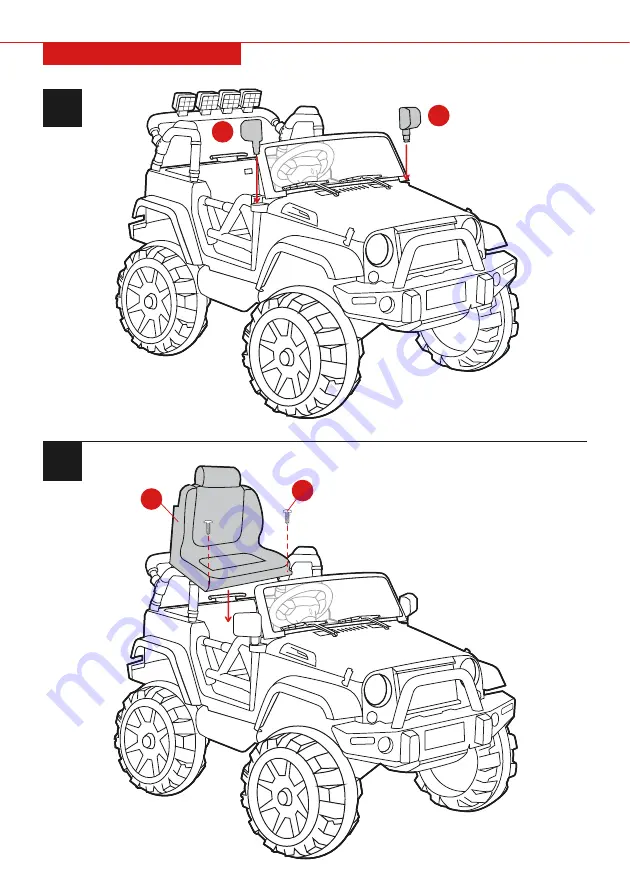
I
J
Snap on part I side mirrors.
Attach the part J seat with two
part 1 screws.
1
Страница 1: ...SKY2856 2857 2858 Ver 4 INSTRUCTION MANUAL 12V Ride On Truck with Remote...
Страница 2: ...vehicle in an unsafe manner Examples include but are not limited to Pulling the vehicle with another vehicle or similar device Allowing more than one rider Pushing the user Traveling at an unsafe spe...
Страница 3: ...le Only drive on level ground Do not go near swimming pools or other bodies of water drop offs or up and down steep inclines Do not drive the vehicle into loose dirt mud sand fine gravel or on wet sur...
Страница 4: ...IPS SCREWDRIVER SMALL WRENCH NEEDLE NOSE PLIERS TOOLS REQUIRED PARTS HARDWARE 1 12 PCS 4 x 10mm 3 x 12mm 10 x 20x 2mm 12 x 22x 2mm 2 5 x 16mm 2 2 PCS 3 2 PCS 4 6 PCS 5 5 PCS A D B C 1 PC 4 PCS 2 PCS 2...
Страница 5: ...Pg 5 PARTS G J H I 1 PC 1 PC 1 PC 2 PCS HOOK SEAT K 1 PC FRONT AXLE L 1 PC STEERING WHEEL WINDSHIELD SIDE MIRROR N 1 PC REMOTE CONTROL O 1 PC CHARGER M 2 PCS FRONT REFLECTOR P S...
Страница 6: ...icle FRONT REAR A A A Remove the nut and bolt from the stabilizer near the rear gear box Slide the part A rear axle through the gear box metal stabilizer and shocks Repeat this on the other side to sl...
Страница 7: ...r side Snap a part D hub cap onto each wheel K D D 4 5 B B 1 1 Pg 7 TOOLS REQUIRED PRODUCT ASSEMBLY 4 5 4 Slide the part K front axle into the steering column Secure the axle with a part 3 small washe...
Страница 8: ...d holes on the rear of the vehicle D E D 4 5 C C 5 4 Slide on a part 4 large washer part C front wheel another part 4 large washer and secure it with a part 5 pin Use needle nose pliers to bend the pi...
Страница 9: ...the part G hook to the rear of the vehicle with two part 1 screws Slide the part F bar light into the holes located on the frame pieces and secure it with two part 2 screws TOOLS REQUIRED PRODUCT ASS...
Страница 10: ...0 9 10 TOOLS REQUIRED PRODUCT ASSEMBLY L Join the connector from the part L steering wheel to the connector from the steering mount then snap the steering wheel into place Snap on the part H windshiel...
Страница 11: ...Pg 11 11 12 TOOLS REQUIRED PRODUCT ASSEMBLY I J I Snap on part I side mirrors Attach the part J seat with two part 1 screws 1...
Страница 12: ...reflectors onto the front of the vehicle and they will snap in place Under the hood connect the red wire to the red terminal on the battery M Pg 12 13 TOOLS REQUIRED PRODUCT ASSEMBLY SPEAKER BATTERY...
Страница 13: ...UX input plug in a music player to play music TF MicroSD port play music from a MicroSD card play pause music short press to play to the next song long press to increase volume short press to play the...
Страница 14: ...tery Electrical protection Switch not in the correct position Battery connectors disconnected Low battery Overloaded vehicle Uneven or sloped road Loose connection to motor Steering wheel is not prope...
Страница 15: ...se permanent damage to the battery and void the warranty Damage to the battery may occur if it is allowed to drain completely Do not allow the battery to drain completely Check the battery and charger...
Страница 16: ...he reason for return is a result of an error by Best Choice Products then Best Choice Products will provide a pre paid shipping label via email Boxes for return shipping will not be provided by Best C...