


Installation
3.4 System Memory (DRAM)
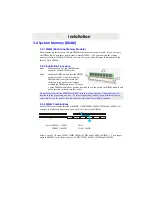
3.4.1 DIMM (Dual Inline Memory Module)
The motherboard features two 168-pin DIMM sockets, share memory module. If you have only
one DIMM RAM, note that you must insert it into DIMM 1. You can configure the system
memory size from 16MB to 512MB in a variety of ways by using different combinations of the
three 168-pin DIMMs.
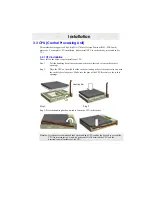
3.4.2 Installation Procedure
Step1:
Make sure
Pin 1 of the DIMM match
with pin 1 of the DIMM socket.
Step2:
Insert the DIMM module into the DIMM
socket vertically. After inserting the
DIMM module completely into the
socket, push up on the socket latches
securing the DIMM into place. If the pin
1 of the DIMM module does not line up with pin 1 of the socket, the DIMM module will
not be inserted correctly into the socket.
Be careful not to misfit the DIMM into DIMM socket in wrong direction. This module can be
inserted into the socket only one way. To release the memory module, push both latches down
and carefully rock the module forward and backward while slowly lifting it upward.
3.4.3 DIMM Combinations
Each DIMM socket can be inserted with 8MB, 16MB, 32MB, 64MB, 128MB, and 256MB. For
example, the following figure shows you one way to insert your DIMMs.
1 6 M B
6 4 M B
3 2 M B
2 5 6 M B
D I M M 1
S e le c t
E m p ty
1 6 M B
6 4 M B
3 2 M B
2 5 6 M B
D I M M 2
1 2 8 M B
1 2 8 M B
Select DIMM 1: 32MB
DIMM 2: 64MB
Total
32+64=96MB
Select 1 out of 5 Choices (16MB, 32MB, 64MB, 128MB, and 256MB) in DIMM 1. Then, repeat
again in DIMM 2 for 6 choices (Empty, 16 MB, 32 MB, 64 MB, 128MB, and 256MB).


