Electric steam steriliser
EN
7
Preparing for sterilisation
■
Before sterilising bottles and accessories, thoroughly wash them with a bottle brush and accessories in hot
water using a detergent suitable for children, rinse thoroughly and allow to dry .
Assembling the steriliser
■
The steriliser is assembled in two ways depending on the type of items that are to be sterilised .
–
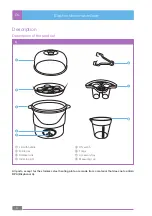
It is possible to leave only the bottle tray
A
2
at the bottom of the steriliser unit
A
3
and sterilise up to
6 baby bottles .
–
It is possible to leave the bottle tray
A
2
and the accessories tray
A
7
on the bottom of the steriliser unit
A
3
by first inserting into the steriliser unit
A
3
the bottle tray
A
2
and then into the holes in the bottle
tray
A
2
the tray for accessories
A
7
such as nipples, dummies, etc . and sterilise 4 bottles and two
nipples . Place bottles into the tray
A
2
with their bottom facing upwards and the bottle lids, nipples,
screw rings and dummies into holes in the accessories tray
A
7
in a horizontal position .
Note:
Make sure that all parts intended for sterilisation have be completely disassembled . Place them into the
tray with the opening facing downwards so that they do not fill up with water .
■
Before turning on the steriliser, place the lid with handle
A
1
on to the steriliser unit
A
3
making sure that
it has properly adhered to the steriliser unit
A
3
. Never turn on the steriliser without putting on the lid with
handle
A
1
. Now the appliance is ready for operation .
Operation
!
Attention:
Never use the appliance without water inside the steriliser!
■
The steam that is released during the sterilisation process is hot . Keep your hands away from the appliance
during the sterilisation process .
■
Stand the steriliser on a horizontal and stable surface .
■
Using the measuring cup
A
8
, measure out exactly 90 ml of tap water and pour it directly on to the stainless
steel heating plate inside the appliance . The water level should to exceed the stainless steel heating part .
■
Assemble the steriliser according to the instructions contained in the chapter Assembling the steriliser and
insert the trays and then the items intended for sterilisation into them .
■
Put on the lid
A
1
and make sure than it has properly adhered to the steriliser unit
A
3
.
■
Insert the power plug into a power socket .
■
Turn on the steriliser by pressing the ON button
A
5
.
■
The indicator light
A
4
will be lit indicating that the appliance is in operation .
■
After the sterilisation process is completed, the steriliser will turn off automatically .
■
Wait until the appliance cools down . Only then take off the lid using handle
A
1
.
■
Be careful, steam may come out of the steriliser .
■
Remove bottles or other items from the trays using the provided tongs
A
6
. Be careful, sterilised items may
still be hot .
Note:
Thoroughly wash your hands before touching any sterilised items .
■
Disconnect the appliance from the socket and wait until it cools down completely .
■
Pour out all the water remaining in the water tank inside the steriliser unit
A
3
and wipe the water tank dry .


