background image

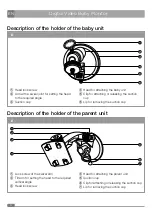
Digital Video Baby Monitor 

EN

14

Cleaning and maintenance


Before cleaning the baby monitor, disconnect it from the power source. If it becomes soiled, wipe the 
outer parts of the baby monitor, power adaptor A

5

 or charger A

6

 with a clean, dry cloth.


For cleaning, do not use abrasive cleaning products, solvents, thinners, etc. Never submerge the 
baby monitor, power adapter A

5

 and the charger A

6

 in water or rinse under running water.

Technical specifications

Model number ........................................... BBM 7030
Frequency broadcast band ........................ 2 400–2 480  MHz
Transmission power ................................... 17 dBm
Sensitivity .................................................. –85 dBm
Modulation ................................................ FHSS (Frequency Hopping Spread Spectrum)
Range in open space ................................. up to 250 m
Audio transmission .................................... one way communication
Display type and size ................................. 3.5" LCD
Voltage and power input ............................ 5 V  , 1 A
Power source ............................................ power adapter, JF005WR-0500100VH
 

input: 100–240 V~, 50/60 Hz, 0.18 A, output: 5 V , 1 A

 or
 

supplied 12V car charger

 or
 

 built-in 3.7 V Li-Ion rechargeable batteries  
(baby unit – 900 mAh, parent unit – 950 mAh)

Electrical shock protection  
class (power adapter) ................................ II
Operating temperature .............................. 0–60 °C
Recommended storage temperature ......... 20 °C

Explanation of symbols used on the product, its accessories 
and packaging

This symbol indicates that this appliance meets all the basic requirements of EU directives 
related to it.

This symbol indicates that the product has protection class II.

This symbol indicates the polarity of the power cord connectors.

This symbol indicates that it is a product that may be used indoors only.

LOT.

This abbreviation serves to designate the production lot number.

Содержание BBM 7030

Страница 1: ...ption of the holder of the parent unit 8 Installation location and installation of the baby monitor 9 Power source 10 Using the baby monitor and its functions 11 Pairing the units 12 General informati...

Страница 2: ...s quality transmission up to a distance of 250 m in an open environment The baby monitor will inform you about interference or when the signal range is exceeded The encrypted wireless transmission and...

Страница 3: ...e only intended for powering this baby monitor Do not use it to power other appliances Never use the baby monitor with accessories that are not approved by the manufacturer Before connecting the power...

Страница 4: ...charging it and before cleaning it Do not disconnect the power adapter or the charger from the power source by pulling on the power cord This could damage the power cord or the socket Disconnect the a...

Страница 5: ...ital Video Baby Monitor EN Description of the accessories A 1 2 6 5 3 4 1 Baby unit 2 Baby unit holder with suction cup 3 Parent unit 4 Parent unit holder with suction cup 5 Power adapter 6 12V car ch...

Страница 6: ...D indicator showing that the baby unit is on and the battery is being charged 5 Microphone 6 Button for turning the baby unit on and off pairing button 7 Jack for connecting the power adapter connecto...

Страница 7: ...or car charger 3 LED indicator showing that the parent unit is on and the battery is being charged 4 Volume control dial 5 Button for turning the parent unit on and off pairing button 6 Holes for att...

Страница 8: ...g the baby unit 5 Clip for attaching or releasing the suction cup 6 Lip for removing the suction cup Description of the holder of the parent unit E 1 2 3 4 5 6 7 1 Lock screw of the swivel arm 2 Tilt...

Страница 9: ...e the suction cup D3 against a suitable surface and secure clip D5 This will attach the holder A2 Before connecting the baby unit A1 to the holder A2 make sure that the suction cup D3 has properly adh...

Страница 10: ...al power source Connect the plug on the power adapter A5 or the charger A6 to a corresponding power source Attention Before connecting the power adapter A5 to a power socket make sure the voltage stat...

Страница 11: ...you finish using it always turn off the baby unit A1 and disconnect the power adapter A5 or the charger A6 from the external power source When a battery is being charged disconnect the baby unit A1 fr...

Страница 12: ...rent unit A3 from the external power source only after the charging process has finished LED indicator showing that the parent unit is on and the battery is being charged When the LED indicator B3 is...

Страница 13: ...direction such as furniture interior and exterior walls of buildings trees etc weather events such as fog rain etc Troubleshooting Problem Solution No picture Check that the parent unit A3 is located...

Страница 14: ...one way communication Display type and size 3 5 LCD Voltage and power input 5 V 1 A Power source power adapter JF005WR 0500100VH input 100 240 V 50 60 Hz 0 18 A output 5 V 1 A or supplied 12V car char...

Страница 15: ...pose of electric or electronic appliances ask your retailer or supplier for the necessary information Disposal in other countries outside the European Union This symbol is valid in the European Union...

Отзывы: