background image

6

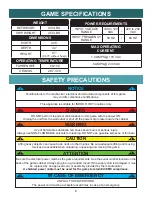
GAME SPECIFICATIONS

SAFETY PRECAUTIONS

WEIGHT

NET WEIGHT

400 LBS.

SHIP WEIGHT

450 LBS. 

DIMENSIONS

WIDTH

44.5”

DEPTH

44”

HEIGHT

97”


(88.75” without ‘hasp’)

OPERATING TEMPERATURE

FAHRENHEIT

80-100

CELSIUS

26.7-37.8

POWER REQUIREMENTS

INPUT VOLTAGE 

RANGE

100 to 120 

VAC

/ 220 to 240 

VAC

INPUT FREQUENCY 

RANGE

50 HZ

/

60 HZ

MAX OPERATING 

CURRENT

1.4 AMPS @ 115 VAC

.8 AMPS @ 230 VAC

DANGER

DO NOT perform repairs or maintenance on this game with the power ON. 

Unplug the unit from the wall outlet or shut off the power strip located inside the cabinet. 

!

!

NOTICE

Modifications to the mechanical, electrical and structural components of this game 

may void its compliance certifications.

!

!

WARNING

Use of flammable subtances can cause sever burns or serious injury.

Always use NON-FLAMMABLE solvents for cleaning. DO NOT use gasoline kerosene or thinners.

!

!

CAUTION

Lifting heavy objects can cause back, neck or other injuries. Be sure adequate lifting and moving 

devices are available when unloading, unpacking and moving this game. 

!

!

ATTENTION

Be sure the electrical power matches the game requirements. See the serial number located on the 

back of the game cabinet. Always plug into a grounded circuit. If the supply cord is damaged, it must 

be replaced by an approved cord or assembly provided by the manufacturer.  

A shielded power cable must be used for the game to retain EU/EMC compliance. 

!

!

IN CASE OF EMERGENCY

UNPLUG THE POWER CORD.

The power cord must be accessible at all times in case of an emergency.  

!

!

This appliance is suitable for INDOOR, DRY locations only. 

Содержание Pop the Lock

Страница 1: ...1 Licensed By Simple Machine and its logo and Pop The Lock are trademarks of Simple Machine and are used with permission Simple Machine All Rights Reserved...

Страница 2: ...6 E sales baytekgames com All games are proudly manufactured at our factory in Pulaski Wisconsin USA JOIN OUR SERVICE FIRST NETWORK This free service is intended to keep you up to date on the latest g...

Страница 3: ...TO ACCESS MONITOR 13 DIP SWITCH SETTINGS 14 MAIN MENU FUNCTIONS 15 VOLUME ATTRACT SETTINGS 16 GAME SETTINGS 17 19 PAYOUT SETTINGS 19 TICKET PATTERNS 20 STATISTICS 21 CIRCUIT BOARD LAYOUT 22 MAINBOARD...

Страница 4: ...to contact our factory if you have any questions or would like some more information Thank you for your purchase Your business is important to us and we hope you enjoy this game as much as we do Your...

Страница 5: ...5 HOW TO PLAY Press the button to stop the red bar on the yellow dots Win tickets for successful hits 50 in a row wins the jackpot...

Страница 6: ...ARNING Use of flammable subtances can cause sever burns or serious injury Always use NON FLAMMABLE solvents for cleaning DO NOT use gasoline kerosene or thinners CAUTION Lifting heavy objects can caus...

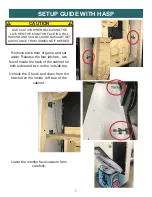
Страница 7: ...cabinet on both sides and two on the outside top Unhook the S hook and chain from the bracket on the inside left rear of the cabinet Lower the monitor face vacuum form carefully CAUTION USE CAUTION W...

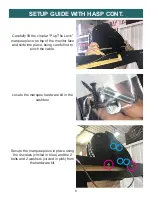
Страница 8: ...e piece on top of the monitor face and slide into place being careful not to pinch the cable Locate the marquee hardware kit in the cashbox Secure the marquee piece in place using the 4 screws circled...

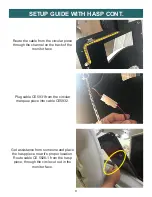
Страница 9: ...he channel on the back of the monitor face Plug cable CE5931 from the circular marquee piece into cable CE5932 Get assistance from someone and place the hasp piece near it s proper location Route cabl...

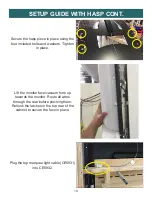
Страница 10: ...onitor Route all wires through the rear before pinching them Rehook the latches in the top rear of the cabinet to secure the face in place Plug the top marquee light cable CE5931 into CE5932 Secure th...

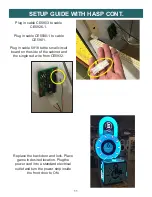
Страница 11: ...o cable CE5901 Plug in cable 5918 to the small circuit board on the side of the cabinet and the single red wire from CE5932 Replace the back door and lock Place game in desired location Plug the power...

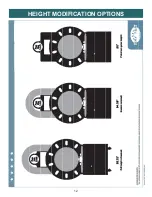
Страница 12: ...12 HEIGHT MODIFICATION OPTIONS...

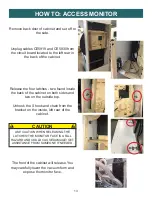
Страница 13: ...o found inside the back of the cabinet on both sides and two on the outside top Unhook the S hook and chain from the bracket on the inside left rear of the cabinet The front of the cabinet will releas...

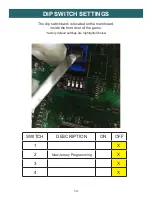
Страница 14: ...WITCH SETTINGS The dip switch bank is located on the mainboard inside the front door of the game factory default settings are highlighted below SWITCH DESCRIPTION ON OFF 1 X 2 New Jersey Programming X...

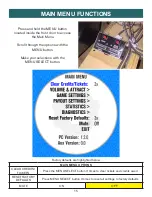
Страница 15: ...ns with the MENU button Make your selections with the MENU SELECT button MAIN MENU OPTIONS CLEAR CREDITS TICKETS Press the MENU SELECT button 3 times to clear tickets and credits owed RESET FACTORY DE...

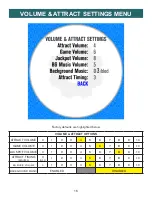
Страница 16: ...LUME 0 1 2 3 4 5 6 7 8 9 10 GAME VOLUME 0 1 2 3 4 5 6 7 8 9 10 JACKPOT VOLUME 0 1 2 3 4 5 6 7 8 9 10 ATTRACT TIMING MINUTES 0 OFF 1 2 3 4 5 6 7 8 9 10 BG MUSIC VOLUME 0 1 2 3 4 5 6 7 8 9 10 BACKGROUND...

Страница 17: ...1 2 3 4 5 CONTINUE TIME Amount of seconds allowed for a player to insert credits continue play 5s 10s 15s 20s 25s 30s GAME MODE PAYMENT NORMAL TICKETS ENTERTAINMENT ONLY POINTS DEMO ADVANCED SETTINGS...

Страница 18: ...aying same game UNLIMITED 0 disabled TO INC 1 5 DIAL SPEED Adjusts overall game difficulty making the dial rotate slower or quicker EASIEST EASY NORMAL HARD HARDEST DIAL ACCELERATION The rate of speed...

Страница 19: ...ULT 0 MERCY TICKETS 0 1 2 3 4 5 TICKETS AWARDED FOR AMOUNT OF HITS SET BELOW 1 2 3 NUMBER OF HITS TO WIN ABOVE SELECTED AMOUNT OF TICKETS 1 2 3 4 5 6 7 8 9 10 CONTINUE TICKETS 5 TO INC 5 500 DEFAULT 1...

Страница 20: ...E BONUS AMOUNT JACKPOT BONUS AMOUNT 3 1 10 20 50 9 1 3 20 100 18 1 4 50 250 20 1 3 50 250 25 1 2 50 250 33 1 3 100 500 37 2 4 100 500 45 1 3 150 750 50 2 4 150 750 58 1 3 200 1000 62 2 4 200 1000 74 1...

Страница 21: ...games won on continue game option Jackpot Winners Number of times Jackpot has been won Average Tickets Average number of tickets paid out per play Jackpot Tickets Total number of tickets paid out on...

Страница 22: ...otherboard USB Socket to Update Software AACE5921 Bill Acceptor AACE5920 Coin Door 12 V Signal Com AACE5912 12 Volt DC Power In Cable AACE5910 Menu Buttons AACE5920 LED control AACE5909 Stop Light AAC...

Страница 23: ...23 MAINBOARD PINOUT 15...

Страница 24: ...26 J21 20 Pin Type Purpose Ref Pin Ground J24 1 Ground J24 2 12 Volts J24 3 12 Volts J24 4 PB7 Play Button J24 5 LOWSIDE 12 Play Button Light J24 6 PX29 J24 7 HIGHSIDE 10 J24 8 HIGHSIDE 11 J24 9 3 3V...

Страница 25: ...talled Enter Diagnostic Menu to see if DBA input flashes ON quickly when bill is inserted Look for Check Newgen Comm error on screen Check for power to Bill Acceptor Dirt or debris in acceptor slot Pi...

Страница 26: ...Menu and verify Game Volume Attract Volume is not zero Check connections and reseat audio cable from motherboard to Newgen board Cables AACE8811 AACE5908 and A5CEAU010 Unplug audio jack cable A5CEAU01...

Страница 27: ...k Faulty Cable Faulty LED Check for proper connection from Light board to LED strips Check continuity AACE5930 AACE5901 Swap LED connector on Light Board to verify Replace LED if needed AACE5930 Marqu...

Страница 28: ...on Monitor Low Tickets message on monitor Tickets are empty in ticket tray Faulty cable Disconnected loose or broken wires Faulty low ticket switch Faulty Newgen Board Load tickets into tray Ensure t...

Страница 29: ...nothing at all on power up Power cable unplugged from monitor Faulty monitor Ensure power is plugged into back of monitor down to power strip Replace monitor A5MO5500 Error on screen at power up Re B...

Страница 30: ...ord to TV Outlet Strip A5OU1000 Bill Acceptor Power Cable AACE5921 AC Power to Power Supply A5CORD5 AACE5912 AANEWGEN1 PJ RBN To J18 Connector on Main Board AAMB9A SHD SATA Hard Drive A5HD1800 Power C...

Страница 31: ...rd From Newgen Board AACE5933 AACE5902 AACE5900 Not Used AACE5901 AACE5903 AACE5904 AACE5905 AACE5924 Console Surround Led s AACE5925 Button Housing Led s AACE5930 Lock Surround Led s AACE5926 Lock La...

Страница 32: ...911 To Ticket Dispenser Part A5TD1 Notch Signal Com Ground Enable Signal 12 Volt Power Low Ticket Switch Wired Normally Open AASW200 1 4 Spacer A5SENY020 AACE5911 To J5 on main board To J9 on main boa...

Страница 33: ...plugged into this connector Coin Switches and Lights AACBL4A DOOR AACE5920 AACE5931 Marquee LED From Power Dist Bd From Power Dist Bd AACE5932 AACE5920 To Game Ground AACE5921 AACE5921 AACE5920 Bill A...

Страница 34: ...rom blue J16 on Newgen board to J1 on Interface Board AAMB9A SHD A5CE5914 AACE5913 Communication cable from J2 on Interface Board to Motherboard 55 TV A5MO5500 A5CEAU010 Audio Jack from green socket o...

Страница 35: ...power supply to turn on Minimize load on power supply and isolate short Unplug the power supply cables going to the Power Distribution Board This will leave the power supply motherboard and monitor le...

Страница 36: ...ip If power is OK Clean Bill Acceptor path to make sure there is nothing jamming unit Check dipswitch settings on side of acceptor Make sure switch 8 is OFF for Always Enable ERROR CODES Count the num...

Страница 37: ...AACE5909 CABLE ASSY BUTTON SWITCH LIGHT AACE5910 CABLE ASSY MENU COUNTER CABLE AACE5911 CABLE ASSY TICKET TRAY CABLE AACE5912 CABLE ASSY POWER SUPPLY CABLE AACE5913 CABLE ASSY COMMUN CABLE AACE5914 C...

Страница 38: ...TURES 18 A5PL9097 A5CA1002 A5VF2002 A5CE1801 A5FI9010 A5OU1000 A5CN1031 A5CEAU010 A5CORD11 A5CORD23 A5CORD5 A5LK2000 A5LK5001 A5PS1008 A5CN1031 AACBL4A DOOR AACE8811 AAPB2700 A5CB2204A AAMB9A SHD AANE...

Страница 39: ...39 DECALS DIAGRAM 20...

Страница 40: ...e quickest and provide you a valuable troubleshooting option Call our technicians to get recommendations for what you should keep on hand for spare parts Technical Support You are the best tool for tr...

Отзывы: