background image

7.0 Changing Components

14

7.4

Burner

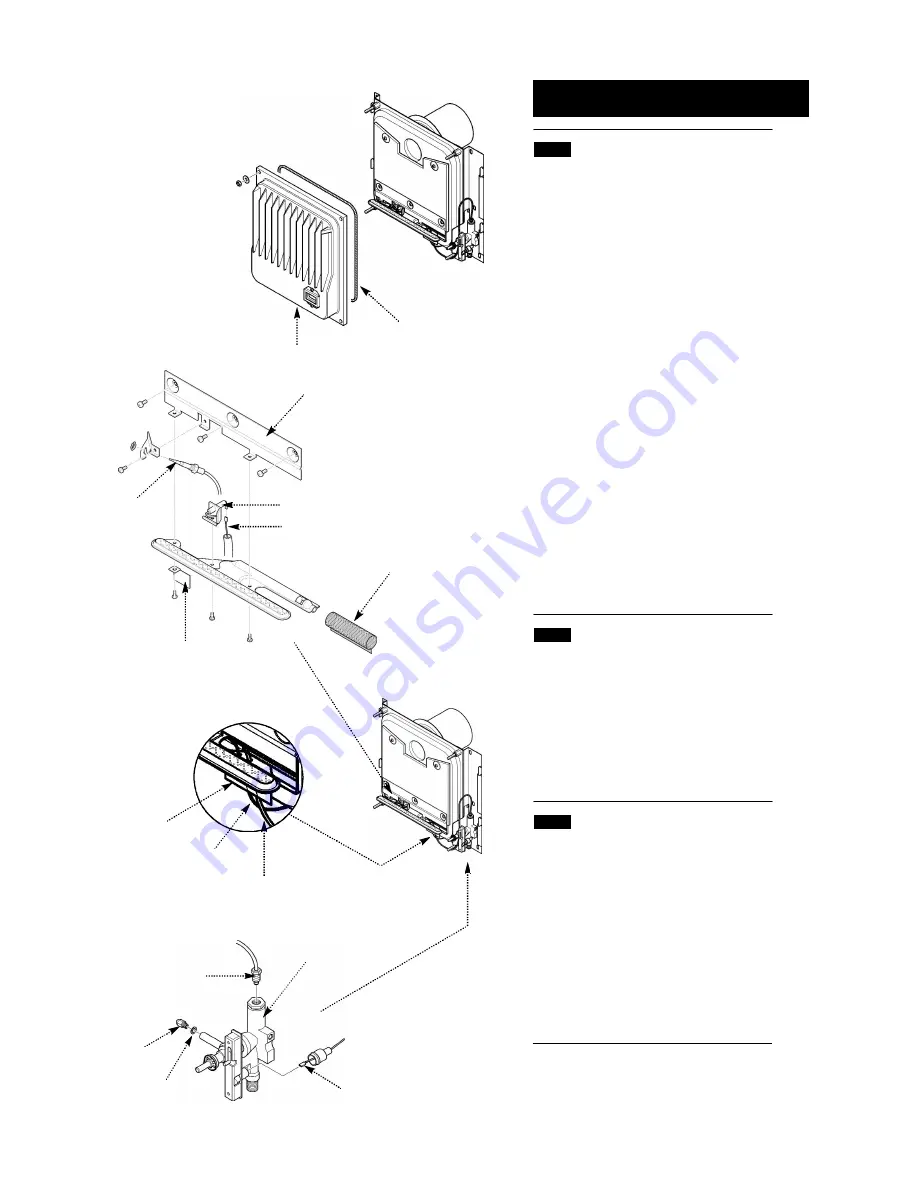
1. Undo the heat exchanger retaining nuts and
washers and draw the casting forwards off the
locating studs (Fig. 25).

2. Remove the three screws holding the burner
retaining plate to the airbox, also remove the
insulation and undo the thermocouple nut from
the gas tap (Fig. 26 & 28).

3. Ease the thermocouple and electrode lead
from the rubber grommet (Fig. 27).

4. Disengage the burner from the injector and
pull the electrode lead off the spark electrode
(Fig. 26).

5. Remove the intake gauze from the burner inlet
and undo the screws securing the burner to its’
retaining plate, noting the position of the shield at
the left hand side (Fig. 26).

6. Undo the screw securing the spark electrode
to the burner. Fit the electrode to the new burner
(Fig. 26).

7. Fit the intake gauze to the burner inlet
ensuring that it covers the primary aeration hole
(Fig. 26).

8. Reassemble in reverse order of dismantling.

7.5

Injector

1. Remove the burner as described in sections
7.4.1 to 7.4.4 .

2. Undo the injector and sealing washer,
retaining the washer for use with the new
injector. If the washer is damaged it must be
replaced.(Fig. 28).

3. Reassemble in reverse order of dismantling.

7.6

Thermocouple

1. Remove the burner as described in sections
7.4.1 to 7.4.4 .

2. Undo the nut retaining the thermocouple tip to
the burner bracket and withdraw the
thermocouple (Fig. 26).

3. Bend the new thermocouple in a similar
manner to the one removed. Avoid any sharp
bends.

4. On reassembly ensure that the airbox sealing
grommet is correctly positioned. 

Burner Retaining Plate

Injector

Thermocouple

Gas Tap

Electrode Lead

Washer

Grommet

Electrode Lead

Thermocouple

Spark Electrode

Burner Gauze

Shield

Thermocouple

Electrode Lead

Heat Exchanger Casting

Rope Seal

Fig. 25

Fig. 26

Fig. 27

Fig. 28

© Baxi Heating U.K. Limited 2007.

Содержание Brazilia Comfort Stat F 8ST Oak

Страница 1: ...ak Balanced Flue Gas Wall Heaters Installation and Servicing Instructions Please leave these instructions with the user 3003035 03 Baxi Brazilia F 5 Baxi Brazilia F 5S Baxi Brazilia F 8ST Comfort Stat Baxi Brazilia F 8S Baxi Heating U K Limited 2007 ...

Страница 2: ...075 03A Baxi Brazilia F 8S Mahogany G C No 35 075 03A Baxi Brazilia F 8S Oak G C No 35 075 03A Baxi Brazilia Comfortstat F8ST Oak G C No 35 075 09 Propane Baxi Brazilia F 5 Propane G C No 35 075 04A Baxi Brazilia F 5S Grey Propane G C No 35 075 05A Baxi Brazilia F 8S Grey Propane G C No 35 075 06A Baxi is a BS EN ISO 9001 Accredited Company For GB IE only Baxi Heating U K Limited 2007 Baxi Heating...

Страница 3: ...9 1 F 8S F 8ST 24 4 One person should be sufficient to lift the fire If for any reason this weight is considered too heavy then obtain assistance When lifting always keep your back straight Bend your legs and not your back Avoid twisting at the waist It is better to reposition your feet Avoid upper body top heavy bending Do not lean forward or sideways whilst handling the fire Always grip with the...

Страница 4: ...colouration of wall surfaces Most heating appliances generate warm air convection currents and transfer heat to any wall surface against which they are situated Some soft furnishings such as blown vinyl wallpapers may not be suitable for use where they are subject to temperatures above normal room levels and the manufacturer s advice should be sought before using this type of wall covering adjacen...

Страница 5: ...tween low and high temperature settings Flame failure device Thermocouple Output 8 13mv Heat Exchanger Cast Iron 2 0 Technical Data 5 F 5 F 5S Natural Gas Category of Appliance II2H3P The appliance is set for Gas Type G20 at 20mbar Heat Input gross High Med Low kW 2 05 1 41 0 86 Btu h 7 000 4 800 3 000 Heat Output gross High Med Low kW 1 5 0 98 0 57 Btu h 5 100 3 350 1 950 Setting Pressure Cold mb...

Страница 6: ...ata F 5 F 5S Propane When converted using kit No 5110284 Category of Appliance II2H3P The appliance is set for Gas Type G31 at 37mbar Heat Input gross High Med Low kW 2 05 1 41 0 86 Btu h 7 000 4 800 3 000 Heat Output gross High Med Low kW 1 5 0 98 0 57 Btu h 5 100 3 350 1 950 Setting Pressure Cold mbar 36 5 1 in wg 14 6 0 4 Injector Size 74 Nox Class 3 Gas Rate on HIGH 0 077 m3 h 0 146 kg h Gas C...

Страница 7: ... Gas Installations in Timber Framed Dwellings IMPORTANT LPG Models This appliance must not be installed below ground in basements cellars etc unless these are open to ground level on one side For further guidance see BS 5871 Pt 1 3 2 Clearances 1 The appliance must be fitted on a vertical flat non combustible wall Any combustible wall coverings should be removed from within the area of the outer c...

Страница 8: ...dow capable of being opened or any ventilation inlet or similar opening no part of the terminal shall be within 300mm 1 ft measured vertically from the bottom of the opening b Where the flue terminal of the appliance is less than 2m 6 ft above the level of any ground balcony flat roof or place to which any person has access and which adjoins the wall in which the flue terminal is situated the term...

Страница 9: ...sses from 248mm 93 4 in to 349mm 133 4 in 2 Three further flue terminals are available as optional extras to suit the wall thicknesses indicated in the table opposite 3 5 Ventilation 1 The appliance is room sealed and therefore requires no purpose built ventilation 2 It is intended for use in habitable rooms and must not be fitted in cupboards or confined compartments 3 6 Gas Supply 1 The inlet co...

Страница 10: ...mm 3 4in Adjust the distance from the back of the airbox and the joint between the terminal and air duct to this dimension Using the length of flue tape provided fix this dimension by taping up the joint between the flue duct assembly and the flue outlet 3 Offer the appliance up to the wall pushing the terminal and flue ducting through the wall 4 Ensuring that the appliance is level secure it to t...

Страница 11: ...e OFF position 2 Remove the knob from the appliance by gently pulling the knob forward Fig 11 3 Fit the outer case by locating the slots in the outer case rear strip onto the four mounting lugs on the wall brackets Fig 13 4 Replace the control knob Fig 13 5 3 Instructing the User 1 Explain how to ignite the appliance and alter the heat settings 2 Show the position of the external gas service cock ...

Страница 12: ...h away any dirt from the heat exchanger casting If necessary clean the viewing window 13 With a light brush carefully remove deposits from the spark electrode burner flame ports and the burner gauze Fig 16 14 Replace the rope seal in the heat exchanger casting if it is damaged in any way Fig 15 Also examine the thermocouple and replace if necessary 15 Re assemble the injector washer and burner ass...

Страница 13: ...e airbox and undo the thermocouple nut from the gas tap Fig 22 24 3 Ease the thermocouple and electrode leads from the rubber grommet Fig 23 4 Disengage the burner from the injector and pull the electrode lead off the spark electrode Fig 22 5 Pull off the spark electrode lead at the rear of the igniter Fig 24 6 Remove the supply pipe from the gas tap 7 Undo the nut holding the gas tap to its retai...

Страница 14: ... burner inlet ensuring that it covers the primary aeration hole Fig 26 8 Reassemble in reverse order of dismantling 7 5 Injector 1 Remove the burner as described in sections 7 4 1 to 7 4 4 2 Undo the injector and sealing washer retaining the washer for use with the new injector If the washer is damaged it must be replaced Fig 28 3 Reassemble in reverse order of dismantling 7 6 Thermocouple 1 Remov...

Страница 15: ...8 0 Fault Finding 15 3 5 0 5mm 7 1 5mm Fig 29 Ensure all installation criteria have been satisfied before performing Fault Finding e g flue terminal position Baxi Heating U K Limited 2007 ...

Страница 16: ...iezo Igniter Generator 042941 I 381941 Injector F 5 F 5S 224047 J 381942 Injector F 8S F 8ST 224104 K 205791 Washer For injector 082365 L 205844 Insulation F 5 F 5S 224048 M E01359 Insulation F 8S F 8ST 223971 N 155654 Lead Electrode 043043 O E01360 Thermocouple 243215 P 384248 Tap Mag Unit Not F 8ST 082462 Q Thermostat Gas Control E94622 Bracket Assy 3002927 For LPG models only R Igniter Gas Tap ...

Страница 17: ...10 0 Notes 17 Baxi Heating U K Limited 2007 ...

Страница 18: ...10 0 Notes 18 Baxi Heating U K Limited 2007 ...

Страница 19: ...heating market Gas Central Heating Boilers Wall Floor and Fireside models Independent Gas Fires Renewal Firefronts Gas Wall Heaters Solid Fuel Fires If you require information on any of these products please write telephone or fax to the Sales Department Baxi Heating U K Limited 2007 ...

Страница 20: ...ne Erdington Birmingham B24 9QP www firesandstoves co uk The Baxi Helplines For General Enquiries 44 0 8706 061 064 For After Sales Service 44 0 8706 090 081 For Technical Enquiries 44 0 8706 061 065 Baxi Heating U K Limited 2007 ...

Отзывы: