6
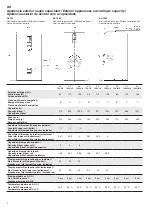
Storage cylinders of 750, 1000, 1500 liters for
solar thermal systems. Models AS 750-2 E, AS
1000-2 E and AS 1500-2 E are fitted with two
heat exchange coils. The lower coil is connected
to the solar collectors and the upper coil is used
for the possible additional heating by means of
a back-up boiler.
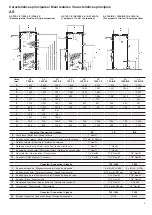
Models AS 750-1 E, 1000-1 E and 1500-1 E are
equipped with a heat exchange coil connected to
the solar collector circuit.
Water heating in storage cylinders without coil
AS 750-IN E, 1000-IN E and 1500-IN E takes
place through external heat exchangers.
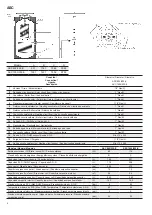
ASC 800/200 and 1000/250 have been designed
for combined applications of domestic hot water
and heating.
Both the storage vessels and the coils are in
enamelled steel and protected by magnesium
sacrificial anodes.
All models are heat-insulated with they are heat-
insulated with flexible polyurethane foam and
covered with the same insulating material, lined
with white plastic and a zip fastener.
Optionally, all models can be supplied with a
heating element.
Delivery
They come on a wooden pallet and are suitably
protected for transport.
Installation
- Always in a vertical position.
- To comply with current regulations, the
following must be fitted in the cylinder’s cold
water mains inlet: a shut-off valve, a check
valve, and a pre-set pressure relief valve for
the secondary circuit. It is advisable to install a
BAXI Flexbrane safety unit, which is a compact
unit that includes these components and their
fitting instructions.
AS model assembly
- Make the hydraulic connection to the solar
thermal system and, if appropriate (AS models
750, 1000-2 E and 1500-2 E), to the backup
boiler.
If you do not plug boiler support, place caps on
the connections of the coil higher.
- Also make the hydraulic connection to the water
mains inlet (8) and hot draw-off (14), inserting
dielectric sockets.
- Insert the solar sensor and that for a possible
boiler in the tappings (6) and (3) respectively.
- Install a drain cock in (9) and route the
discharge to a drain system.
ASC model assembly
- Make the hydraulic connection to the solar
thermal system and heating circuit.
- Also make the hydraulic connection to the water
mains inlet (12) and hot draw-off (10), inserting
dielectric sockets.
- Make connections of the primary circuit (9 and
13) of the cylinders of DHW to the backup
boiler.
- Insert the heating circuit sensor (16).
- Also make insert DHW sensor (14)
- Install a drain cock in (1) and route the
discharge to a drain system.
Stopper all connections that have been free
after assembly.
Operation
The heat transfer between the primary and
secondary circuit(s) is established according to
the temperature values set in the
CS* solar control centre, in the thermostat in the
optional RC* electric heating element or the back-
up boiler, if any.
* See the respective Instructions.
Cleaning
- Empty the tank when necessary.
- Clean the parts inside accessible.
- Remove the solid parts on the bottom of the
tank.
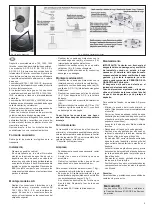
To access the interior of the tank, 1 fig.1, it is
necessary to remove the flange inspection:
- In AS models, remove the black cover held by
beautifying two screws with black faceplate, 2
fig.1. Then remove the screws that secure the
flange. Finally pull the existing handles.
- In ASC model, remove the top flange.
Maintenance
IMPORTANT: Control frequently the erosion
of the magnesium anode and replace it
immediately when necessary. The damage of
the tank as a result of not having replaced a
extinguished anode could be a reason to loose
the warranty of the manufacturer.
The anode erosion level could be know by
pushing the bottom of the sensor.
When pushing the bottom and the arrow
is on the red area means that the anode
is extinguished and must be replaced
immediately.
To replace the anode on AS range, proceed to:
- Take out pressure of primary circuit, if it exists.
(It is not necessary to empty completely the
circuit).
- Close the inlet and outlet valves and empty
the tank through the drain connection (9). See
connections diagram.
- Unplug the tap and the extinguished anode.
- Lift the top flange fixed with screws.
- Replace the extinguished anode by a new one
and undo the above procedure until the opening
of the valves and the filling of the tank.
On ASC range, close the water inlet valve and
open a tap of hot water until there is no pressure
in the tank.
- Lift the plastic cover above and unlock the
flange, unplugging the screws that fix it to the
tank.
- Uninstall the extinguished anode, unplugging
the nut that fixes it to the flange.
- Replace the anode by a new one, installing all
the components following this procedure on
reverse.
Attention
:
Specifications and performance qualities subject
to change without notice.
CE marked
AS and ASC cylinders are certified to comply
with the essential requirements of the Pressure
Equipment Directive 97/23/EEC.
GB


