background image


12

uper Cool mode 


will ensure that a powerful supply of cold air enters the fridge section. 

er Cool indicator (‘S.Cool’) on the fridge 

thermostat dial. 

by selecting a normal temperature range on the thermostat dial. 

ld return the appliance to normal operation as 

outlined above. 

o


NOTE: Please see pages 16 for Super Freeze mode details. 

se the 

ppliance to overwork and the fridge section to freeze.  

UNNING THE SUPER COOL MODE FOR MORE 

HAN 24 HOURS 

pen door warning alarm 

is equipped with an open door warning alarm in the 

idge section. 

ft  open  for over 60 seconds then the open 

door alarm will sound. 

times every 0.5 

seconds, every 30 seconds until the door is closed. 

en you should contact the Baumatic Customer 

Care Department. 

S
 
This setting should be used if you want to cool something quickly, it


o


Select the Sup


o


Super Cool mode will continue to run until manually turned off - 


o


Once you are satisfied that your item(s) have been sufficiently 
cooled, you shou


IMPORTANT: If you run the appliance with the thermostat dial 
on super cool mode for prolonged periods, it will cau
a
 
TRY TO AVOID R
T
 
 
O
 
Your appliance 
fr
 

o


If  the  fridge  door  is  le


o


The alarm is an audible buzzer which will sound 3 


o


If the warning alarm stays on for a prolonged period after the door 
has been closed th


Содержание BRCIF7535

Страница 1: ...Fin BRCIF7535 266 Litre built in combi frost free fridge freezer...

Страница 2: ...ruction Manual contains important information including safety installation points which will enable you to get the most out of your appliance Please keep it in a safe place so that it is easily avail...

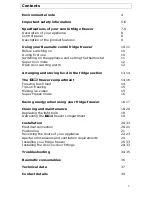
Страница 3: ...d in the fridge section 13 14 The freezer compartment 14 16 Freezing fresh food 14 Tips on freezing 15 Making ice cubes 15 Super Freeze mode 16 Saving energy when using your fridge freezer 16 17 Clean...

Страница 4: ...disconnect it from the power supply Cut off and render any plug useless Cut the cable off directly behind the appliance to prevent misuse This should be undertaken by a competent person Disable the do...

Страница 5: ...caused o Altering the specification of the appliance must not be attempted for reasons of safety Before using your appliance o Check the appliance for any signs of transport damage If you notice any d...

Страница 6: ...to come into contact with the wall surface o Always ensure that the location where you are installing your appliance is free of stored items such as papers and other flammable materials o Never block...

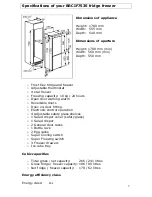
Страница 7: ...or warning alarm o Reversible doors o Door on door fitting o Electronic control operation o 4 Adjustable safety glass shelves o 1 Salad crisper cover safety glass o 1 Salad crisper o 2 General door ra...

Страница 8: ...ction behind the salad crisper drawer You will need to open the fridge door of your appliance to be able to find it The rating plate will indicate the ambient temperature range that your appliance wil...

Страница 9: ...n the bottom of your refrigerator and there is a cover that goes over it o The cover helps to prevent fruit and vegetables from drying out prematurely General door racks o The door liner holds various...

Страница 10: ...ories should be thoroughly dried after the cleaning process has been completed o There can be an odour when you first switch on the appliance It will lessen as the appliance starts to cool During firs...

Страница 11: ...s positioned nearer to the High setting then you will get a higher temperature inside the fridge and freezer sections o Ideally the dial should be set to the midway position of Mid o Your refrigerator...

Страница 12: ...or over 60 seconds then the open door alarm will sound times every 0 5 seconds every 30 seconds until the door is closed en you should contact the Baumatic Customer Care Department S This setting shou...

Страница 13: ...ide of the fridge o packaging on the food should be removed Quickly perishable food should be stored at the o refrigerator which is the coldest part of the appliance No food items should be o wall of...

Страница 14: ...open the doors of the appliance during this period of time rating plate you should follow the Freezing using the super of fresh food you should follow the Freezing using the super freeze setting secti...

Страница 15: ...freezer as he bottle to burst during freezing Fill the ice cube tray with water and place it in the freezer the water is completely frozen and turned to ice you can twist ice o Fresh food should be p...

Страница 16: ...est temperature o Place the food that is to be frozen inside the freezer o Once the food is frozen you should turn off the super frost setting and return the dial to normal operation DO NOT TURN OFF S...

Страница 17: ...erator compartment should operate at around 3 to 4 degrees Celsius o Allow food to sufficiently cool before putting it in the appliance but do not let it sit at room temperature for too long o In the...

Страница 18: ...Do not clean them in a dishwasher o Do not use abrasive products detergents or soaps o After washing the appliance wipe over the area that you have cleaned with a damp cloth and then dry it thoroughly...

Страница 19: ...rten its storage life and therefore the food should be used within a relatively short period of time DO NOT PLACE FOOD BACK IN o THAT HAS STARTED TO THAW After ensuring that your hand o freezer from y...

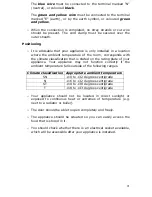
Страница 20: ...nce is connected by a o Your refrigerator comes supplied with a 13 amp plug fitted If in en a 13 amp st be used o i red as follows Brown Live o As the colours of the wires in the appliance s mains lea...

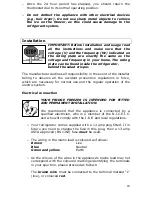
Страница 21: ...d in a location where the ambient temperature of the room correspond appliance Your appl ance may not function correctly if t tem alls outside of the following range Appropriate ambient temperature SN...

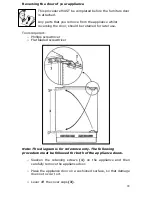
Страница 22: ...ly The following o Slacken the retaining screws 1 on the appliance and then o Place the appliance door on a cushioned surface so that damage o Lever off the cover caps 3 versing the door of your appli...

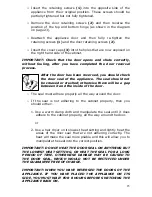
Страница 23: ...original position The o Remove the door retaining screws 2 and then reverse the position of the o Reattach the appliance door and then fully re tigh o Insert the cover caps 3 into the h IMPORTANT Chec...

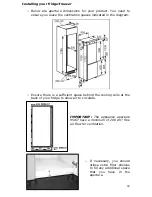
Страница 24: ...aperture dimensions for your product You need to ensure you leave the ventilation spaces indicated in the dia o Ensure there is a sufficient space behind th back of your fridge to allow air to ci IMPO...

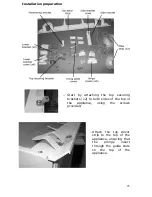
Страница 25: ...ng the screws provided e guide slots on the top of the appliance I o Start by attaching the top securing brackets x2 to both sides of the top of oAttach the top d cor strip to the top of the appliance...

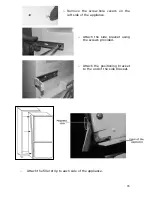
Страница 26: ...w hole covers on the left side of the appliance o Attach the side bracket using the screws provided o Attach the positioning bracket to the end of the side bracket o Attach the filler strip to each si...

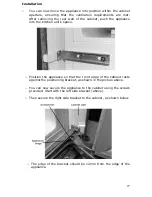
Страница 27: ...binet using the screws o t as shown below o The edge of the bracket should be 12mm from the edge of the appliance Installation o You can now move the appliance into position within the cabinet apertur...

Страница 28: ...o Secure the top of the appliance to the cabinet ceiling using the screws provided 28 o You can now push the top securing bracket back so that it is flush with the top of the appliance...

Страница 29: ...pboard door o Remove the plastic fix plate cover o Remove the locking nuts on the upper fix plate and remove the upper fix plate see figure below IMPORTANT DO NOT REMOVE THE DOOR SENSOR WHEN REMOVING...

Страница 30: ...entre and secure the fixing plate using the screws provided IMPORTANT Levelling height adjustments may have to be made based on your cabinetry This installation guide is based on a standard 50 50 spli...

Страница 31: ...ow for about 5mm movement in width Retighten the nut once in place o Loosen the depth adjustment screw to allow for about 3mm movement in depth Retighten the screw once in place o Take care to check t...

Страница 32: ...each other o The bottom of the cabinet door is aligned by slightly loosening the fixing screws and adjusting the position of the fixing brackets Retighten the screws when you are satisfied with its p...

Страница 33: ...33 Completion When you are satisfied that the doors and appliance are fitted without any malfunctions you can attach the bracket hinge fix plate and lower bracket covers...

Страница 34: ...te of your appliance My fridge freezer appears to be performing poorly o Check that the appliance isn t overloaded and that food hasn t been packed too tightly into it o The thermostat setting is too...

Страница 35: ...upply and then contact the Baumatic Customer Care Department on telephone number 0118 9 DO NOT ATTEMPT TO REPAIR THE APPLIANCE YOURSELF Please note that if an engineer is asked to attend whilst the pr...

Страница 36: ...o BC003 Ceramic Hob Cleaner 250 ml o BC004 Oven Cleaner 250 ml o BC005 Stainless Steel Cleaner and Protector 250 ml o BC007 E Cloth General Purpose Cloth o BC008 Microwave Cover To order a Baumatic c...

Страница 37: ...Fridge and Freezer Temperature Rise Time 12 hours Freezing Capacity 10kg 24hr Climate Class 3 N SN T ST Noise Level 39 dB Installation Type Built in 1 On a scale from A highest efficiency to G lowest...

Страница 38: ...38...

Страница 39: ...one 421 255 640 618 01235 437244 www baumatic sk Advice Line Telephone Germany 0118 933 6933 Baumatic Gmbh E mail Bachstr 10 12 sales baumatic co uk D 32 257 B nde customercare baumatic co uk Deutschl...

Страница 40: ...40...

Отзывы: