background image

The defrost drain hole 


o


Defrosting occurs automatically in the refrigerator section during 
operation. The defrost water is collected by the evaporating tray 
and evaporates automatically. 


o


The drain hole should be cleaned periodically with the drain hole 
cleaner. This will prevent water from collecting in the bottom of 
the refrigerator, instead of flowing down the defrost drainage 
channel and drain hole. 


o


IMPORTANT: 

Please note that the drain hole cleaner should not 

be left in position permanently. Otherwise this may prevent the 
defrost water from entering the drain hole. 


o


You can also pour a small amount of water down the drain hole 
to clean the defrost drainage channel. 


o


You should be careful to make sure that food packages do not 
touch the rear wall of the appliance, as this can interrupt the 
automatic defrosting process and deflect water into the base of 
the refrigerator section. 


o


Use a solution of bicarbonate of soda and lukewarm water to 
clean the evaporating tray. 


o


IMPORTANT: 

It is normal to get some ice droplets forming on 

the back wall of the appliance. The formation of ice droplets does 
not indicate an appliance fault. 


20

Содержание BR180SS

Страница 1: ...d yo BR180SS BR180W 315 Litre combi fridge freezer BR181SL 315 Litre combi fridge freezer...

Страница 2: ...User Instruction Manual contains important information including safety installation points which will enable you to get the most out of your appliance Please keep it in a safe place so that it is eas...

Страница 3: ...storing food in the fridge section 13 14 The freezer compartment 14 17 Freezing fresh food 15 Tips on freezing 15 16 Storing commercially frozen food 16 Defrosting frozen food 16 Making ice cubes 17...

Страница 4: ...off directly behind the appliance to prevent misuse This should be undertaken by a competent person Disable the door lock to make sure that children cannot get stuck inside the appliance o The packag...

Страница 5: ...used o Altering the specification of the appliance must not be attempted for reasons of safety Before using your appliance o Check the appliance for any signs of transport damage If you notice any dam...

Страница 6: ...e back coils of the appliance to come into contact with the wall surface o Always ensure that the location where you are installing your appliance is free of stored items such as papers and other flam...

Страница 7: ...rsible doors o Adjustable feet Dimensions of appliance Height 1850 mm Width 600 mm Depth 600 mm Please refer to the installation instructions for more specific information on the size of aperture that...

Страница 8: ...o Adjustable feet Dimensions of appliance Height 1850 mm Width 600 mm Depth 600 mm Please refer to the installation instructions for more specific information on the size of aperture that you will re...

Страница 9: ...over 2 Thermostat dial and light 3 Adjustable fridge shelves x 3 4 Salad crisper cover 5 Salad crisper 6 Upper freezer drawers 7 Lower freezer drawer 8 Adjustable feet x 2 9 Egg tray 10 Dairy shelf 11...

Страница 10: ...annel never becomes clogged see The defrost drain hole section for a detailed explanation of how to keep the channel clear 3 Crisper drawer and cover o The crisper drawer is in the bottom of your refr...

Страница 11: ...nterior and accessories should be thoroughly dried after the cleaning process has been completed o There can be an odour when you first switch on the appliance It will lessen as the appliance starts t...

Страница 12: ...fridge section can maintain a temperature of between 4 6 degrees centigrade o The freezer section can cool down to 18 C and lower o IMPORTANT The ambient temperature of the room the temperature of fo...

Страница 13: ...t the door can close completely Particular attention should be given to bottles that may protrude when placed on shelves inside the main section of the refrigerator o Some organic solutions such as th...

Страница 14: ...y the lower freezer drawer 7 should be used when freezing fresh food Once the food is frozen you can then transfer the food to the upper freezer drawers 6 o Warm food should be allowed to cool down be...

Страница 15: ...re that flavour does not transfer from other foods o Do not allow fresh food to touch items that are already frozen o After 24 hours you should check that the fresh food is satisfactorily frozen If it...

Страница 16: ...with complete storage instructions It should have been stored in a freezer where the temperature does not rise above 18 C o Do not buy packages of food that are covered with frost This could indicate...

Страница 17: ...action within the fridge freezer Short cracking noise o Can be heard when the thermostat turns the compressor on and off Compressor noise o There will be an operating noise when the compressor is runn...

Страница 18: ...lean the door gasket with warm water or a neutral detergent that leaves no residue A tight sealing door gasket is critical to the efficiency of your appliance Usage o Do not open the door repeatedly o...

Страница 19: ...CE IS DISCONNECTED FROM YOUR MAINS SUPPLY BEFORE ATTEMPTING TO CLEAN IT o Do not clean the appliance by pouring water onto it or spraying water over it o The refrigerator and freezer sections should b...

Страница 20: ...left in position permanently Otherwise this may prevent the defrost water from entering the drain hole o You can also pour a small amount of water down the drain hole to clean the defrost drainage cha...

Страница 21: ...me o DO NOT PLACE FOOD BACK IN THE FREEZER SECTION THAT HAS STARTED TO THAW o Set the thermostat knob to position 0 and disconnect the appliance from your mains supply o Remove the drawers from the fr...

Страница 22: ...system Replacing the light bulb 22 WARNING PLEASE ENSURE THAT YOUR APPLIANCE IS DISCONNECTED FROM YOUR MAINS SUPPLY BEFORE ATTEMPTING TO REPLACE THE LIGHT BULB o There is an interior light next to th...

Страница 23: ...s connected by a qualified electrician who is a member of the N I C E I C and who will comply with the I E E and local regulations o Your refrigerator comes supplied with a 13 amp plug fitted If in fu...

Страница 24: ...ur appliance should not be located in direct sunlight or exposed to continuous heat or extremes of temperature e g next to a radiator or boiler If this is not possible then you should install an insul...

Страница 25: ...door and remove the screws or hole cover installed on it Both screws are on one side and the hole cover on the other o Fasten the handle 3 with the self tapping screws 2 on the side of the door 4 wher...

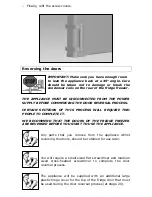
Страница 26: ...HIS PROCESS WILL REQUIRE TWO PEOPLE TO COMPLETE IT WE RECOMMEND THAT THE DOORS OF THE FRIDGE FREEZER ARE REVERSED BEFORE YOU START TO USE THE APPLIANCE Any parts that you remove from the appliance whi...

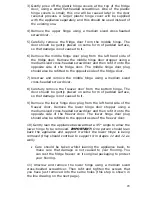
Страница 27: ...crews are not over tightened 1 Gently prise off the three plastic screw covers from the top cover using a small flat headed screwdriver Then remove the screws from the front and back of the top cover...

Страница 28: ...rew driver 8 Carefully remove the freezer door from the bottom hinge The door should be gently placed on some form of padded surface so that damage is not caused to it 9 Remove the lower hinge door pl...

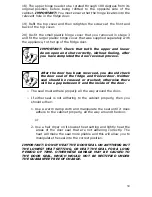
Страница 29: ...is level 14 Locate and refit the freezer door onto the lower hinge IMPORTANT You must ensure that the hinge locates into the relevant hole in the freezer door 15 Remove the three small plugs from the...

Страница 30: ...d check the door seal of the fridge and freezer door Neither seal should be creased or crushed otherwise there will be a gap between it and the inside of the door o The seal must adhere properly all t...

Страница 31: ...your appliance My fridge freezer appears to be performing poorly o Check that the appliance isn t overloaded and that food hasn t been packed too tightly into it o The thermostat setting is too low y...

Страница 32: ...t it is in contact with the inner back wall o IMPORTANT It is normal to get some ice droplets forming on the back wall of the appliance The formation of ice droplets does not indicate an appliance fau...

Страница 33: ...r to perform any necessary repair If your appliance is installed in such a way that an engineer is concerned that damage will be caused to the appliance or your kitchen then he will not complete a rep...

Страница 34: ...w baumatic co uk Republic of Ireland Service Telephone 1 890 812 724 Spares Telephone 091 756 771 Czech Republic Baumatic CR spol s r o Pr myslov z na Sever 696 460 11 Liberec 11 Czech Republic 420 48...

Страница 35: ......

Страница 36: ...36 36...

Отзывы: