background image

Frozen cutlets from 
minced, carrot, beetroot or 
Potato(350-1000g) 

DROP OIL 

3 200 Baking 

tray 

20-30 

Pork on bone cutlets 
(500-1000g) 

DROP OIL,ADD SALT& 
PEPPER 

3/2 200  Wire 

grill/ 

Baking tray 

(for juice catching) 

40-50 

Baked potato 
(cut in half) 
(500-1000g)


3 180-200 Baking 

tray 

30-45 

Meat roll   
With mushrooms filing 
Frozen(500-1000g)


DROP OIL 

3 180-200 Baking 

tray 

40-50 

2. Top Heat + Convection 

  Suggested temperature: 190 °C   

This setting should be used when cooking cakes placed on one shelf and biscuits that must be well browned or crispy on the bottom. It   
is also good for pizzas, quiches lorraine and cheesecakes. The top heating element is in operation and the fan operates to constantly  

  circulate the hot air. 

Before starting to cook you should preheat the oven. 
(You can preheat the oven in the current mode “ Top-heat +Convection ”) 

Food Item


Shelf Level


Temperature  (

)


Accessory


Time(min)


Pork on bone 
(1000g) 

DROP OIL,ADD SALT&PEPPER 

3/2 

180-200 

Wire grill with 

products 

Baking tray 

(for juice catching) 

50-65 

Pork shoulder in foil 
(1000-1500g) 

Better marinate meat 

3/2 180-230  Baking 

tray 


60-120 

Whole chicken 
(700-1500g) 

DROP OIL,ADD SALT&PEPPER 

3/2 190-200  Baking 

tray 


40-55 

Meat or fish steaks 
(400-800g) 

DROP OIL,ADD SALT&PEPPER 

3/2 

180-200 

Baking tray with a 

wire roast on top 

15-35 

Sponge cake(Bisquit) 

(1000g) 

3/2 180  Deep 

pan 20 

3. Convection


Suggested temperature: 170 °C   

Содержание BMEO6ETL

Страница 1: ... 共 张 第 张 工艺 批准 材料 机械触摸双区 全触摸双区说明书 品号 43090753 浙江安德电器有限公司 处数 分区 更改文件号 签名 年月日 技术要求 1 贴纸材质 铜版纸 2 外形尺寸 A4大小 图号 FSMS ARDA 28 005 铜版纸 1 1 1 安德标准 3 颜色以电子为准 图为说明书封面 Multifunction Oven Instructions for installation and use Baumatic BMEO6ETL ...

Страница 2: ...en the appliance and the mains The omnipolar circuit breaker should be sized according to the load and should comply with current regulations the earth wire should not be interrupted by the circuit breaker The rating plate is located on the right side of the door The power supply of the appliance should be turned off when it is being repaired or cleaned Take care when connecting electrical applian...

Страница 3: ... capabilities or lack of experience and knowledge if they have been given supervision or instruction concerning use of the appliance in a safe way and understand the hazards involved Children shall not play with the appliance Cleaning and user maintenance shall not be made by children without supervision The appliance is not intended for use by persons including children with reduced physical sens...

Страница 4: ...s Wipe the plate gently with a soft cloth or microfiber cloth and a mild window cleaning detegent WARNING Make sure the oven is cool before cleaning Oven interior Do not hand clean the door seal Do not use coarse scouring pads or cleaning sponges To avoid damaging the enameled oven surfaces use commercially available oven cleaners To remove stubborn soil use a special oven cleaner Oven door glass ...

Страница 5: ...t water and washing up liquid applied with a soft brush Remove all accessories from the oven Set the oven to conventional function Set the heat to 250 C Run the oven for approximately 1 hour The length of time will depend on the degree of soiling It is a good idea to set the finish time for the process using the end time setting in case you forget to switch the oven off at the end Any remaining so...

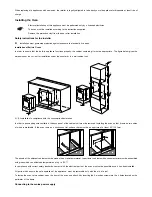
Страница 6: ...n 4 5 m i n 4 5 m in 4 5 m in 594 594 547 8 577 2 21 594 594 547 8 577 2 21 N B Installation in compliance with the consumption declaration In order to ensure adequate ventilation the back panel of the cabinet unit must be removed Installing the oven so that it rests on two strips of wood is preferable If the oven rests on a continuous flat surface there must be an aperture of at least 45 560mm Th...

Страница 7: ...f its unit Open the back cover of the oven at the bottom using a flat bladed screwdriver and completely unscrew the connection screw and the cable clamp before fitting conducting wires into the appropriate terminals The earth wire must be connected to the terminal of the oven If the oven is connected to the power supply by a plug this must remain accessible once the oven has been fitted We cannot ...

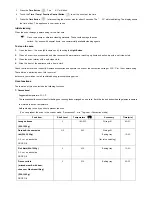
Страница 8: ...e probe Insert the probe into the meat Plug the probe into the outlet in the oven Make sure it is pushed all the way in If the Probe is inserted correctly will shows on the display Close the oven door Switch the Oven On by touching the On Off Button then touch the Time Temp Function Adjust Button to select the function you need Touch the Temperature Button the oven temperature will shows on the di...

Страница 9: ...switch on the rear wall of the cooking compartment Insert into the back completely If you hear two beeps after inserting the divider that means you can use divider function When you take off the divder two beeps means this fuction can not be used The baking tray deep pan and wire grill should be inserted correctly into the side runners When taking out the cooked foods from the oven be careful of h...

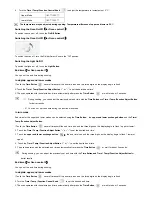
Страница 10: ... Before You Begin Setting the clock for Oven control 1 When power is first supplied to the oven the display on the control panel will light briefly and 0 00 will begin blinking in the display The oven cannot be operated until the clock is set 1 0 will blink in the display when power is first supplied to the appliance and shows the set hour 2 Touch the Time Temp Function Adjust Button or to set the...

Страница 11: ...et correctly Remove accessories and operate the oven at the convection setting at 200 C for 1 hour before using There will be a distinctive odor this is normal but ensure your kitchen is well ventilated during this conditioning period Oven functions The features of this oven include the following functions 1 Conventional Suggested temperature 200 C The conventional function is ideal for baking and...

Страница 12: ...s lorraine and cheesecakes The top heating element is in operation and the fan operates to constantly circulate the hot air Before starting to cook you should preheat the oven You can preheat the oven in the current mode Top heat Convection Food Item Shelf Level Temperature Accessory Time min Pork on bone 1000g DROP OIL ADD SALT PEPPER 3 2 180 200 Wire grill with products Baking tray for juice cat...

Страница 13: ...out the hearts add sugar in Put in a pan with water 3 200 220 Wire grill 15 25 Cutlets from minced meat 300 600g DROP OIL 3 195 Baking tray 18 25 Meat roll with filling minced meat 500 1000g DROP OIL 3 180 200 Baking tray 50 65 4 Grill Suggested temperature 240 C The grill function grills large quantities of flat foods such as steaks schnitzels and fish It is also suitable for toasting Both the to...

Страница 14: ...ven You can preheat the oven in the current mode Fan Assisted Grill or in Top heat Convection mode Food Item Shelf Level Temperature Accessory Time min Camembert for frying Frozen 2x75g 4x75g PUT IN COLD OVEN before preheat 3 200 Wire grill 10 12 Tomato Mozzarella baguettes French bread with ham with salami frozen 3 2 200 Wire grill Baking tray for juice catching 15 20 Fish fingers 300 700g PUT IN...

Страница 15: ...ugh pies with filling 600 1000g BRUSH EGG YOLK 3 180 200 Baking tray 20 30 7 Twin Convection In the models of ovens where the Twin Convection function is one can cook 2 dishes with 2 different modes at the same time using the divider For example you can cook apple pie putting it in lower part of the oven with meat steak putting it in the upper part of the oven Before starting to cook you should pr...

Страница 16: ...p Sirloin Medium 1360 to 2270g Well 20 24 24 28 28 32 165 165 165 60 70 75 Beef Tenderloin Rare Medium 10 14 14 18 165 165 60 70 Pork Bone in Boneless 1360 to 2270 g 23 27 165 75 Chops 1 2 to 1 thick 2 chops 4 chops 6 chops 30 35 total 30 40 total 40 45total 165 165 165 75 75 75 Ham Canned Butt Shank 1360 to 2270g fully cooked 14 18 165 60 Lamb Bone in Boneless Medium 1360 to 2270g Well 17 20 20 2...

Страница 17: ...the divider at the OFF position And then turn the Divider Select Knob to select the mode you want For further details see the table below 1 Turn the Divider Select Knob to select the desired partition 2 Press the Function Button and hold for about 3 seconds 3 Turn the Time Temp Function Control Button to select the desired oven function If 3 seconds have elapsed and there are no further adjustment...

Страница 18: ...mode activates first When one of the dishes has finished cooking in twin mode and you would like to change the cooking time or temperature of the other partition touch the Function Button to select the mode upper or lower that you would like to continue operating then touch the Time Button and the Temperature Button to select the cooking time or temperature Divider should be inserted Single mode C...

Страница 19: ...wer or upper mode 4 Touch the Time Temp Function Adjust Button or to adjust the temperature in increments of 5 C Upper Mode 180 250 Lower Mode 180 250 The temperature may be adjusted during cooking Temperature difference of upper and lower is 30 C Setting the oven temperature for Oven control 2 In single upper and lower modes 1 Touch the Temperature Button and hold for about 3 seconds the tempretu...

Страница 20: ...et cook time during the function with probe In twin mode End times for the upper and lower modes can be selected using the Time Button the upper and lower exchange button and the Time Temp Function Adjust Button 1 Touch the Time Button several times untill the end time icon and the three digits on the display begin to flash upper or lower 2 Touch the Time Temp Function Adjust Button or to set the ...

Страница 21: ... oven operates with the selected cook time automatically after press the Time Button or wait for about 3 seconds 1 During cooking you can adjust the previously set cook time with the Time Button and Time Temp Function Adjust Button for better results 2 You can not set cook time during the function with probe In twin mode 1 Touch the Time Button several times untill the cook time icon and the three...

Страница 22: ... time is 3 00 and the desired cook time is 5 hours 2 Touch the Time Temp Function Adjust Button or to set the end time Example You want to cook for 5 hours and finish at 8 30 3 Touch the Time Button The oven is inoperable until the delayed start point Delayed start for Oven control 2 If the end time is entered after the cook time has already been set the cook time and the end time are calculated a...

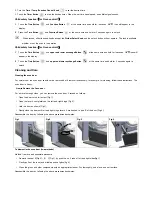
Страница 23: ... and hold for 3 seconds again to unlock Cleaning and Care Cleaning the oven door For normal use the oven door should not be removed but if removal is necessary for example for cleaning follow these instructions The oven door is heavy How to Remove the Oven door For a more thorough clean you can remove the oven door Proceed as follows Open the door to the full extent Fig 1 Open the lever A complete...

Страница 24: ...em Fig 1 Gently lift up the inner pane and remove it fig 2 Gently lift up the middle pane and remove it fig 3 Clean the glass and other components with an appropriate cleaner Dry thoroughly and place on a soft surface Reassemble the door by following the above procedures backwards Fig 1 Fig 2 Fig 3 B C A 1 2 1 2 ...

Страница 25: ...Disconnect the appliance from the electricity supply Switch off and unplug at the socket or disconnect the fuse or switch off at the isolator as appropriate Turn the lamp turn anti clockwise to release it and then pull it downwards to take it out Replace it with a new halogen lamp Refit the lamp cover and turn it clockwise to secure it Reconnect the appliance to the mains electricity supply The si...

Страница 26: ...ource 220 230V 50 60Hz Volume usable capacity 67 L Output Power 4 190 4 985 W Company Name ARDA ZHEJIANG ELECTRIC Co LTD Company Add NO 166 Yingui northern road chengxi new industrial area Yongkang Zhejiang 321300 P R China ...

Отзывы: