background image


22

Cleaning the oven 
 

o


The oven compartment is coated with vitreous enamel. To clean 
particularly difficult burnt spots a special oven cleaning agent 
may be used. However, as these agents are caustic, be careful 
when using them and follow the manufacturer’s guidelines.  

 
Warning: Do not steam pressure clean the oven.  
Always wait until the oven cools down before cleaning.
 
 
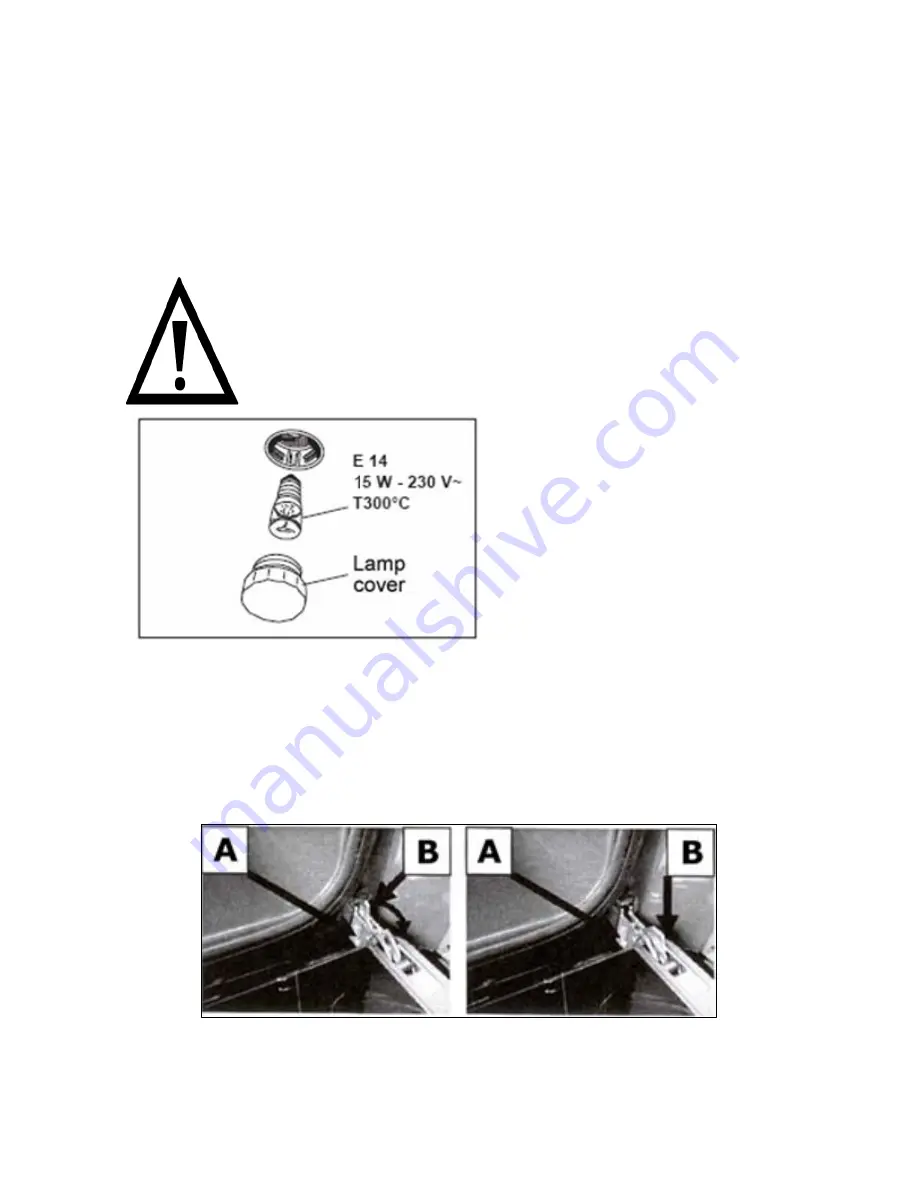
Replacing the oven bulb 


IMPORTANT: The oven must be disconnected from 
your mains supply before you attempt to either 
remove or replace the oven bulb. 


o


Remove all oven shelves 
and the drip tray. 


o


Unscrew the lamp cover. 


o


Unscrew the bulb and 
remove it from its holder. 


o


Replace the bulb with a 

15 W/300°C, screw type pygmy. 


o


Do not use any other type of bulb


o


Screw the lamp cover back into its original position. 

 
Removing the oven door for cleaning 


To facilitate the cleaning of the inside of the cooker and the outer 
frame of the oven, the door can be removed as follows:- 
 

Содержание BCG620SS

Страница 1: ...1 y BCG620SS BCG620W 60 cm Twin cavity gas cooker...

Страница 2: ...anual contains important information including safety installation points which will enable you to get the most out of your appliance Please keep it in a safe place so that it is easily available for...

Страница 3: ...irst use 18 Using the hob top zones 19 Hob guidelines 19 20 Cleaning and maintenance 20 23 Cleaning the gas hob top 21 After each use 21 Cleaning the burners 21 Cleaning the oven 22 Replacing the oven...

Страница 4: ...4 Environmental note o The packaging materials that Baumatic uses are environmentally friendly and can be recycled o Please discard all packaging material with due regard for the environment...

Страница 5: ...or discolouration at temperatures below the guidelines given above o IMPORTANT Baumatic Ltd DO NOT recommend that this appliance is installed on any type of marine vessel o The use of this appliance f...

Страница 6: ...hen removing items from the oven as the contents may be hot Always keep the oven doors closed when the oven is not in use Always follow the basic principles of food handling and hygiene this will prev...

Страница 7: ...o Do not grill food containing fat without using a grill trivet The grill trivet should never be covered with aluminium foil o Do not place hot parts in water leave them to cool first o Do not allow...

Страница 8: ...appliance o Heat steam and moisture will be created during use of the appliance take care to avoid injury and ensure that the room is adequately ventilated If the appliance is going to be used for pro...

Страница 9: ...x 1 75 kW zone o 1 x 3 00 kW zone o 1 x 1 00 kW zone o Gas oven o Gas grill o Main oven gross net capacity 65 58 litres o Top oven gross net capacity 30 27 litres o LED minute minder o Pushbutton ign...

Страница 10: ...tlet with 3mm contact gap Max Rated Inputs 10 00 kW Mains Supply Lead 3 core x 1 5 mm not supplied Oven Light Bulb E14 15 W 300 C screw type pygmy Gas details Gas Connection Type 1 2 BSP Gas Type Natu...

Страница 11: ...invoice The rating plate for your oven can be located on the front frame of the oven cavity Model Number Serial Number Date of Purchase Control Panel Thermostat control knob main oven o Use this contr...

Страница 12: ...of the relevant cooking zone to set the temperature intensity Oven timer 1 Alarm stop icon press minus button to stop alarm 2 Timer minus button 3 Timer plus button 4 Time setting mode indicator pres...

Страница 13: ...minute minder at any time regardless of whether an oven function has been selected You can set a period of time using the minute minder function and an alarm will sound when this period of time has el...

Страница 14: ...room whilst the burning off process is taking place o You should leave each oven on maximum setting for 30 40 minutes o IMPORTANT You should not burn off both ovens simultaneously o After both caviti...

Страница 15: ...gain to switch the light off o The oven has a flame failure safety device to ensure that no gas escapes if the flames are extinguished There is also a thermal cut off which prevents the oven from over...

Страница 16: ...e o You may also need to make small adjustments to the cooking temperature and cooking times that you normally used previously Using the grill o To turn the grill on press and turn the control dial to...

Страница 17: ...the oven is in use o Always remember to use the handle when removing the grill pan and do not leave the grill unattended while in use o IMPORTANT You should always grill with the oven door open NEVER...

Страница 18: ...opening the door to avoid contact with hot parts and steam o IMPORTANT In case of fire close the main valve of the gas supply and switch off the electricity supply to the appliance NEVER pour water o...

Страница 19: ...press and hold the bottom half of the ignition button until the burner ignites o For a maximum temperature keep the dial turned to the large flame position o For simmering lower the heat by turning th...

Страница 20: ...cavity After residues have been baked on several times they are far more difficult to remove o Never clean the oven surfaces by steam cleaning o The oven cavity should only be cleaned with warm soapy...

Страница 21: ...After each use o Wipe the appliance over with a damp cloth and a little washing up liquid o Dry the appliance by rubbing the surface with a clean cloth Cleaning the burners o Gas burners should be cle...

Страница 22: ...placing the oven bulb IMPORTANT The oven must be disconnected from your mains supply before you attempt to either remove or replace the oven bulb o Remove all oven shelves and the drip tray o Unscrew...

Страница 23: ...cal previously o To refit the door you should slide the hinges back into their slots and open the door fully o IMPORTANT The movable bolts B must be closed back into their original positions before cl...

Страница 24: ...dle or control panel o The cooker is designed to slot in between 600 mm deep cabinets which are spaced approximately 600 mm apart o It can also be used as freestanding with a cabinet to one side in a...

Страница 25: ...tchen cabinets o If the cooker is not level or is unstable due to an uneven floor surface use the adjustable feet to alter each corner until the cooker is level Ventilation requirements o The room con...

Страница 26: ...and fix the chain anchors to the wall using the screws provided and suitable wall plugs for the type of wall being fixed to o Leave the chains unattached until the installation process has been comple...

Страница 27: ...end chain link into position Electrical connection YOUR COOKER IS INTENDED FOR FITTED AND PERMANENT INSTALLATION o Before connecting the appliance make sure that the supply voltage marked on the rati...

Страница 28: ...inal marked L live or coloured red The blue wire must be connected to the terminal marked N neutral or coloured black The green and yellow wire must be connected to the terminal marked E earth or by t...

Страница 29: ...d by competent persons in accordance with the current edition of the Gas Safety Installation and Use Regulations o It is in your interest and that of safety to ensure compliance with the law o In the...

Страница 30: ...use with LPG then it should be connected to the gas supply using an appropriate bayonet type hose The hose MUST be suitable for use with LPG gas these are identifiable by a red band or stripe o A hos...

Страница 31: ...rew the injector and replace it with the required injector for the new gas supply according to the table below Burner Type Gas Type Pressure Mbar Injector Marking 1 100mm Power Kw Max Min Natural Gas...

Страница 32: ...screw anti clockwise to increase the flow of gas and make the flame bigger o To establish the correct adjustment the flame should be approximately 3 4 mm in length For Butane Propane gas the adjustin...

Страница 33: ...ing the minimum flow of the burners o Before you can change the injectors on the grill and oven burners you must unscrew the burners from their fixing brackets Grill burner Oven burner o The grill bur...

Страница 34: ...Gas 20 1 00 Grill Burner Liquid Gas 28 30 37 0 66 1 8 0 6 o After changing the injectors YOU MUST change the minimum flow rate Minimum flow adjustment for the oven and grill burners All work must be c...

Страница 35: ...lift it off the support brackets which hold the hob down at the front of the cooker o To take off the control panel remove the screws fixing the control panel o When the screws have been removed you...

Страница 36: ...tightly screwed in o Turn the control knob to maximum and then back to minimum two or three times to make sure that the flame does not go out when the control knob is set to minimum o If the flame doe...

Страница 37: ...n Steam and condensation is a natural by product of cooking any food with high water content such as frozen food chicken etc You may get condensation in the oven cavity and forming between the oven do...

Страница 38: ...cost of the call out charge The appliance must be accessible for the engineer to perform any necessary repair If your appliance is installed in such a way that an engineer is concerned that damage wil...

Страница 39: ...Website www baumatic co uk Republic of Ireland Service Telephone 1 890 812 724 Spares Telephone 091 756 771 Czech Republic Baumatic CR spol s r o L pov 665 460 01 Liberec 4 Czech Republic 420 483 577...

Страница 40: ...40...

Отзывы: