background image

UNPACK AND PREPARE | 7

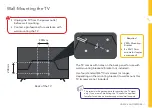
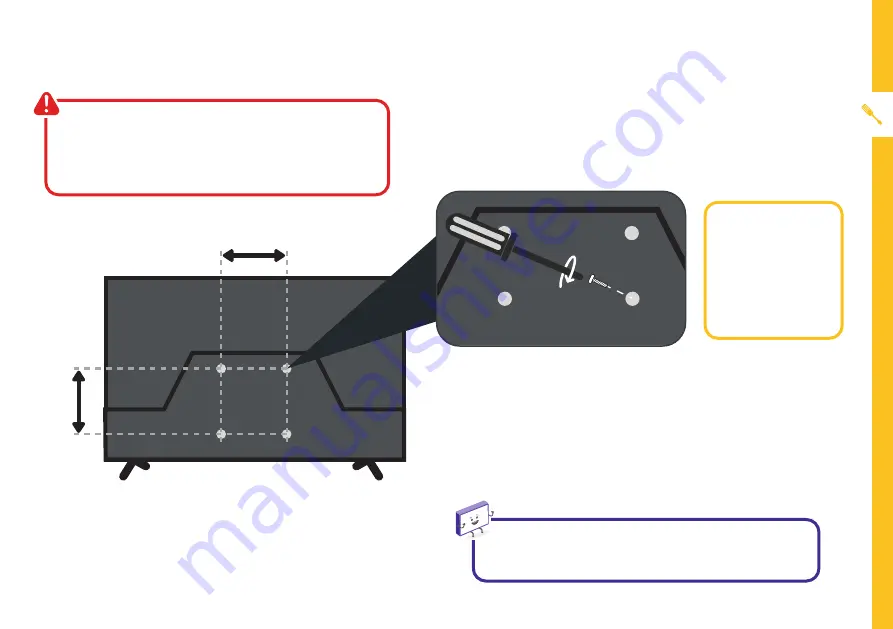
200mm

200mm

Back of the TV

Wall-Mounting the TV

The TV comes with holes on the back panel for use with 

wall-mounting brackets (bracket not included).
Use four standard M6*10mm screws (or longer, 

depending on the mounting bracket) to wall-mount this 

TV (screws are not included).

•  Unplug the TV from the power outlet 

before wall-mounting.

•  Contact a professional for assistance with 

wall-mounting the TV.

Required

•  VESA Mounting 

Bracket

•  4 x M6*10mm 

screws (or longer 

as required)

The screws in the package are for securing the TV stand 

only. If you are wall-mounting the TV, consult a qualified 

installer for advice on bracket support and wall support.

Содержание ATV40FHDG-1122

Страница 1: ...tempo org support MODEL ATV40FHDG 1122 PRODUCT CODE 710521 11 2022 AUS User Manual ATV40FHDG 1122 AFTER SALES SUPPORT 1300 002 534 40 1080P Full HD...

Страница 2: ...the highest standards of performance and safety and as part of our philosophy of customer service and satisfaction are backed by our comprehensive 1 Year Warranty Domestic use only This product is in...

Страница 3: ...17 How to set up Android TV Remote Control app 18 Smart TV 19 Download or Delete Apps 20 Stream using Chromecast enabled Apps 21 Using Voice Interaction 22 Connect To Google Home 22 TV Setting Menus 2...

Страница 4: ...tion to access Smart TV apps and functionality Antenna cable to watch live TV Before installing your new TV check you have everything needed In the box you will find A 40 Full HD Android TV B Remote C...

Страница 5: ...enough space around vents for airflow The remote control works up to 5 metres away from the TV Unplug the TV before cleaning it Clean using a dry cloth only do not use water or chemicals Use only the...

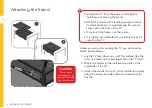
Страница 6: ...ands to the TV at the installation points using the screws provided Grab a screwdriver for this bit Attaching the Stand Unplug the TV from the power outlet before installing or removing the stand DO N...

Страница 7: ...mounting bracket to wall mount this TV screws are not included Unplug the TV from the power outlet before wall mounting Contact a professional for assistance with wall mounting the TV Required VESA M...

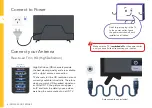
Страница 8: ...oadcast signals on an Ultra HD TV the picture can appear soft and lacks the detail you see when watching the same content on a HD TV Connect to Power Make sure the TV is switched off at the power outl...

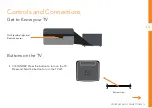
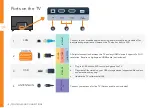
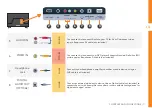
Страница 9: ...CONNECTIONS 9 Controls and Connections Get to Know your TV On Standby light and Remote sensor Bottom View STANDBY Press the button to turn on the TV Press and hold the button to turn the TV off Butto...

Страница 10: ...D PICTURE COMPUTER All digital connection between the TV and any HDMI device Supports Full HD resolution Requires a high speed HDMI cable not included 3 USB STORAGE Plug in a USB stick to PVR record a...

Страница 11: ...Standard Definition SD picture quality Requires an AV cable not included 7 Headphone Jack SOUND Connect to your headphones amplifier soundbar or audio device using an AUX cable not included 8 DIGITAL...

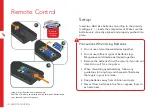
Страница 12: ...Alkaline batteries together Remove the batteries from the remote if you do not intend to use it for a long time When discarding used batteries follow any guidelines for recycling and disposal of batte...

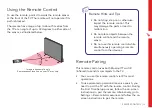
Страница 13: ...This may damage the parts or lead to malfunction Do not place objects between the remote control and the remote sensor Do not use this remote control while simultaneously operating a remote control fo...

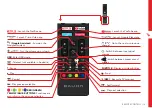
Страница 14: ...interface Android TV home screen Switch the TV to On or Standby NUMBER BUTTONS 0 9 Press to select a TV channel directly when watching TV INFO Display additional information Display system settings P...

Страница 15: ...Display or hide subtitles Stop REC Record a TV program Fast forward Play next selection Launch the Netflix app Launch Prime Video app Google Assistant Summon the Google Assistant Turn the volume up or...

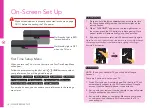
Страница 16: ...are 3 options to set up your TV 1 Quick Start using an Android phone Your Android TV will automatically connect to the Wi Fi network and Google account that the Android phone is connected to 2 Set up...

Страница 17: ...utton on the remote select Digital Subtitle Language Setting and set the option to Off 2 To turn on subtitles press the SUBT button on the remote select Digital Subtitle Language Setting and set the o...

Страница 18: ...droid TV Remote Control app Note For Android users the app name will be Google TV 1 After app has downloaded and installed open up the app Ensure that both your smart phone and Android TV are using th...

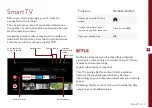
Страница 19: ...of a wide variety of award winning TV shows movies and documentaries A paid subscription is required This TV can play Netflix content in HD resolution however the playback resolution may be lower depe...

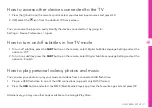
Страница 20: ...ies When you find a category you re interested in move to the right to view items To search To speak your search scroll to the top of the screen and select the icon To type your search scroll to the r...

Страница 21: ...rn Chromecast built in always available to On during the first time setup process 1 Connect your device to the same Wi Fi network as this TV 2 Open the app that has the content you want to cast 3 In t...

Страница 22: ...mote s microphone You can ask your Google Assistant for info and play videos from YouTube etc For ideas about what your Assistant can help with ask What can you do Download the Google Assistant app on...

Страница 23: ...Mode HDMI RGB Range Colour Tuner Reset To Default Sound 27 Sound Style Balance Sound Surround Equalizer Detail Speakers Digital Output SPDIF Delay Auto Volume Control Downmix Mode Reset to Default TV...

Страница 24: ...App Permissions Special App Access Security Restrictions Retail Mode 32 About 33 System Update Factory Reset Status Legal Information Android TV OS Version Software Version Date Time 34 Automatic Date...

Страница 25: ...Adjust settings to best suit your viewing environment and content Option Description Backlight Adjust the screen brightness by adjusting the backlight The closer to 100 the brighter the screen Bright...

Страница 26: ...screen noise to make the image clean MPEG NR SDR TO HDR Reduces the noise produced during the creation of digital video signals Turn HDR on off Adaptive Luma Control Automatically adjusts the brightne...

Страница 27: ...akers Select which speakers the TV uses for audio output Speaker Delay Adjust the speaker delay time Digital Output Select the digital audio output mode Options Auto Bypass PCM Dolby Digital Plus Dolb...

Страница 28: ...gle RF Scan Manually scan DTV channels one frequency at a time Channels Channel Skip Hide channels from the channels list Channels Channel Edit Delete channels from the channels list Parental Controls...

Страница 29: ...rk using a wired or wireless connection When you connect an ethernet cable the TV automatically accesses the Internet Wireless Network Settings Option Description Wi Fi Switch Wireless connectivity On...

Страница 30: ...on Wireless Network Turn WOW on off WOL Wake on LAN Turn WOL on off WOC Wake on Chromecast Turn WOC on off Option Description Not connected Display the network once connection is successful Proxy set...

Страница 31: ...avigate from Settings Device Preferences Google Assistant Option Description Add Account Add your Google account to your TV Choose Synced Apps Manage which apps are synced with your Google account Rem...

Страница 32: ...app permissions for your installed apps Special App Access Modify the APP access settings Security Restrictions Control installation of apps from unknown sources and disallow warn before installation...

Страница 33: ...ctory default settings Status View information on IP address MAC address Bluetooth address Legal Information Read up on legal notices and opt out of personalised ads Android TV OS Version View Android...

Страница 34: ...d time or enable setting update and time manually Set Date Manually set the date Set Time Manually set the time Set Time Zone Set your time zone Use 24 hour Format Turn On Off 24 hour time display Dat...

Страница 35: ...pport CEC connected via HDMI Device Auto Power Off Power off connected HDMI devices when you switch off your TV TV Auto Power On Power on connected HDMI devices when you switch on your TV CEC Device L...

Страница 36: ...d continues Press the OK button to turn on the screen again Switch Off Timer Set the switch off timer No Signal Auto Power Off If there s no input signal nor press button operation the TV will enter s...

Страница 37: ...instantly start the screen saver Screen Saver To access screen saver settings navigate from Settings Device Preferences Screen Saver Option Description Location Status Select how location is estimated...

Страница 38: ...gh Contrast Text Enable high contrast text Text to Speech Adjust for preferred engine or General settings Accessibility To access accessibility settings navigate from Settings Device Preferences Acces...

Страница 39: ...2 When TVC0GWBT appears on the top right corner of the screen select the name and press the OK button to initiate pairing 3 If the pairing is unsuccessful please wait 30 seconds and try again 4 Press...

Страница 40: ...ater dynamic range of luminosity by capturing and then combining several different exposures HDR promises better picture quality thanks to brighter more realistic highlights more realistic colour and...

Страница 41: ...om previous day RED Filter programs by category BLUE Schedule a program to be recorded Exit TV Guide menu TV Guide Free to air TV To access the TV guide press the button on the remote To activate the...

Страница 42: ...in recording mode the recording will stop until the signal is established Do not turn the TV off while it is in time shift mode The file recorded can only be used on this TV Do not copy it to any othe...

Страница 43: ...e to start recording Stop Recording Press STOP once to stop recording Scheduled Recording See TV Guide Functions on page 41 to schedule recordings View the list of scheduled recordings press the butto...

Страница 44: ...tton then press the button to go to the RECORD section Select Time Shift Mode and press OK Press OK to turn on Time Shift mode and press the to exit out of the menu Press the button and set up disk fo...

Страница 45: ...d on and the power indicator at the bottom of the TV is lit If using a multi outlet check if it is working properly To check whether a power strip is working properly plug the TV s power plug directly...

Страница 46: ...the external audio device Move the TV away from electronic equipment or devices that could cause interference When using an external audio device via a HDMI cable ensure that the device supports HDMI...

Страница 47: ...roblem persists contact your Internet Service Provider or modem manufacturer USB storage device is not recognised or media files don t play properly This TV has been tested with the majority of Flash...

Страница 48: ...Holdings Pty Ltd is under license Other trademarks and trade names are those of their respective owners Active screen size diagonal 100 3cm Resolution 1920 x 1080 Refresh rate 60Hz Aspect ratio 16 9 M...

Страница 49: ...of its working life do not throw this product out with your household rubbish An environmentally friendly method of disposal will ensure that valuable raw materials can be recycled Electrical and ele...

Страница 50: ...s warranty are in addition to all rights and remedies in respect of the product that the consumer has under the Competition and Consumer Act 2010 and similar state and territory laws Our goods come wi...

Страница 51: ...his data elsewhere prior to sending the product for repair You should also be aware that rather than repairing goods we may replace them with refurbished goods of the same type or use refurbished part...

Страница 52: ...ries with the product Product does not work If you encounter problems with this product or if it fails to perform to your expectations please contact our After Sales Support Centre on 1300 002 534 ALD...

Отзывы: