This is a publication by Conrad Electronic SE, Klaus-Conrad-Str. 1, D-92240 Hirschau (www.conrad.com).
All rights including translation reserved. Reproduction by any method, e.g. photocopy, microfilming, or the
capture in electronic data processing systems require the prior written approval by the editor. Reprinting, also in
part, is prohibited. This publication represent the technical status at the time of printing.
Copyright 2018 by Conrad Electronic SE.
*1697235_V1_0918_02_mxs_m_en
Replacing the membrane
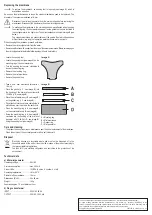
To replace the membrane, an opening tool is required (see image A), which is
available as an option.
As soon as the mist decreases or stops, the ceramic membranes need to be replaced. The
diameter of the ceramic membrane is 16 mm.
Disconnect the mini-mist generator from the mains voltage before replacing the
membranes. Disconnect the transformer from the mini-mist generator.
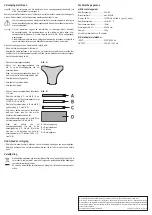
To exchange the membrane in the correct sequence, pay attention when inserting
the mounting ring, the mist membrane as well as the gasket so they are installed in
the mist generator in the right order. The correct sequence is shown in image B (see
below).
The ceramic membrane is a consumable part, the service life of which depends on
different factors, e.g. length of operation, water hardness, water purity etc.
When changing the membrane, proceed as follows:
• Remove the mini-mist generator from the water.
•
Remove calcifications with vinegar from the area of the ceramic membrane. Before screwing open
the mini-mist generator (before the following steps) it has to be totally dry.
• Locate the opening tool
• Locate the opening tool (see image A) on the
mounting ring of the mist membrane.
• Turn the opening tool counter clockwise to
loosen the mounting ring.
• Remove the mounting ring.
• Remove the mist membrane.
• Remove the gasket ring.
• Take a new mist membrane (diameter =
16 mm).
• Place the gasket (= C, see image B) into
the housing of the mini mist generator with
12 LEDs (= D, see image B).
• Place the mist membrane (= B, see image B)
on the gasket ring (= C, see image B).
• Pay attention that the ceramic coated side is
placed down over the area in the dark circle.
• Place the mounting ring (= A, see image B)
on the mist membrane (= B, see image B).
• Screw the mounting ring (= A, see image B)
clockwise into the housing of the mini mist
generator with 12 LEDs (= D, see image B),
using the opening tool (see image A).
Care and cleaning
• The product does not require any maintenance apart from the replacement of the membrane.
Clean the outside of the mini-mist generator with a soft clean cloth.
Disposal
Electronic devices are recyclable waste and must not be disposed of in the
household waste. At the end of its service life, dispose of the product according to
the relevant statutory regulations.
You thus fulfil your statutory obligations and contribute to the protection of the
environment.
Technical data
a) Mini-mist generator
Operating voltage ......................... 24 V/AC
Current consumption .................... max. 900 mA
Colour LEDs ................................. 12 LEDs (4 x blue, 4 x yellow, 4 x red)
Operating temperature ................. +5 to +40 °C
Diameter of the membrane ........... 16 mm
Dimensions (Ø x H) ...................... 45 x 46 mm
Weight .......................................... 165 g
Vaporises approx. 70 ml of water per hour
b) Plug-in transformer
INPUT ........................................... 230 V/AC 50 Hz
OUTPUT ....................................... 24 V/AC, 1,000 mA
Image A
Image B
A = Mounting ring
B = Mist membrane
C = Gasket ring
D = Mist generator


