


BEFORE USING YOUR AIR CONDITIONER, INSERT BATTERIES INTO YOUR REMOTE CONTROL
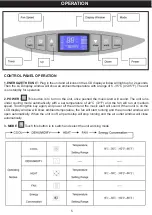
1. POWER
: Press this button to start the unit when it is energized
or stop the unit when it is in operation.
2. MODE
: Press this button to select operation mode.
3. TEMPERATURE
: Press this button to increase/decrease room
temperature and timer setting.
4. FAN
: Press this button to select fan speed in sequence: Low → Medium
→ High.
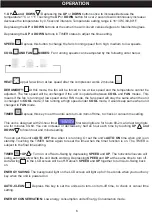
5. AUTO-SWING
: Press this button to turn on or turn off auto-swing
function.
6. SLEEP
: Press this button to select or cancel sleep mode (only effective
under cooling, heating operation or energy conversation modes).
7. TIMER
: Press this button to set
AUTO-ON
and
AUTO-OFF
time. Time
can be adjusted between 0.5-24 hours. It jumps by 0.5 hour interval within
5 hours, and 1 hour interval over 5 hours, set time will flash 5 times on
screen then confirm the setting.
Before using your remote, install the AAA batteries into remote control.
Use alkaline batteries only. Do not use rechargeable batteries.
When replace batteries, always replace both batteries with new batteries, do
not mix old and new batteries.
If the air conditioner will not be used for an extended period of time, remove
the batteries from the remote control.
NOTE:
In order to avoid losing the remote control, please put the remote control inside of the storage place.
Your air conditioner has a special place for convenient storage
the remote control
7
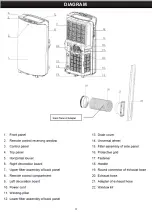
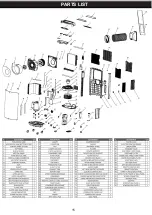
FEATURES AND PARTS
Содержание 99911
Страница 5: ...4 DIAGRAM...
Страница 16: ...15 PARTS LIST...