Barton 99911 Скачать руководство пользователя страница 12

MULTIPLE PROTECTION FUNCTIONS:


1.

 Under COOL mode, when the compressor continuously runs over 10 minutes, if tube temperature is 

<=2°C/36°F for 20 seconds, the anti-frozen protection function will be on, E4 will be shown on LCD display,

compressor  and  water  wheel  motor  will  stop  working,  but  upper  fan  remains  running;  If  tube 

temperature>=8°C/46°F,  the  unit  will  stop  anti-frozen  protection  and  recover  to  the  original  working 

condition. Compressor will re-start working with 3 minutes delay for protection. 

2.

 Water-full safety alarm and shut –off protection function: When the water volume exceeds its alarm 

level in chassis, warning sounds automatically and water-full icon is lighting in LCD display, you need to 

drain the condensate and re-start the unit.(For more information about how to drain, refer to the “Drainage 

Instruction” please). If the unit is not shut down manually, the unit will recover to the original operating 

status automatically once the water is fully drained. Or connect the power to re-start the unit again.

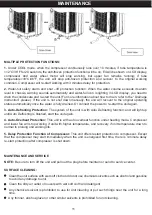
3. Auto-Defrosting Protection:

 The system of this unit is with Auto Defrosting function, and will light up 

until Auto Defrosting is finished, start the unit again.

4. Auto-Overheat Protection:

 This unit is with auto overheat function under heating mode. Compressor 

and lower fan will stop working if unit with higher temperature, and recovery if unit temperature down to 

normal to prolong unit working life.

5. Delay Protection Function of Compressor:

 This unit offers restart protection to compressor. Except 

that the compressor may start immediately when the unit is energized first time, there is 3-minute delay 

re-start protection after compressor is shut down.

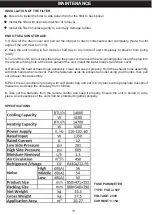
MAINTENANCE AND SERVICE

NOTE: 

Be sure to turn off the unit and pull out the plug before maintain or send to service center.

SURFACE CLEANING:


Clean the unit surface with wet soft cloth and do not use chemical solvents such as alcohol and gasoline 

to avoid any damage to unit. 
Clean the dirty air outlet or louvers with wet soft cloth and detergent.

Any chemical solvent is prohibited to use for unit cleaning or put such things near the unit for a long 

time.

Any thinner, alcohol-glazer or other similar solvents is prohibited for unit cleaning.

11

MAINTENANCE

Содержание 99911

Страница 1: ...SPECTION MAINTENANCE AND CLEANING PROCEDURES WRITE THE PRODUCT S SERIAL NUMBER ON THE BACK OF THE MANUAL NEAR THE ASSEMBLY DIAGRAM OR MONTH AND YEAR OF PURCHASE IF PRODUCT HAS NO NUMBER OWNER S MANUAL...

Страница 2: ...warnings and instructions may result in electric shock fire and or serious injury Save all warnings and instructions for future reference SAFETY The warnings precautions and instructions discussed in...

Страница 3: ...and persons with reduced physical sensory or mental capabilities or lack of experience and knowledge if they have been given supervision or instruction concerning use of the appliance in a safe way an...

Страница 4: ...xhausts all condensate automatically in most environments Auto Restart Auto restart saves your settings for when power is restored to the unit Dehumidification Function Control your indoor humidity le...

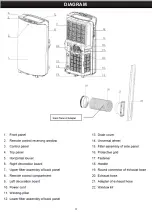
Страница 5: ...4 DIAGRAM...

Страница 6: ...sound The unit runs under cooling mode automatically with a set temperature of 22 C 72 F and the fan will run at medium speed Touching this key again will power off the unit and the music alert will s...

Страница 7: ...d under COOL mode it would keep same when unit changed to FAN mode TIMER Depress this key to set the units auto turn on turn off time to check or cancel time setting This unit is designed with 24 hour...

Страница 8: ...MER Press this button to set AUTO ON and AUTO OFF time Time can be adjusted between 0 5 24 hours It jumps by 0 5 hour interval within 5 hours and 1 hour interval over 5 hours set time will flash 5 tim...

Страница 9: ...ation of exhaust hose assembly and its adapter 1 Take out the exhaust hose and its connector and adapter to remove the plastic bag 2 Extend one end of exhaust hose screw the end without slot of round...

Страница 10: ...rtical or horizontal position See illustration 4 Extend seal plate parts and adjust it to the length of window keep both ends to meet window edge fix it with screws 5 Keep two ends of window seal plat...

Страница 11: ...properly Move the unit carefully to avoid the leakage it is necessary Tilt the unit slightly backwards when draining Block the drain hole as soon as possible before the tray is full if it cannot hold...

Страница 12: ...in 3 Auto Defrosting Protection The system of this unit is with Auto Defrosting function and will light up until Auto Defrosting is finished start the unit again 4 Auto Overheat Protection This unit i...

Страница 13: ...out 40 mixed with neutral cleaner and then rinse and dry them thoroughly in the shade NOTE Clean the filter once every two weeks or it would influence the unit function if filter clogged with dust Pul...

Страница 14: ...pillar insert the plug into the universal fixing hole at the back panel of the unit install the water stopper and drain cover 4 Remove the heat exhaust hose assembly clean and keep it properly Hold th...

Страница 15: ...t should not be disposed with other household wastes To prevent possible harm to the environment or human health from uncontrolled waste disposal recycle it responsibly to promote the sustainable reus...

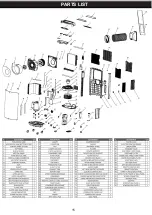
Страница 16: ...15 PARTS LIST...

Страница 17: ...ALL REPAIRS AND PARTS REPLACEMENTS SHOULD BE UNDERTAKEN BY CERTIFIEDAND LICENSED TECHNICIANS AND NOT BY THE BUYER THE BUYER ASSUMES ALL RISK AND LIABILITY ARISING OUT OF HIS OR HER REPAIRS TO THE ORI...

Отзывы: